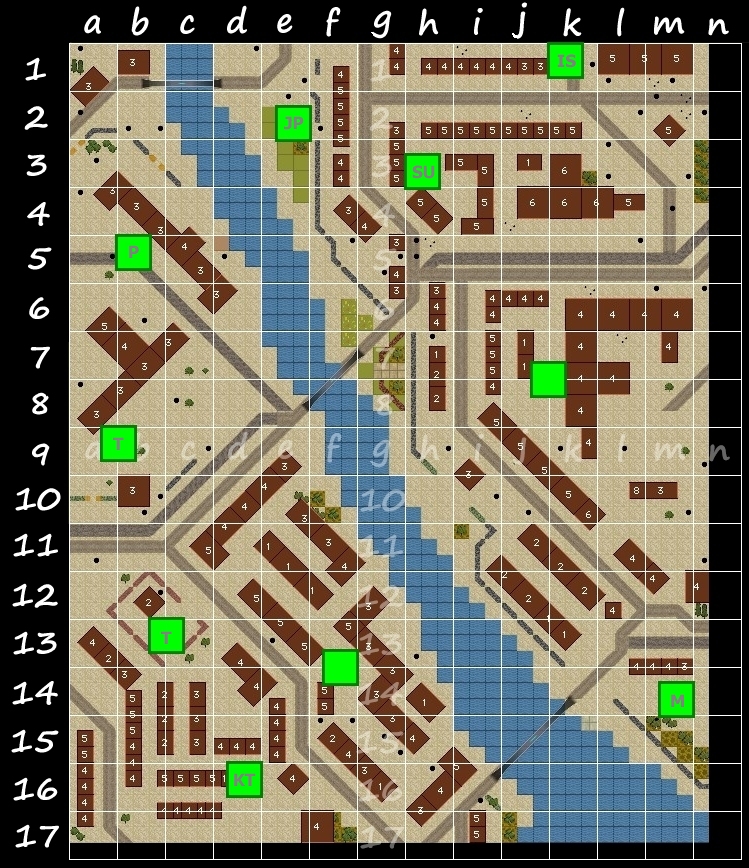
Control one of the German AFVs in THC’s 2023 play-by-comment Combat mission game? Use the comment section of this password-protected post to discuss tactics with your comrades, and communicate orders to me, the GM.

Control one of the German AFVs in THC’s 2023 play-by-comment Combat mission game? Use the comment section of this password-protected post to discuss tactics with your comrades, and communicate orders to me, the GM.
Comments are closed.
Hi,
Thought I’d get the ball rolling with a question for Tim:
Which variant of Jagdpanzer IV is modelled? Wikipedia says there were 4 main variants, with differences in the gun mounted and the armour layout.
Other than that, perusing the map says we may have an opportunity to knock out their T34 quickly as it’s sandwiched between our Tiger and King Tiger and therefore can’t face both with its frontal armour. For my tank, I’m also on the “wrong” side of the river. Backing across the northern bridge seems to be a good way to be exposed to everything, so my first thought was to moved forward to the corner of the buildings at F1 either E or C facing SE, depending which gives me a view of where the IS or SU may come from and attempt to at least get the first shot off on either of them.
What think the rest of you?
Edited to add: I have a cautious trait, so no fast or quick movement orders for me.
>> Which variant of Jagdpanzer IV is modelled?
It’s a “JPz IV/70(V) (late)”
Hi VFR, (henceforth known as JP)
Good to meet you.
My ‘Cocksure’ trait means no reversing, which in a narrow street environment with a King Tiger is going to be interesting.
Agree with T34, its early demise should be prioritised otherwise it will remain a thorn in our midst, hopefully our Tiger will coordinate with me.
Unfortunately for you the role is reversed, its likely the opposition will try to take you out asap also. You have the added disadvantage that your turretless tank cant target very quickly. Agree the bridge is a no go.
Another challenge for us is our Panther’s lone wolf trait meaning we cant discuss tactics with it, otherwise an option to consider would for it to move to A3 facing NE to cover you from an F1 attack, leaving you to concentrate on the southern approach.
Will chat again when Tiger appears.
Regards KT.
I’m planning to run a short piece tomorrow morning (Lions of Lodowice Turn #0). It will include overview screenshots of the eight starting positions which will hopefully aid early decision-making.
Hi everyone,
Sorry, I’m a bit late for the start of the party. I’m playing the Tiger.
My trait is ‘Chilly’, which means my tank crew will be buttoned-up at all times. Guess that reduces my line of sight and increase the blindsiding. Weirdly enough, it actually suits me, as it is how I played before with tanks. Not a specialist at all though.
Tim, a few questions for you:
– Is it okay to run some tests with the demo of red thunder? Or it is considered cheating?
– Could you tell me if the fact that I’m buttoned-up at all times means increased risk of death for the crew if the tank got hit? Does it make my tank slower?
– I can see there are two variant of Tiger on the game. Which one will I have?
– Can we have an idea of the kind of ammunition available? Do we have other equipment? The ability to make smoke screen?
– On the map, I can see bush and wall. Can the tiger go through them? I assume that the building are indestructible. Is that correct?
– If possible, I would like to know how much distance can cover my tank in one round?
On the tactical side, it seems to me that we may not as mobile as the soviet. My suggestion would be to move as slowly as possible to take position, and use your maximum speed to get away when things gets tricky or flank the enemy.
I agree that our JP is the most vulnerable. Retreating looks more dangerous than taking cover. But taking two tanks at once will be challenging. Hard to say if Panther will give you a hand or not at the start.
I also agree that we should take that T34 out as quickly as possible. He is outnumbered and deep in our territory. I expect him to be aggressive and willing to get out of this trap. One thing I also noticed is that it can have a good LOS on JP, which is worrying. We also have to be wary of the M4A2(76)W, which is close to KT. It could be willing to flank you or move up north to take out JP.
I can suggest a few possibilities:
-1. KT and I go and flank the T34. I believe that the KT is not the easiest thing to drive nor the fastest, so I guess my Tiger could serve as a decoy while you flank the T34. Or the other way around.
-2. I go for the T34 and KT go for the M4A2(76)W. Or the other way around.
-3. JP could be moving North and try to ambush the soviet.
-4. JP could try a retreat and ambush the soviet with the help of Panther
Again, hard to say if Panther will give us a hand or not at the start. We have to trust him.
I forgot to mention that I live far away from Europe, so expect some delay in my answers.
>> Is it okay to run some tests with the demo of red thunder? Or it is considered cheating?
That’s absolutely fine.
>> Could you tell me if the fact that I’m buttoned-up at all times means increased risk of death for the crew if the tank got hit? Does it make my tank slower?
Not 100% sure, but my guess would be ‘no’ and ‘no’.
>> I can see there are two variant of Tiger on the game. Which one will I have?
You have the ‘late’ version
>> Can we have an idea of the kind of ammunition available? Do we have other equipment? The ability to make smoke screen?
46AP, 46HE. No smoke shells, but you can ‘pop smoke’.
>> On the map, I can see bush and wall. Can the tiger go through them? I assume that the building are indestructible. Is that correct?
Yes and yes.
>> If possible, I would like to know how much distance can cover my tank in one round?
This is a little hard to predict as cornering times can vary considerably. I’ve just run a brief test and the Tiger moving ‘quickly’ eastward from its starting position reached the end of the Boleslav Bridge 90m away in 20 seconds. So roughly 270m per turn (assuming no turns and no distractions/problems!).
I found an article about the general tactics of the panzer division. It’s short, but I think it is interesting.
The link is: https://www.feldgrau.com/ww2-german-panzer-tank-tactics-training-guide/
This is going to be fun!
OK, reviewing the map again I’d say we need to gang up on the T34 ASAP. Taking it out puts us one tank up for now, and frees the centre of the map our side of the river. The starting positions views in the latest article look to me like the SU can’t see the Tiger, and won’t be able to see it if it moves down to the West side of the building at 10B. That would keep the Tiger safe and cover if the T34 moves West or North West. I can pivot in place to look SW (Tim do I need to move forward/South to get a view of the road junction at 11B/C? Or would facing that way be enough? How far away is that junction from me?) That should cover if the T34 makes a bolt for the central bridge to try to get back to its own side.
Tim, can the KT move down any of the roads to its west, or are the too narrow for it? I’m thinking of whether it can get to 15C South East looking North, even if only with its turret facing North. That would give it a flank shot in to the T34 if it moves West.
Of course if it doesn’t move at all we’ll have to hunt it. Could really do with some infantry to scout which way its facing.
If we can take out the T34 quite quickly, maybe I can move down to the gap at 4F North looking East to try for flank shots on the SU or IS.
What are peoples thoughts?
>> Can the KT move down any of the roads to its west
It seems to be able use roads like the one traversing c16 E-W and c15 N-S without any issues. it’s ‘half-square’ gaps such as the one at e15SW it baulks at.
>> do I need to move forward/South to get a view of the road junction at 11B/C? Or would facing that way be enough?
The eastern corner of the university blocks LoS to b11. Most of c11 is visible.
Hi Everyone.
Last night my addled brain was thinking along these very same lines, tho hadn’t picked up the possibility of the JP being part of the T34 action till Tiger mentioned it.
Today I think the T34 ( the fastest tank in town) might well do a runner, though not for the bridge as its to exposed. Looking again at the map and the first starting position view the most likely bolt hole is straight thro the conveniently open brewery gate NE across the road to the warren of buildings circa E10. A guesstimated distance of 100m. It could then do a 180 and have perfect view of any subsequent follow up AFVs.
This route at the moment is not covered by any of our units, the buildings ( B10, C11 ) obscure the route. The lumbering lump of KT should be able to move to 15C but by the then the T34 will either be long gone or waiting patiently to give me a 85mm AP shaped present.
A potentially more troubling aspect from looking at the SU starting picture, if it moves just one square to G4 between the two buildings it will dominate our central section, effectively cutting our forces in two. Tiger can move to 10B as suggested, but then be trapped. Something to ponder. Maybe the Sovs wont see it?
P.S.
Apologies for just bringing problems today, tomorrow will try to look for solutions.
German AFV ammo details:
Panther – 40HE, 39AP
Tiger – 46HE, 46AP, can ‘pop smoke’
King Tiger – 35HE, 35AP, can ‘pop smoke’
Jagdpanzer – 27HE, 28AP, can ‘pop smoke’
Hi everyone,
To me, the best course of action for T34 would be to go straight into the building bloc on the west and use the help of the M4A2 from the south east to escape. Another option for this tank might be to go through the building in the south and flank KT. We should also look at the possibility to neutralise the M4A2 while he is still alone in the south east corner.
Since Panther is a lone wolf, it is hard to know what it will do. It could come to help hunt the T34 or go north to help JP. The last option seems more likely, at least to me.
My first plan is : I could go for the T34 alone and KT goes for the M4A2. The less dangerous road for me would be through A10 – A12, where I could pop a smoke (Tim, is it possible to launch smoke while in movement?) and then continue to C14 where I flank the T34 by the rear. Assuming that Panther doesn’t move, the escape road though Boleslav Bridge ( the central bridge) is blocked. Worth case scenario, JP could also control the bridge for the first few turns. But the south east road is open and could offer the possibility for T34 to flank KT by the rear. Not great.
Another option could be that I go to A11, and wait for the T34 to shows up while KT flank it by the rear through the building or by the east using the road. Alternatively, KT block the east road and wait while I flank the T34 by the rear (same road as before). If Panther doesn’t move, the escape road though Boleslav Bridge ( the central bridge) is blocked. Worth case scenario, JP can also control the bridge for the first few turns. We also need to keep an eye on the M4A2, so it doesn’t flank KT by the rear. Since it start from afar, we should be able to see it coming.
Last option: I go for A11 and wait, while KT goes south to D17 to monitor the possible escape route for T34 from the south and the east. I don’t know if it is possible to survey such a wide area with only one tank without risking being flanked by the enemy.
In this goes well, we should be able to attack the T34 whatever it does. The idea is that Panther and/or JP cover the north east path, while KT cover the south east and I cover the north west. Once we know where T34 goes, we flank it with a pincer movement.
After that, I think we will have to decide if we want to go to the east to help JP or cover its retreat.
Regarding the defensive position, we have either the university in the north west or the building blocs in the south west. The last one is narrower, so it might be more difficult to defend it.
>> is it possible to launch smoke while in movement?
Yes, but a moving tank is unlikely to get the full benefit of the smoke screen (which will be sown just in front of it). ‘Pop smoke’, pause, change facing, and ambush arc orders can be attached to any waypoint.
I guess maybe selfishly I’d like to move aggressively against the T34 ASAP as the sooner it’s dead the sooner I get more support! 🙂
I think I’d lean towards the idea of you moving to A10 or A11 looking South East to catch the T34 in the flank if it bolts for the buildings to the North East, or if it exits the courtyard then turns South East.
Tim how high is the wall around the compound the T34 is starting in, can it or the Tiger see/shoot over it?
Not sure moving the KT south is good – it can either face East or West, but it could end up with either the T34 or the M4 behind it unsighted whichever one it chooses. I’d have said better to move aggressively with it to eliminate one threat before the other can get to it.
Tim, can the KT get line of sight down the road that is the border between 15 and 16 BCD? If so having it do that first turn would allow it to cover should the T34 run straight south.
Either way, for me the first turn looks like I should stay in place facing South West to control the central bridge and it’s approaches should the T34 run that way.
JP.
You’re not selfish!
Agree Tiger to A10, anything further South than that is risky unless the SU moves away.
An option for you to consider is a move to F1 facing SE, you may surprise the IS, whose first possible move is due East straight along the 1 line with intention of flanking you from F1.
For KT agree don’t see much value for me to go South.
I cant see the T34 making a break South down BCD in what it knows is my current position. But it is a low risk option for me to position myself for it so happy to consider it!
My current thinking is to move to E14. As far as T34 goes this gives the KT flexibility to subsequently:
Cut off the East escape route if it doesn’t get taken in the first move.
Turn back South if it did head that way.
Try a flank attack via E12 or E13 if it stays.
Also if M starts moving NW to join an attack on you I may get an opportunity to take a shot via quick move to F12.
I agree with A10S for TG, looking SE. I think E14SW is good for KT. That way, we can cover all the exit while not being too exposed. If T34 doesn’t move, we can use a pincer attack to neutralise it.
For JP, I would suggest F3 looking S or SW, near the two building, to be more difficult to be seem if IS comes from the north.
Again, I also assume that Panther (maybe PT?) is covering JP somehow.
Hi Monk.
For brevity maybe refer to you as TG?
Your comment “the best course of action for T34 would be to go straight into the building bloc on the west”. Do you mean East ie agreeing with my last post, cos west looks like a dead end?
Re your first and subsequent plans, you should be aware the SU has a fine view of your squares south of A10. and it moves slightly forward to G4 it has an even better one of our central area. Check out the starting position picture in Turn #0 (its the 5th one).
If you still want to chance it, a fast move to A13 turret pointing east could take the T34 by surprise. My recommendation though would be fast move A10, gun pointing SE you might just catch the T34 if it runs NE. If it stays we might have to come up with an alternative plan.
Hi,
Yes, ok for TG. And yes, I meant East, not West.
Regarding the best approach for the first turn, I agree that we need to be cautious. I also think that going for A10 or A11 is the best move. If I need to move south, I can use the smoke to have some cover. Being very aggressive like JP suggested seems too risky.
Also, that way I can see if T34 is on the move and also being covered from the SU-100 by the planetarium. By the way, I didn’t realised that the SU-100 could creep its way between the building, thanks for the tips! But now, I’m really worried for JP, as it could be flank as soon as the end of the first turn. Let’s hope that Panther will go to its help.
TG
>> how high is the wall around the compound the T34 is starting in, can it or the Tiger see/shoot over it?
It’s a high wall – the only one on the map IIRC. It blocks LoS.
>> can the KT get line of sight down the road that is the border between 15 and 16 BCD?
Yes, if it moved N a tad. It could also use that road/gap if it wished to.
Tim, I’m assuming we can’t breach walls, either with explosive rounds or by driving through them?
Tanks can drive through low walls and destroy sections of high ones with sustained (generally 2-4 rounds) HE fire.
Sounds like we have a plan. I’ll move south to E3 and occupy the four squares in it’s NE corner, but look SW and load AP.
TG and KT move as you’ve described to attempt to sandwich the T34.
I’m hoping neither the IS or SU can’t make it to flanking positions on me in one turn, but TBH, my position is pretty exposed so I think the best I can do is try to make their lives difficult. Once we have turn one out the way, we’ll know what the Panther is doing, and hopefully either have killed the T34 or at least be about to.
Does that sound about right?
JP.
Almost.
What did you think of the suggestion for you to move to F1 face SE ?That way you protect yourself from a likely Northern flanking move from IS, rather than relying on our out of touch Panther.
The SU already has a good sighting position (protecting the rear approaches to the T34), it would be surprising if they gave it up on the first turn. Aside from that the SU would be a poor choice for a southern attack on you. It doesn’t have a turret so it would be slow to turn any corner, it would also have to expose itself to a possible attack from TG. They may try to rush their Sherman NW to try that, but that should take a couple of turns and if you’re already at F1 that also becomes very difficult for them.
Hope this helps – but of course its your final decision.
Hey.
That was my first thought TBH. But as you say, I can’t see the SU moving this turn, and I’d need to be pretty lucky to defeat the IS’ frontal armour if it comes trundling towards me in F1.
My thinking is spend turn 1 covering the T34 heading for the middle bridge in case the Panther moves to cover me and leaves that exposed, then probably head east to get up against the buildings so that if the IS does come round that corner I get a flank shot at very short range.
Tim, are we allowed to know what the likely movement range in a turn is of the IS? I’m working on the assumption that even if it heads straight for E or F1 this turn its unlikely to get there in 1 turn, but if it can, then maybe I should setup to ambush it from the off.
JP.
Don’t worry about the frontal armour (easy for me to say!) at that range and with your gun any hit will be fatal. Besides if you get there first (its a much shorter distance) you will probably get a side shot as it rounds the corner.
Your 2nd turn East move, sounds like a good compromise if you have enough time to carry it out. The wooded terrain will slow you and turning thro 180 is not a fast manoeuvre either. The time available depends how far the IS travels in turn 1.
JP/KT,
This plan sound good to me!
>> what is the likely movement range in a turn is of the IS?
An AFV’s ‘advertised’ top speed isn’t a bad guide to its movement range. In the case of the IS-2 its 37km/h (so 37000m/h -> 617m/minute when travelling at top speed. Half that if the AFV starts stationary, and reduce distance further if cornering involved.)
I’d like to execute the first turn early on Sunday morning so please have all orders in place by Saturday night. Beginning the relevant posts with ORDER will help me sort instructions from suggestions/ideas.
ORDER
JP to move to F1 North East, and face SE via the fastest route. Load AP. Ambush towards G1 South.
And rest your hand on the smoke dischargers! 🙂
Good luck all.
ORDER
KT. Open hatch. Fast move to E16 SE. Set armour target arc covering A10 to D10 inc. Continue fast move to F16SE. Then hunt to E14NE. Face NW clear target arc.
ORDER – Turn 1 Tiger
Starting from A9E pointing toward A10N.
Moving Fast to A10N, and Set a target arc covering from D9S to A12SW.
Then Hunt to A10S. The nose should be pointed toward the tree in the south near the enclosed building.
Well, farewell JP! Hope, you will continue to come and support us.
KT, I think we need to avenge him soon. We have some time to think about it, but I would suggest to chase the T34-85 before anything else. I could go to B14 and hunt it until the end of the turn, while you come back from the east. What do you think?
I now regret not including a ‘second chance’ AFV amongst the reinforcements. VFRHawk, you are welcome to issue orders to one of the infantry AT teams due from Turn 5 onwards. Their visibility/mobility means they’ll probably struggle to get a kill, but they could help apply pressure.
Good luck team, and no problem Tim – always knew it was a risky move.
Infantry may fail to get kills, but they’d be invaluable for spotting/ambushing, so happy to help out.
Thanks as ever for all the effort to run this.
Very unlucky JP.
This is the point when the restart button usually gets pressed on my CM games! The IS has covered about twice the distance than the (historically 20% faster) JP did . I’m assuming the cautious trait has been our undoing, but the IS wasn’t to know any of that, so it was a very risky/bold move on their part!
I’m glad you will continue with the infantry, but please don’t wait until then to join us in the mess to share your thoughts on our future moves.
TG.
The SU is moving into a dangerous position for you, it will shortly be able to target the A11,12 column via the gap between the buildings H6. You might just to be able to make a dash South but its risky. Having said that I cant think of an alternative at the moment. The M4 also has a good view of any attempts East or North east.
Re KT- Yes my first instinct is to move back the way I came to contain the T34 in our SW corner but wish to consider in more detail if that’s the best overall move.
All- Is there a preferred daily time slot that’s convenient for everyone to meet in the mess and maybe exchange thoughts a couple of times a day to speed up our decisions?
I’m flexible around 1000-2200 GMT.
>> I’m assuming the cautious trait has been our undoing
It didn’t help, but the Jagdpanzer was in place before the IS-2 appeared. It was its painfully slow turn/rotation rate that cost it dear. I’ve just run a series of three tests using different routes and waypoint combinations and while I did manage to achieve a slightly better arrival angle for the JP, in all versions the German TD perished while attempting to turn/ bring its gun to bear.
Thanks Tim.
I had been wondering if a F1SW destination rather than NW could have worked, now I know.
If we had been able to fast move am I correct in thinking we would have had a more favourable outcome? This will help me understand if the IS-2 was lucky (as they wouldn’t know about the cautious trait) or masterful in correctly calculating the risk.
As the JP was only a second or two from firing in a couple of the tests, I suspect a FAST order would have enabled it to fire on the IS-2. Would the shot have penetrated? Quite possibly given the extremely short range.
It’s okay, Tim. We will manage somehow.
KT, I agree that we don’t have many possibilities now. To me, T34 could either keep moving or be waiting to ambush us.
I could go north or south. North doesn’t seems to be worth it. It would leave you alone with the T34 and the gap at A8 seems quite narrow. The plus side would be to have a chance to say hello to the IS.
I can see two way South: either B13 or A13.
B13 is quite dangerous (I would say I have 50% chance to die). A13 is very narrow and I don’t know if I can make it through. Going that route would offer the possibility to flank T34, which could be a good option though.
>> Tim, I have a question again: could you tell me if the Tiger could get between the map boarder and the building in A13? I run some tests on my game and it worked, but I don’t know if it will be the same for you.
As for you KT, I can see four possibilities:
1. Going north then turn to the west and follow the pass of the T34. It is dangerous, as he may be waiting for us. And we have to be careful with SU and IS which could get a view of our rear.
2. Going west to F12 and attack the M4A2. Risky and would expose you to the M4A2 and/or SU.
3. Going south to E15 to flank T34 (I assume that T34 keeps moving)
4. Going south to G17, then try to cross the south bridge in pursuit of the M4A2 to flank it by the rear. That one is a long shot and you could have T34 on your tail if I can’t reach him in time.
Since we are three now, we have to be even more careful and bold.
Regarding time, the most convenient for me would be 09:00am to 11:00am or 19:00pm to 21:00pm GMT.
The Tiger can use the edge gap in a13.
TG.
Please consider this a holding reply, hopefully I will have more to add later at 1900, tho I am leaning towards options 2 and 3 or some variation thereof.
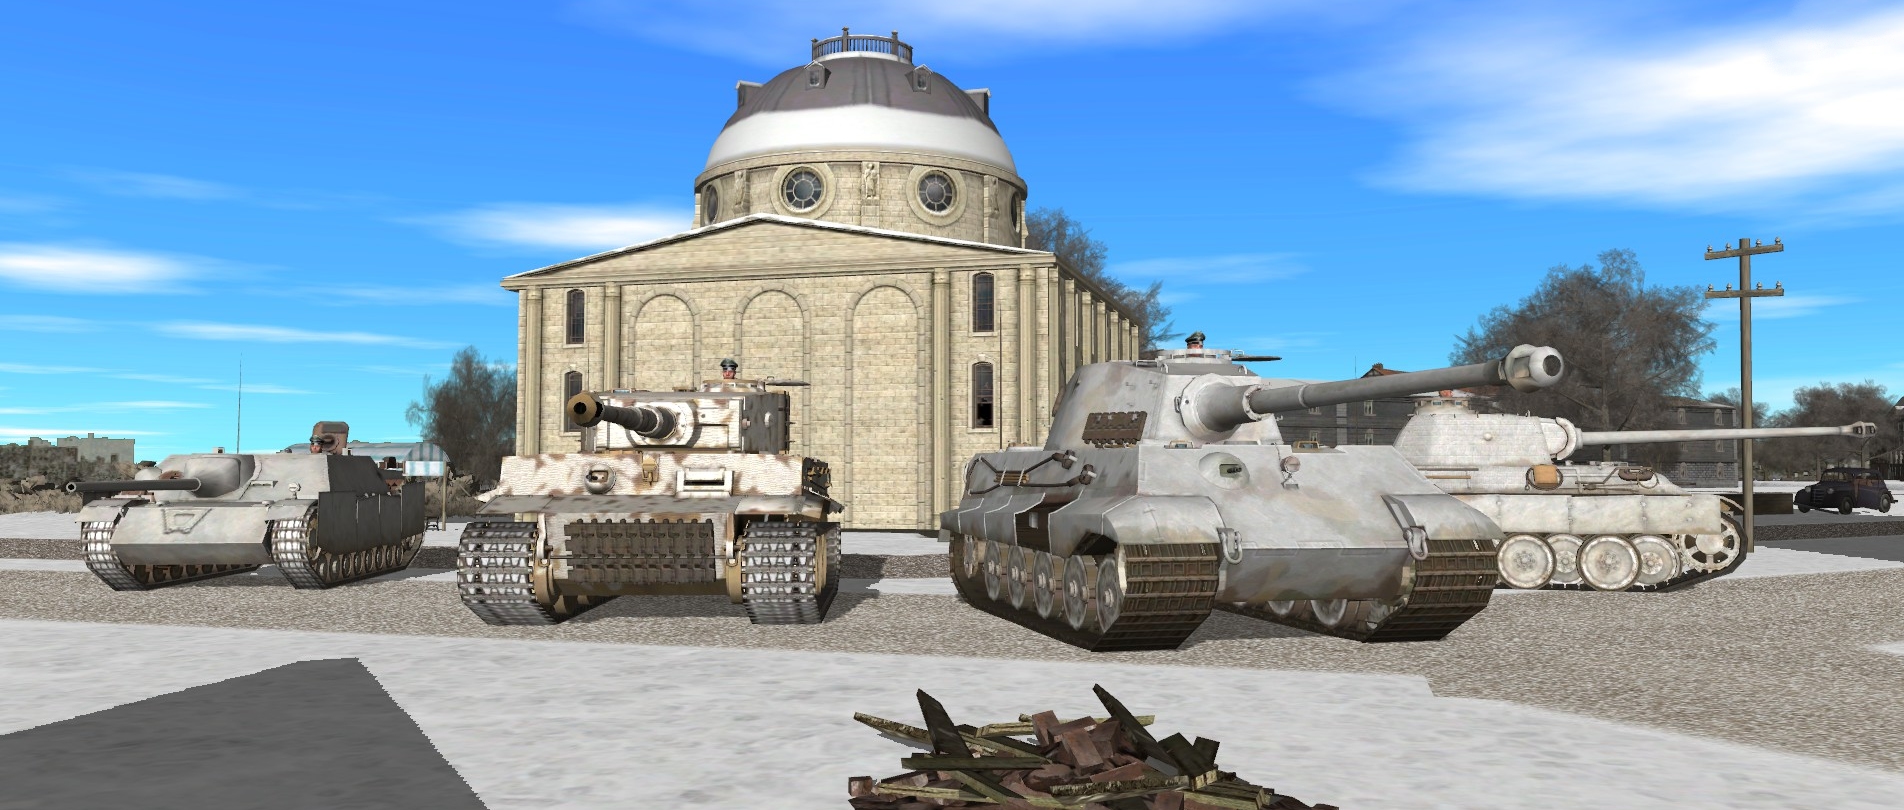
Am I right in thinking you are modelling this game – Impressive!
Thanks Tim!
KT, well, I have decided to buy CM RT in the end, and I had some free time to spare, so I ve tried a couple of things to get a better understanding.
So have you replicated this specific scenario with all the buildings or just small parts to see if certain things work? Either way I admire your commitment to the cause!
I created a map with the general layout of the building. That was the easy part. Going further is far more time consuming and honestly, the map creator of CM RT is not really user friendly.
I admire Tim art even more, as creating and running the whole thing is quite something!
My only thought is that if TG is going to make the trip across the road southwards to continue pushing the T34 from the rear, is it worth popping smoke first?
It’s doesn’t look to me like the SU can see between the buildings at the H6 junction, or if it can, it’ll be the tiniest keyhole (Tim, can you clarify if that’s allowed?) and if it can, would smoke block that and allow you to make that trip unobserved?
The SU-100 can’t see Warsaw Street (the street that links Boleslav Bridge to the planetarium) from its its current position. However a short move westward would open a narrow keyhole view.
I agree the SU probably doesn’t have much if any view at its present location. But it could quickly move into one around H5 or H5e facing SW.
RE KT move to F12 not sure bout this as I’m beginning to think the M4 will reverse course to cross the southern bridge in a future turn to support the T34, threatening our southern flank generally. Heading NW It cant risk a move beyond I10 building because of the Panther.
I suggested to attack the M4, because Tim, in its latest piece, explain that it didnt finish its move. But it may reverse at some point.
Yes I picked up on that too, but considered that by the time the KT reached a firing point the M4 could be at I10 protected from the Panther, but facing my attack route. I think if its first command is stop/reverse he would not go beyond its current position.
two alternative moves to consider for KT.
1. Turn around back down the road to E15 to hopefully contain T34 in SW cnr and protect southern approach of M4. E15 also has useful keyhole SW between the bldgs where the T34 may pass.
2. More risky but one I’m leaning towards as it may help your run south , if thats what you decide to do. Is a move to D12NW/D11SW which could give a keyhole shot to the SU position if it moves SW or W to engage you.
Either options are good to me.
From the test I run with CM, I can say that the first one in position usually (but not always) get the upper hand. You will have to be quite precise in your positioning and timing if you have to fight from D12/D11. I would recommend D11NW as it offer a bit more cover for your rear.
Tim,
I’m considering a move circa D12/D11 for a keyhole shot at the SU if it moves into H5, but noticed the required LoS goes thro some gardens/park at G7 will that interfere?
TG
Have you considered any other options than the risky run south? Can you fit thro the gap at A8 ?
Tim,
Apologies just thought of another question, this time about the T34 was it still moving at the end of the last turn?
It ended the turn halted.
Hi KT,
Yes, I have considered going north, but I do not think is worth it. The IS and the SU are not a direct threat at the moment. I can go through A8 (it is the same gap as A13) but we already have Panther and if some soviet moves there, we will see them coming. I also can’t coordinate with Panther and that would leave you alone in the south part of the map. I rather prefer that we stick together, as it increase our chance of survival.
Regarding the M4, I think it’s about to clash with Panther early next turn. We will see how it goes.
My main concern is the T34. Actually, reading again the report on the first turn, we don’t have much info on its whereabouts. For sure he is cornered, but that’s it. Neither of our position are a direct threat to him. I could go in fast but that makes me an easy prey.
I can only guess what it will try to do next: keep waiting? keep moving? I think that the T34 will keep moving. At the moment, I’m considering breaking the wall at B12W then rush to cover behind the building at B12S. If the T34 is still there, I can shoot him. If not, I can follow through
Regarding your move at D12/D11, I’m not sure is worth it. The Los is narrow and it leaves your rear open. Also, your tank can’t go reverse. Since the space in D12/D11 is reduce, your movement will be difficult and slow, making you a good target. My suggestion would be to go instead to E15 to have a look at the escape road for the T34.
Agreed not much point going North for you other than being safer.
I think we should aim to contain the T34 in our SW corner and let our infantry take it out in a couple of turns time rather than us chasing it that warren of streets. Its far faster than we are and at these close ranges any hit is likely to be fatal for either of us.
With this in mind I will move back south as discussed to E15, this cuts off that route but also threatens the M4 as I expect it to turn around and also head south to wait for a chance to cross the southern bridge which could be as early as turn 3.
Whilst not an immediate danger to you the SU could quickly (ie early this turn) move to H5, E,S or H6N giving it a good field of view of any attempted southern move by you in this or subsequent turns.
Perhaps consider staying where you are for this turn? You are covering the northern escape route of the T34 and perhaps the SU wont see the H5/6 move? Also you are posing a threat to any Sov attempts to cross the central bridge.
Probably a good idea to reduce the walls around the brewery anyway to improve your LoS down B column generally.
Hi KT, yes, we could wait for infantry to help us. But having enemy force where your troups may appear is not good in my view. .
I also expect that the axis forces will be smaller than the soviet one. I don t know if we will be able to coordinate with them or not.
Tim didn t tell much about it, so I guess he want to keep the surprise. We will see when the time comes.
I think we should get to the T34 before the troops appears. In order to do that, I was thinking of two different plan:
1. We close the south road and let the north open for escape, then catch him by the rear
2. We close the north and let the south open, then catch him by the rear.
What do you think?
I don’t think the T34 necessarily wants to escape, certainly not to the north, where would he go? It is causing us a lot of trouble just by existing in our rear.
We cant risk opening the south road otherwise the M4 can join him.
Infantry are far more suited to hunt tanks in this urban environment than we are and I think JP has already agreed to command a unit so coordination should not be a problem.
If you move too far south to hunt it, the middle bridge becomes open as I think the Panther will now be worried by a flanking attack from the north and could well move this turn to cover that. I doubt the IS is going to hang around up there, it will probably continue to F1 and await an opportunity to cross the north bridge.
Okay, then I think I will break the wall at B12W for the first 30 seconds, then move quickly to B12SW and slowly approach B12S to survey the south. If possible, I will try to have a go at the T34, but it is not the priority
>> the required LoS goes thro some gardens/park at G7 will that interfere?
I don’t think the trees/undergrowth will cause a problem.
Hi TG.
If you intend to move south this turn I would recommend you do it immediately (before the SU gets into position), you’re already facing SE I think, so just head in that direction somewhere like C12NW to turn or do whatever to chase the T34. The brewery wall should protect you if the T34 doubles back or moves up C. Do you think its possible for it to come up thro the small gap at C15SE?
If you wish to demolish the wall first, then what about spending the entire turn doing so, that way you can see where the T34 and SU moved to before committing yourself.
I will be here tomorrow at 1000GMT to give my orders if you want to discuss further.
Yes, I think that the T34 can come up through the gap at C15SE. It is the same as the one it is right now.
The downside of firing to demolish the wall is that I don’t think I will be able to defend myself if the T34 come to my direction for the first 30s.
Another possibility would be to move fast to D14 through B11-D13. Then face NW. I will think on it and makes my choice for 1000 GMT.
I don’t think the T34 would be able to do a 180 turn and move back up to engage you in the first 30 secs, also would they risk it as they couldn’t know your intention to use HE?
A risk with the alternative D14 move (other than SU) is once you arrive D13/14 the T34 could have moved to a position that would threaten it eg C15SE, E15W gaps, or back up north of the B and C lines. I don’t think that’s likely but it is possible.
I don’t think the risks involved in moving south at this time are worth it. Good luck whatever you decide.
Well, you are right that doing the 180° will take a long time. But I fear a trap. It s to easy a target. Going in head first has not been in our favour so far.
If the T34 were to move north, I think we wouldn’t see each other.
Tim
ORDER KT. Change face South. Fast move to D15N Face SE.
ORDER – Turn 2 Tiger
Moving Fast from A10 to C13SE through B11, C11SW and D12SW
Then Reverse to D14S
Stop at D14S, then Face NW
An “interesting” move.
As the Finns say when fighting the Soviets “Tulta munille!”
I think I must be misunderstanding. Your turning south, then moving West? Or do you explicitly want to move to your new position via E16, but when you get there, you’re going to do a 180 to face SE?
Sorry, this was supposed to be a reply to KT! Fat fingers!
Well spotted JP.
My tired old eyes mistook D15 instead of E15!
It will be interesting to see what the AI pathing makes of it.
At least it should confuse the other side ?.
Well, that went well. At least, the M4A2 is down.
I don’t know yet how we will destroyed the T34 and come to the rescue of the Panther in timely manner. But we will have to figure it out soon. The IS-2 has a nasty power, so we better find a way to flank it.
Yes that was unexpected.
The M4 pushed his luck much too far that time – I expected it to move south and support the T34 and/or try and flank me.
We can’t do anything this turn to help the Panther. The SU’s position prevents any safe movement north of the Planetarium.
The Panther commander gives all the indications of a experienced player and is capable of moving into an ambush position – assuming the IS continues its run – tho it wouldn’t surprise me if reverses course next turn.
Now our southern flank is secure I will move at speed south then west somewhere around my original starting position to try and catch/contain further the T34 while you do something similar from the north.
Hi KT,
Your move to the south is good for me. For the Tiger, I must say that I m still not sure what to do yet.
Tim, I can see that the Tiger is at D13SW. Could you tell me where the reverse movement would end, if I let it finish its move? Is it possible to cancel the reverse order?
The reverse order was plotted from c13SE to d14S as requested, but the Tiger seems to be struggling to execute it cleanly. Feel free to cancel/replace it.
TG.
Looks like you are stuck on the NW cnr of that building, see last pic of the last turn report just after the map.
My recommendation is to stop immediately and set target arc to cover the north exit at C14. Potentially the T34 could move there in about 3 secs and take a shot at you!
Up to now it has take a cautious approach so it could well just reverse out of trouble back the way it came to B column, perhaps even exiting at B13.
It also could head east after reversing – either in anticipation of the KT arriving or a cheeky move up that gap at C15SE.
If it tries heading south to escape via the A colm the KT should have turned the cnr at F/E16 by then and be able to have a shot at it.
So for you other than the initial stop/target exit point at C14 for the first half of the turn we need to think of what else can be done to limit these other options. May just mean staying roughly where you are perhaps changing facing West.
What do you think?
KT,
I was actually think of adjusting the position of the Tiger and wait for a move of the T34. My idea is to move forward a bit to C13NE, then reverse to D14W.
With the KT covering the other side, we should be able to block him and wait for its mistake. Or the infantry.
Hi TG.
As I posted yesterday your first move should be to stop, cover that northern exit at C14 in case the T34 decides to surprise you. If after say 10 secs it hasn’t appeared then move.
I wouldn’t recommend ending at D14W as that does not have a LoS to a potential escape route should the T34 retrace its steps back to the B column, then exit B14/13 before heading NE – it has the speed to do it this turn.
Maybe make a short fast move fwd to C13E, then reverse to D14NW facing west? This would prevent any north escape while the KT does the same for the south.
Hi KT,
Well, I think the tree in front of the Tiger will be the issue. Since the T34 is hidden by the building, I think I have enough time to move forward a bit, then reverse more properly. And coming to D14NW should be enough, your are right. I will post my order soon.
I didn’t think the tree would have an effect, but you are right why take the chance.
What I disagree with is that you won’t have the time to complete the move should the T34 decide to move forward, hopefully that wont happen and they will reverse.
Fingers crossed!
ORDER – Turn 3 Tiger
Cancel Reverse order
Moving Fast D13NW while covering with a target arc the left flank of the Tiger
Then Reverse with a curve to D14NW, still cover the left flank. I would like to avoid the wall of the building and the tree.
Once at D14NW, turn west to cover with a target arc from A15 to C11
ORDER KT.
Load AP (if not done already).
Fast move to F16S. Target arc A16S-A13NE. Hunt E16SE. Hunt D16N. Face West. Cancel Target arc.
Well, that was quite an unexpected turn of event! CMRT has some mysterious ways when it comes to pathfinding.
Anyway, KT, let me know if you want the Tiger to come to your help for next turn. Otherwise, I will look for a way to deal with the SU-100. It will be easier to flank than the IS-2.
Wow, that must be one tense T34 crew just now!
Hopefully 2 of theirs down. What do we think’ll happen with the Panther and IS next turn? Even if the Panther only manages to de-track the IS it’d make life a lot easier – assuming the IS chooses to advance.
Maybe TG look to come round to the south side and get across the river? After the T34 is dealt with the KT can setup to ambush the SU if he moves forward? Still very much in the balance.
The clash between the Panther and the IS promise to be brutal. The IS is very effective. We will see how it goes.
I was thinking of going to the other side to flank the SU, but it is a long drive. And starting turn five, we will have infantry on both side. Unless I got support from our own infantry, I don’t like the idea of fighting alone.
TG.
Strange pathfinding indeed! Perhaps in the heat of battle your ‘driver’ misinterpreted your reverse D14NW for D14NE or E14NE. Its easy done, I did something similar my 2nd turn!
Thanks for your offer to assist, hopefully it won’t be needed – but you would arrive too late to alter events either way.
JP.
I cant see the I.S continuing its advance next turn, maybe it will await the outcome of the T34/KT quick draw competition before moving again. Agree any hit from that range should seriously damage if not kill it.
All.
I think we should cover the Panthers southern flank by moving TG to C12NW facing NE, this spot would also cover any attempt by the I.S to retreat back across the northern bridge, or if it attempted an albeit unlikely aggressive fast move to D6NE then D6SW giving a shot at the Panther in the rear.
If the KT wins its duel I was considering a move for the southern bridge to eventually outflank the SU or I.S. in subsequent turns, hopefully with infantry support.
Thoughts welcome.
KT,
I also think that the King Tiger should be able to beat the T34. But we had surprise before, so I was thinking of coming by anyway, just in case.
Regarding the duel between Panther and the IS, I agree it will be brutal and could go either way. We will see.
As for the SU, I don’t think that it can cover the distance from the bridge to the rear of panther in one turn. Flanking it is the best option, but with my tiger crew buttoned-up, I believe it reduce the LoS. So I need to choose my spot carefully if I don’t want the tiger to end up destroyed.
I would advise against crossing the bridge yet, as the infantry will appear in two turns. Unless we can have support from our own infantry, obviously.
For know, I think coming to the south. Then, next turn, moving back up in order to flank the SU.
Think there’s been a misunderstanding.
To clarify I didn’t mention the SU flanking the Panther from the south, it was the IS.2 I thought might try it – out of desperation.
Incidentally I did some rough calcs and I’m pretty sure the SU could also do it in one turn as it only has around 150m (at 6m/s) to travel, even adding in a lot for turn time its technically possible.
Again it would be high risk move leaving itself exposed afterwards- personally cant see it moving from its very defendable position yet.
If you don’t wish to occupy C12NW this turn I will move north (assuming success with the T34) asap as suggested by JP to try and cover the Panthers rear/confront the JS/SU. Guessing it will take the best part of two turns.
Well, I didn’t consider that move for the IS, to be honest. If it does that, the Panther could follow through or just reverse and wait for the IS at the other side. It would actually help us, so I don’t think it will go that way. I still expect a duel. Or a cat-and-mouse game.
For the SU, I run a quick test at the highest speed, and it could only reach the other side of the bridge. It couldn’t turn. Maybe it could do it with a better course, but I doubt it. I agree that its current position is safer.
If the Tiger don’t go south, then the options could be to go to C12NW or G12NW to flank the SU.
Regarding KT, assuming you beat the T34, you could go north either through the gap in A13 or using to the main road. I agree that it will take 2 turns.
The I.S could complete the flanking move on the Panther within this turn – by fast moving SE to D5 then SW to D6SW or W.
This means the Panther would not have time to reverse /change direction etc as it wouldn’t become aware of the move until the end of the turn.
Re the G12NW move.
You are facing NW, so a lot of turning before you start slow manoeuvring thro narrow streets, can it be completed in the turn?
Assuming the A.I pathing gods are kind, you are buttoned up and moving – they are stationary, unbuttoned and facing in your general direction, its likely they will see you immediately. Then it all depends on how much time they need adjust their aim.
Assuming you do get the first shot it will only be at their frontal armour which you may not be able to penetrate at that range.
All being well, I plan to move the KT north, via C colm heading to and thro the brewery, not sure how far I will get.
KT,
Sorry, I really didn’t see the threat you suggested. I tried to flank the Panther position (assuming it doesn t move) with the IS. The bad news is it s possible. The good news is that it depends on the starting position. If its facing west, it need some times to rotate, so it will be hard for him to achieve the flanking in one turn. If facing east, it a very different story that usually end bad for the Panther.
Actually, doing more test, I found that the SU could actually get in the rear of the panther fairly easily. I don’t now how, but I messed up my first test badly. My mistake, you were right on this.
Regarding my move to G12NW, no matter the fine tuning, there is not enough time to get a shot at the SU. I was barely able to set the Tiger in place. I tried to move circa C11, but the tiger got killed quite a few times. So, it s no good.
C12NW seems to be the best move for now. I just don’t like the idea of having no cover on my rear if the T34 survive somehow. But it should take two turn for that so I could see it coming before it is too late. I hope that the KT will be able to shot down the T34 before it escape your sight.
>> CMRT has some mysterious ways when it comes to pathfinding.
>> Strange pathfinding indeed!
Sorry, I’ve only just realised what sparked these comments. CMRT’s pathfinding can be bizarre but it’s not /that/ bizarre. The Tiger order was plotted and executed exactly as requested (d13NW – d14NW), but I forgot about the northerly dog-leg when I was updating the gridded map.
No worries, Tim. The Tiger is still in one piece, so it ok.
Tim.
Is it possible for the IS-2 to traverse the east side of the Uni along the riverbank say B3 to D6 ? I noticed an odd coloured square D5NW wasn’t sure if that made it impassable?
Re the KT/T34 duel. Do I (KT) have to wait out the turn before issuing new orders, or can I issue orders that will be carried out during the remainder of the turn – assuming victory of course?
The riverbank next to the university is IS-2 friendly.
Cancelling/replacing unfinished orders is permitted.
TG.
No need for any apologies. Thank you for taking the time to do the extra analysis.
Good luck with the C12NW move, perhaps the Sovs will stay where they are.
All being well I should see you there next turn.
Tim.
ORDER KT. Allow A.I to complete its targeting of the the T34. After its destruction, Move D15SW, Fast move C15SE, Move C15, Fast Move C13W, Move C12.
Good luck KT!
ORDER – Turn 4 Tiger
Cancel all travel and target order.
Moving Fast to D13N. Still moving fast turn to C12SE, but avoid coming to close to the wall. Keep moving fast to C12NW.
Stop at C12NW and target east with a target arc from C5 to E7.
Maybe change facing N or NE after you arrive at C12NW?
Well, that T-34 ‘Leonid’ is really lucky !! I hope KT will finally able to knock him out next turn. Let me know if you want to the help of the Tiger.
Anyway, I think I will have to move next turn. I can go to A13 or A14 to flank the T34 or around B9 to ambush the SU if he keeps going south. I open to your suggestion.
Some immediate thoughts on last turn, will need to think more about our next moves.
I don’t think the SU will move south, it probably moved to cover a southern bridge crossing following the expected demise of the T34. It may return back to its G5 position tho.
It looks like the IS has reversed north slightly A3-B2, not sure what effect it has on the possible flanking move we discussed last time, its more likely to give it a firing arc over the central bridge.
I’m not sure if the infantry arrive at the beginning/end of this turn, we need to be considering their impact and how we control of the bridge crossings.
KT,
On the SU, looks like he is searching for a good flanking position, so he could stay where he is.
On the IS, well spotted that reverse move. Could give him an edge if he try to flank Panther. But, the Tiger is covering, so he may be hesitant to go now.
Regarding the T34, he is no match for the KT. So, based on its previous move, I think he will try to avoid you. For that, I see three option:
Going straight north, but you are close, so low probability for me.
Going north through A13. He would have more room and speed, but the Tiger is nearby. I would say medium probability.
Going east by either reverse or u turn. KT will be slow because of the building and the tiger is far away, so it has the highest probability for me. Could even try to shoot your rear, but it will difficult to do.
I m thinking of using my position as a threat to IS to dash back to your position. Either going south through A13 or to E15.
What do you think for your next move?
We are thinking along similar lines – I don’t think the IS will try the flanking move now. The SU could stay or perhaps move back to where it was.
As for the T34.
This could be its last chance to escape as our infantry will be appearing in that SW corner this turn. I agree the B and C routes are unlikely because of my position. So its the A route or heading east.
My money is on the east route and I’m leaning towards turning back the way I came to end up around D16N facing SE. I agree it would be slow and we will need to work out timings. As you are facing NE I don’t think you would be any faster, and that would leave A route open.
A possible alternative is the KT quickly moves up C to B12NE which will get a firing arc on the A exit. But that still leaves you to quickly get to at least E14 to have a LoS on an eastern escape route.
Time for some calcs and modelling I think!
KT,
I’ve done some test. The best way to come near you seems through the road to E15. The other route are slower, most likely due to the building and narrow corridors.
So I think I will go with this route.
After some head scratching I’ve come up with an alternative move for the KT.
Fast move to B16N, then down the gap B16-C16.
This blocks B and C north escapes (unlikely I agree) for the T34, but should intercept a U turn into the that same gap. If we’re lucky may even catch its attempt at a 180 turn as its already exposed at the end of the building A17NE.
If these opportunities are missed, by traveling down B/C16 I should still get a rear view shot of as it heads east via D or E16.
What it doesn’t do is prevent an escape via the A colm. If you can cover the exit at A13 he has nowhere else to go, unless we have a repeat of last turn!
KT, I also think that the T34 will probably go east. Your plan sound good to me. I dont think you need to move fast, as you are in narrow space. If you go too fast, our tank will lose time when turning as he need to brake first. We can discuss later if you want to finalise our order.
Tim.
I have to ask what happened with the KT targeting. It appeared to have a shot at the beginning of the turn then again at T14. After T14 it seems it lost interest in moving the turret altogether.
Did I miss out a command in the order phase perhaps?
Are you allowed to say when/how many infantry will arrive – asking for a friend!
I’m as mystified as you are. It definitely had a shooting opportunity at the start of the turn, and arguably had others later too. In real life the gunner would have seen his sight filled with T-34 and pressed the trigger. In CMRT, the issue may have been the AI gunner was trying to aim at the centre of the target or a particular bit of it and never quite managed it.
The fact that it stopped tracking the target when its gun was pointing abaft had me Googling King Tiger turret limitations (I seem to remember some WW2 tanks couldn’t rotate their turrets 360 degrees) Of course, the KT wasn’t hampered in this way.
I believe the first infantry units should arrive during turn 5.
TG.
Noted fast moves in narrow spaces.
We (you) still should cover the exit at A13. The easiest/quickest way is to move forward to B11SE, and use a target arc to cover it. My rough cacls indicate the T34 could pop out there T+10 -15 secs. It ended the previous turn moving so it can reach a top speed almost 15m/sec. Not sure where they would move from there so important we intercept it as soon as it emerges.
I don’t recommend driving down there tho as the SU could return to it previous position at H5 and threaten your rear. I don’t see why it would stay where it is, doing nothing, whereas H5 gives it an excellent firing position of our side.
Almost forgot to add you will need to reverse back to your original starting point at about T+35 secs for the same SU reason.
What do you think?
KT,
Sound good for me.
I was think of going to A12 then reversing more toward A10SE or B10SW. That should gives the Tiger crew a good view of the T34, should he move my way.
I will post my order later today.
If you do that its likely you will be still moving when contact is made, which makes the outcome more uncertain.
Usually, going reverse was not a problem. I had good result in the few test I did.
Ok.
Good Luck ?
You too KT!
ORDER – Turn 5 Tiger
Cancel all travel and target order.
Moving to A12N, normal speed, through B11. Then reverse to A10NE. Target arc from A14W to D12.
Tim.
ORDER KT.
Clear all current orders. Quick move to C15SW. Set target arc B17E to B17W. Hunt B16N. Clear target arc. Hunt B16E. Fast move C16. Hunt C16E. Hunt D16SW. Hunt D17NW. Hunt D17. Fast move C17 NW. Hunt B17NE. Face NW.
Good luck everyone!
Congrats for your kill, KT! Two soviet left.
I think we could take a look at that SU for the next move.
Tim,
I’m surprised that the infantry didn’t appeared during that turn. Is there some delay? I m also curious to know how the infantry will be commanded. Will we have reinforcement from other Cornerite? Or will you manage them?
Thanks TG.
It was a bit of a risk but after last turns frustration I wanted to bring things to a conclusion. I suspect my Hunt move (tight target arc) out trumped its slow move (?) command, it looks like they were going for the U turn option.
Yes the S.U should be our focus. It was a good move, one I didn’t see coming ( good job our Panther did), however its now exposed and we (you) need to see if it can be caught.
I will probably move the KT down to the southern bridge circa I.16, both to control the crossing point and maybe try a flanking move on the S.U if it moves down there.
Not sure what the I.S can do now – it cant outflank the Panther anymore. Maybe it goes head to head, maybe the Panther has spotted the gap at A8?
I thought at least some infantry would be making an appearance this turn too, along with our old friend JP – maybe their truck broke down!
KT,
We have been lucky on this turn, so we better be careful for those to come.
KT going toward the south bridge is not a bad idea. I was thinking of moving the Tiger into the building on the west near the river and see if I could get a shoot at the SU. But the tiger is far away and now that the T34 is down, I think he will retreat to the northen part, waiting for the infantry. Guess we still need to apply pressure on the SU, so I will try to find a better alternative.
Let s hope that our troops have a good mecanician so he can repair the trucks quickly!
The SU only has 2 options-
move back north probably with the aim of returning to G5’s good sniping spot, or (more likely I think) a reversing move to the safety of the streets @ J or K11, facing NW.
If it moves north you should be able to get in a shot by reversing to A9N or NW and targeting H9.
If it moves south the KT could try flanking it by crossing the bridge during Turn 7.
Judging from the previous turn of the SU, I also don’t expect him to stand still for us to shoot at him.
I did a quit test with the SU moving back north. I put the Tiger around B9, but nothing happened. I guess to combination of speed from the SU and the fact that the crew of TG is buttoned up doesn’t help. Also, the SU was able to come back to H5 in one turn. That’s further than I expected. It will be hard to ambush it in this condition.
I also try to move circa F12 or G12. It took me two turns to get there, but I was able to knock him out during the 2nd turn. The catch is that the SU didn’t move from its position in H6, so it was an easy target. Hard to say if the Tiger could move to F12-G12 in one turn. Would required a lot of tests and adjustment, so I m not sure it s worth the time.
I will keep looking for a good spot. One thing for sure is I don’t want the Tiger to stay circa B9 to E9 for too long, as I fear the IS will try to make a move through the bank to flank the Panther or the Tiger next turn.
Also, I think we need to plan our movement for next turn without waiting for the infantry, while keeping in mind that they could show up at any moment anywhere on the map. That won’t be easy.
>>I’m surprised that the infantry didn’t appeared during that turn. Is there some delay? I m also curious to know how the infantry will be commanded. Will we have reinforcement from other Cornerite? Or will you manage them?
The infantry teams should appear in dribs and drabs from here on. There’s a dash of randomness in their timing. Comment Commanders who’ve lost a tank can direct a friendly team if they wish to.
TG.
If you want a chance to target the SU whilst it is moving north, then A9N is a better option than B as its closer to you, also did you use a target arc say I9SE-I8E in your test?
Another option for the SU would be a fast move to E10, you should arrive before the SU does at G5. This would enable a shot at the SU while it manoeuvres there.
A non SU move – A10NE facing NE in case I.S appears.
Or if you wish to swap “fronts” with me you could fast move down to South bridge (probably reaching H17 this turn) and I will turn north arriving circa C11 by turn end, it may be better if I’m up there anyway to take on the I.S sooner or later.
What do you think?
Re the infantry I think they will emanate from the NE (Sov) and SW (Ger) map corners. I agree we cant rely on them this turn, but they will get more important as time goes by.
KT,
I ve been running more test. Moving to A9, B9 or C9 using using various move and speed, the Tiger was never able to get a shoot at the SU. The best result I could get was some hit with the machine gun. The target arc doesn’t make a different. Also tried a couple of time to move to E10, but the Tiger get there only at the end of the turn, and the SU is long gone.
The SU is facing north east ar the start of the turn, so it gain speed quickly and can escape easily.
Swapping position could be a good idea, as the Tiger can manoeuvre more easily in tight space and can reverse. The down side is it will take two turns to be in place.
I keep scratching my head on the best way to knock of the SU during next turn, but the only good spot I could found is circa C3, precisely where the IS is. So, not good. I will keep searching.
KT,
After more test, I think the best move for the soviet team could be a sort of retreat. Panther can’t really move forward and both the KT and the TG are no direct threat to them. But they can’t ignore the arrival of infantry.
For the IS, it could either move forward to try, shoot the Panther then retreat or retreat directly to F1.
For the SU, it could move to J11 (as you suggested) or I9 to cover the IS while protecting himself. It could also move further north to H7 or H9, but in this case, it would not be a threat to Panther. So less likely to me, as they have been trying to knock out Panther so far.
In this scenario, it could be interesting for the TG to move to E10 or F12-G12 and for you KT to C11 or C12. Another possibility for KT could be to go to the south bridge circa I16 to flank the SU.
What do you think?
First thanks for all the testing you are doing..its good to see you are committed to the cause!
I don’t think they will be worried about our infantry yet, even assuming something appears this turn in our SW corner its not going to be a threat for another turn or two after that.
The SU- I still think will either go back to H5 or reverse into the streets J11 area, turning perhaps to face any future threat from the south.
The I.S -is more difficult to assess. I agree it may try to confront the Panther and/or retreat to F1. I doubt it will try moving SE along riverbank now, it may even stay where it is as it has a good position covering all the bridges tho psychologically pressure will be building for it to do something.
For our moves
TG.
When I suggested you move to E10 it wasn’t to intercept the SU moving north (as mentioned in your 4th Aug comment), it was to attack it as it attempted to move into G5. This is a little risky as it means you must get into the firing position before the SU arrives otherwise you will be in danger.
An alternative is a move to the southern bridge area, you should be able to get to H17 this turn with a couple of fast moves. Leaving an option of crossing the bridge next turn (ideally with infantry) to outflank the SU.
KT
Is going to move north circa C12, just in case I.S attempts to outflank the Panther by moving south, but also in the longer term its better suited to attack the I.S than any other of our units.
Happy to discuss further.
Thanks for your feedback, it helps a lot.
Regarding your move to C12, since the KT can’t go reverse, the fastest way is by going through the narrow gap in A13.
For the next move of the Tiger, I am considering E10 or E12. I will post it later. Good luck, KT!
Moving thro’ the A13 gap could leave me open to both the SU if it moves to G5 and the I.S if it tries the SE manoeuvre so its too risky.
As the KT had only just begun to turn into B16, I think it could slow turn into B15 then up the B colm to and through the brewery yard.
We’ve discussed the E10 move risk/reward, I’m not sure what the benefit is of E12, but good luck with whatever you decide.
Tim.
ORDER KT.
Clear all current moves. Slow move to B15S. Fast move B14. Move B14NE. Move C13SW. Move C13N. Hunt C12.
ORDER – Turn 6 Tiger
Cancel all travel and target order.
Moving to A11N, fast speed. Then using the road, go fast to C12W. Normal speed, turn to D11SW, then turn again to E12.
TG.
Our generous offer of a truce has been refused by those warmongering Soviets!
We may as well take whatever advantage we can.
I will try and target (probably via C11) the I.S as it exits the North bridge – assuming it continues to travel eastwards.
A fast move to E10 should give you a good chance of intercepting the SU if it moves from behind the building. What do you think?
Tim.
Can you confirm if the IS-2 was driving or reversing across the bridge please.
KT
I’m also not sure what the SU will do next turn. It could keep moving forward, but it will be very exposed. That seems unlikely to me. It could also reverse between the building in the south, which seems safer to me. In that case, it will be more difficult for the Tiger to attack him.
I am hesitating between E10 and G12NW. E10 is close by, but with a narrow LoS on the SU and I think the trees may block it a bit as well. G12NW offer a better LoS, but it will take more time to get into that position. It also provide a better cover for my flank, should the IS survive next turn.
At the moment, G12NW has my preference, but I would like to do some test before deciding.
As for KT move, I think you can advance a bit more than C11, as I fear your LoS wil be too limited. C10E or even D10W could be best spot for you.
Even by fast moving to C11 the KT may not have enough time to aim and shoot at the fast moving I.S. If it tries to move any further to get a better LoS the I.S will have had time to move to safety via F1.
You are in a similar situation with the SU. If you don’t fast move to E10 (or E10NE) I fear you will miss any firing opportunity.
I don’t see how the I.S could threaten your flank this turn, it wont have time with all the tight cornering required and it will most likely want to stay around F1 to stop the Panther flanking him.
You could use the last 10 secs of your turn to issue a reverse order if you were still worried about it.
Tim.
Are the trees circa F10 likely to cause LoS problems firing from G10 looking east or SE?
Many thanks.
>>Are the trees circa F10 likely to cause LoS problems firing from G10 looking east or SE?
Probably not.
KT
I agree that it will be hard for your tank to get a clear LoS on the IS. It is easier for Panther, actually. Since the IS is moving east with the turret to the south, I assume that it will not stop at F1 to wait for the Panther, but prefer to take cover.
I’ve done more test and E10 is the best position to shoot at the SU, if it goes up north. The move to G12 is not as efficient and takes to much time. The only problem with E10 is that I need to stay behind the cover of the building because the IS can actually kill the Tiger from its northern position.
My only doubt is I think that the best move for the SU is to reverse to the building south east from its current position. It could also be a threat to Panther, if it moves while avoiding direct attacks from the Tiger.
When the clock stopped, the IS-2 was moving (not reversing) eastward across North Bridge with its turret pointed to the south.
ORDER – Turn 7 Tiger
Adjust travel destination to D11, then straight to E10SW, using fast speed.
Keep moving using Hunt to E10, then stop. Do not go beyond E10.
TG
If you have the time, I would recommend adding a target arc – something like I8N-K11E prior to the hunt command. This should ensure your turret and the crews attention are focussed on the likely target area (ie circa I10) when you arrive at your firing point.
Your current order could leave your turret pointing and the crew initially looking in the direction of I7. As you are ‘buttoned’ up this could cost a valuable few seconds in adjusting and acquiring the target.
Good luck and good hunting!
Tim
ORDER KT.
Clear existing commands. Fast move C11S. Target arc E1NW-F1NE. Fast move C11. Pause 20 secs. Clear target arc. Change facing NE.
KT
I didnt use the target arc, because it usually gives bad result. It is more efficient to let the crew do the work. Good luck and good hunt!