Control one of the Soviet AFVs in THC’s 2023 play-by-comment Combat mission game? Use the comment section of this password-protected post to discuss tactics with your comrades, and communicate orders to me, the GM.

Control one of the Soviet AFVs in THC’s 2023 play-by-comment Combat mission game? Use the comment section of this password-protected post to discuss tactics with your comrades, and communicate orders to me, the GM.
Comments are closed.
Good morning, comrades! Poor Oneknown in the T-34-85 has a lion’s-den start.
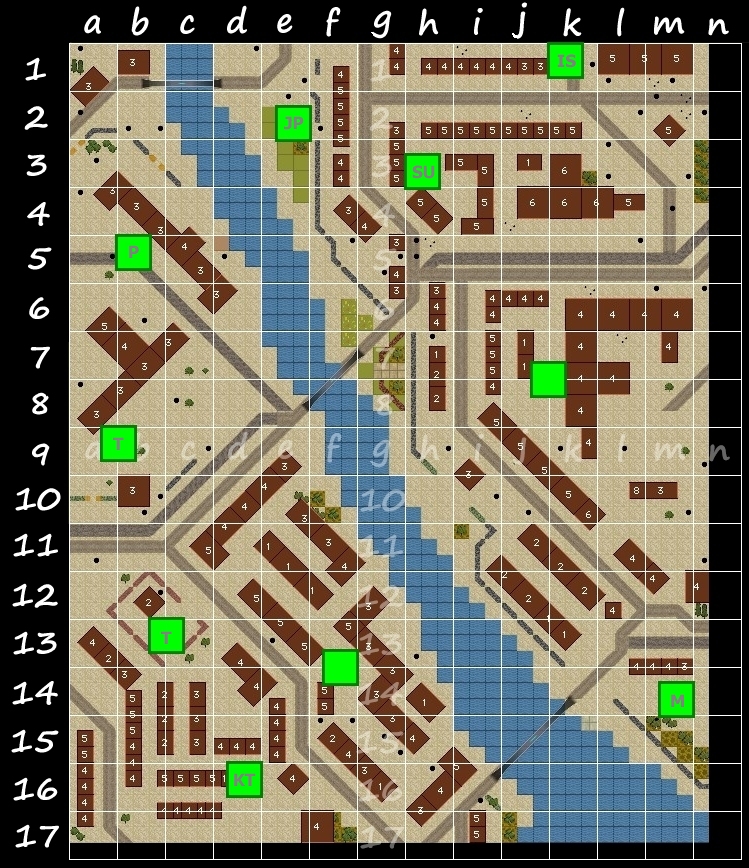
I’m in the IS-2, as a reminder, in k1. My trait (‘Miner’) lets me drop a pair of anti-tank mines within 20 meters of my start position. The road at j2NW or j2N seems like a good candidate.
How do we want to tackle the fascist invaders? They’ve drawn a somewhat more concentrated start position, to my eye.
I may be surrounded by cats, but I’m the lion in this den. More specifically, my trait means I’m not allowed to cross any of the bridges, so I’m stuck running interference on the tigers until the cavalry shows up.
I have no idea how effective my gun or the M4’s gun will be against the KT or T. Are rear shots likely to kill, or am I hoping to immobilize and button my opponents?
A P at C6 and a T at B9 would very quickly cut off travel east, so my hope is to go at top speed to E12. It’s possible the JP already has LoS to me through a keyhole, but I’m hoping a fast moving target could dodge through there.
Once there that forces either the tigers to team up and head south, abandoning the JP, or giving me time to maneuver around the streets.
I think the priority should be to take out the JP and possibly get the M across the river so we can concentrate fire on the KT’s flanks.
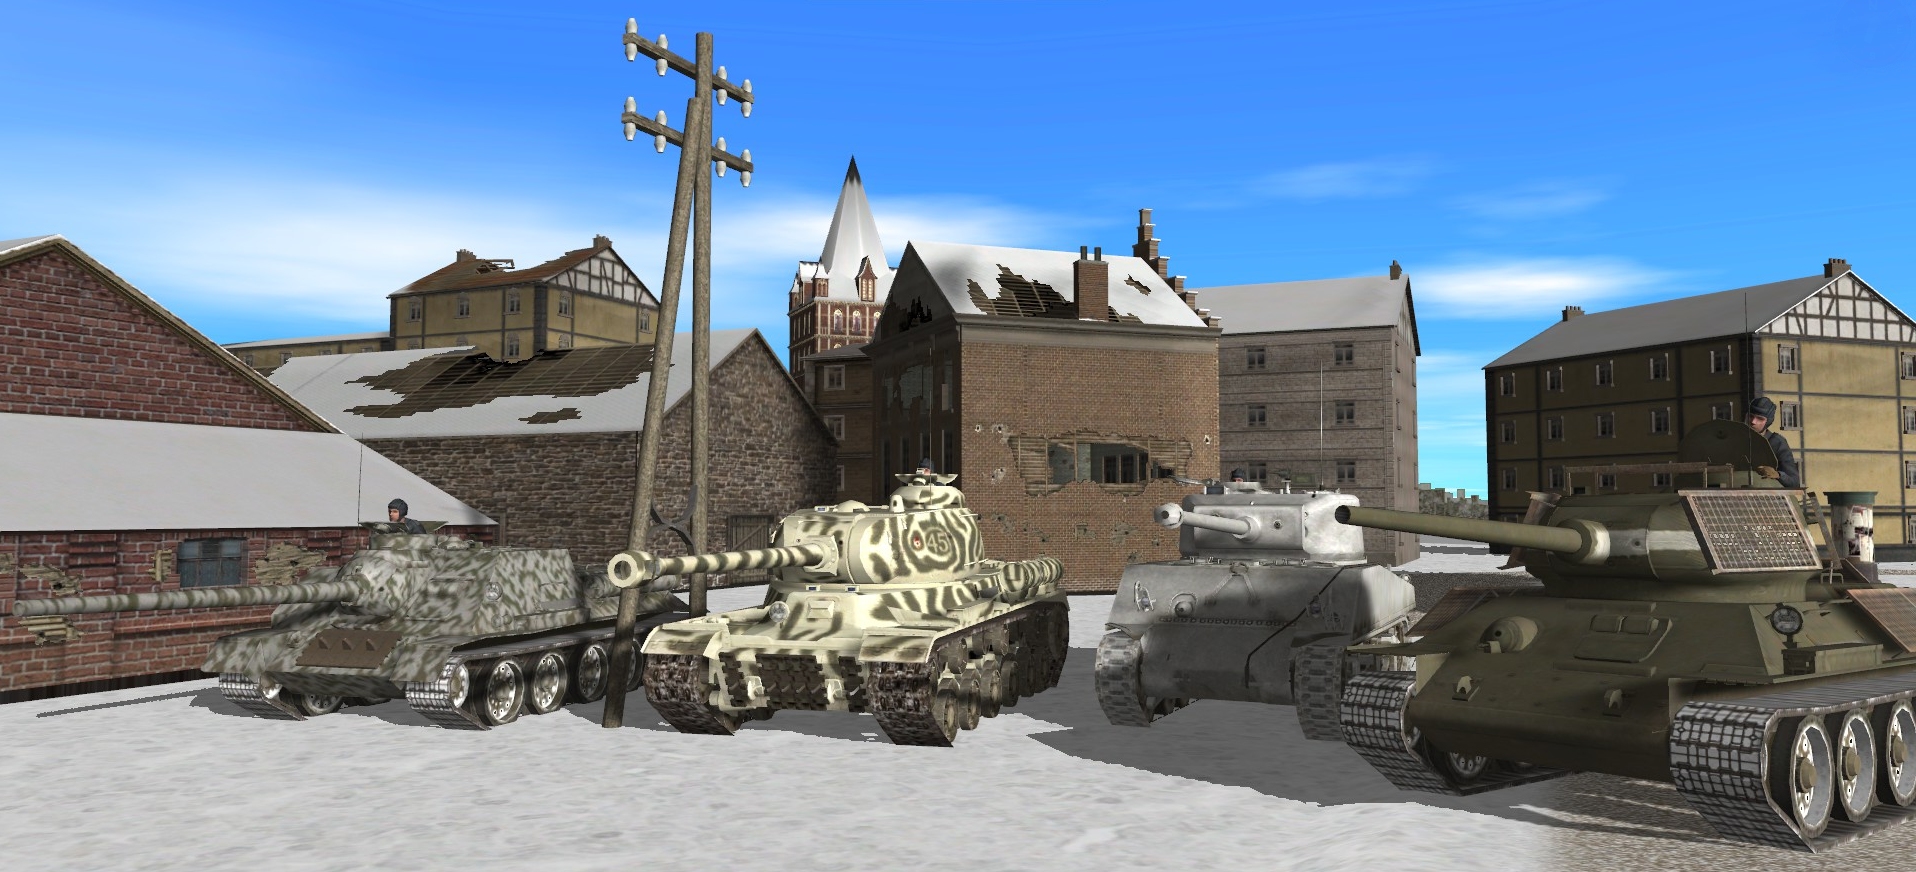
M4A2 Soviet-Sherman and it’s dashing slavic knock-off Brad Pitt commander reporting in!
I’m down in the far SE there, and have drawn the lovely trait of “Restlessness” meaning I’ll not be sitting still the entire match! Minimum 20m move length every turn to assuage red wardaddy’s need for speed.
In case anyone missed it from the comments, location grids for orders should read like this:
As each map square consists of nine smaller squares, I envisaged “move to d7SE” and “reverse to k11N”-style orders. A coordinate followed by one of eight compass points or, if the destination is at the centre of a square, nothing.
I feel like the Panther at B5 likely will continue to have eyeballs over the river and possibly out to K14.
I suspect the Tiger-twins will try to pincer Oneknown’s T34 for a quick crunch, and even if the 76mm gun isn’t a KO, it’ll cause problems for those on the receiving end.
Admin wise: chat & orders appear in here, but is anyone keen for a more free-form Discord, WhatsApp group, or other form of additional comms? Or is it better to keep all the content together? Genuine questions.
Did a little HW. The good news is I’m rocking an 85mm gun that can pierce a Tiger side no problem, and the front turret but not the hull to the front. But a Panther is immune to the front, so that will be harder.
Given the ranges (there aren’t many sight lines on the map in excess of 200-250m), even the 76mm gun may have something to say against side armor.
I’m planning to run a short piece tomorrow morning (Lions of Lodowice Turn #0). It will include overview screenshots of the eight starting positions which will hopefully aid early decision-making.
Thanks for this!
Hi comrades, I’m in the SU-100 and my trait is ‘intuitive’ – I can read an opposition tank’s order in advance once this battle. The tank in question must be in FOV.
My first thoughts:
C6 seems the obvious choice for their panther: well protected and would cover quite a lot of the map, including two out of three bridges and the starting location of our Sherman.
The king tiger has loads of cover from our main force and some prey in it’s cage. It will surely come hunting for the T-34.
Their tiger starts a little exposed and might be looking for cover this turn, maybe around A10? I quite fancy poking my nose to try and get a bead on it (j4SW, say?) in the off-chance it remains exposed.
The JP is hard to predict – it could retreat across the bridge, get aggressive and come hunting or loiter to wait for an opportunity. Some mines in its vicinity sounds a splendid idea either way.
Oneknown is pinned between tigers on the wrong side of a river they can’t cross, with German reinforcements expected in in the area in a few turns. The silver lining is that the fields of our glorious soviet will be watered by the blood of our martyrs, I guess… The houses around E6 do seem to offer good cover and might give the rest of us opportunities to fire on any tigers that follow the bait. I think it’s worth the risk to dash for it.
The central and southern bridges are probably denied to us, so if we do want to get across the water, the JP needs eliminated in the north. Not sure how high priority that is, though.
My suggestion is that while Oneknown tries to draw the tigers into a knife-fight in the streets around E6, the rest of us try to find opportunities to take shots at the tigers as the manoeuvre. If we stay out of sight of C6 I think we can ignore the panther for now, and if Fishbreath and myself move SE we can maybe even bait the JP onto those mines.
The P and JP do seem to be the lynchpins of the German position. If the P takes up the obvious c6 position, and the JP stays in its little wood or moves to the bridge, they control an awful lot of the center of the map. That might induce us to play around the north of the map a little more: dislodging the JP from a position that covers the river gets a lot more important in that scenario, I think.
I hope they might foresee us foreseeing those obvious positions and do something unexpected and dashing, like sending the P up north to support the JP in an effort against our flank. That opens things up for us substantially.
I like your j4 idea as a first cut. If I drop mines on and south of the road at the J/K line, that preserves a way for me to get to the river along the north of the map if that turns out to be the right move. m3/m4 gets me on the move and covers your flank, although puts me a little far from the action.
On that note, about how far can we move in a turn? This is my first time paying tremendously close attention to orders a Comment Commander series, so my sense for Combat Mission scale isn’t great.
Finally, I wonder if we could use Oneknown’s perk to our advantage. The other team doesn’t know about it, of course, so a dash that looks like it could go for a bridge may serve to pull the enemy out of position.
edit: PressPass’s plan to run for e12 might entice the JP to stay put, though, in which case trying to come up on its flank seems like a useful course of action for me.
>>about how far can we move in a turn?
This depends a bit on speed, waypoints, and conditions, but I’ve just a run a short test in which the IS-2 travelled around 200 metres in a sixty second turn from a standing start.
Now that I see extra screenshots, my suggestion of going to j4 seems bobbins – there’s no sightline to the planetarium. On the bright side, my current location has a view south of it, which prevents the Tiger heading too far south. One option is for me to stay put and help turn Oneknown’s fight with the Königstiger into a 1-v-1.
To be more aggressive I reckon I’d need to be around h6 to get a better view, which does feel a little vulnerable to getting flanked by the JP, though we could threaten a pincer if Fishbreath heads west along Vinegar(?) street.
I’m also starting to question the mine placement. It’s hard to forsee the Jagdpanzer going that far into the corner early in the fight, especially with reinforcements imminent. Maybe the road around L2W is worth consideration? It would help fortify the NE area in the event that we need to make a last stand in that zone.
I am not going to duel the big one. I’m going to run away and hope to lure it close to water, get it sick between two buildings, or leave it in the dust.
As for the T, I don’t like my chances in trying to flank it around the church. It’s kind of a 50 / 50 with a narrow time frame, little overwatch help, the panther in the wings, and bad odds head to head.
So yeah, I think I stall for time, force the tigers to slowly creep around, revealing their intentions so we can block off their routes.
My trait would have been great for our plucky T-34. Starting up against the edge of the map doesn’t give me a lot of room for clever mining.
Given that the SU-100 is in a solid position to start, I’m inclined to cover copperbottom’s flank and see if I can distract the Panther away from its spot or evict the Jagdpanzer. The more of a threat we pose on the north side of the map, the more freedom the M4 and T-34 have.
Provisionally: mines on k2E/l2W or k2E/K2N, then proceeding cautiously to g1S?
That reads sensibly to me. I suspect we’ll see the JP pull back to cover the bridge and prevent a rear-rush at the Panther. I can’t imagine the Panther player choosing anything other than the C6 overwatch position.
Looking at the screenshots, I now see there’s not much of the KT’s routes I can cover from the starting position. It wouldn’t surprise me to see the KT planting itself around F14, but also if our T34 makes the sprint, it’ll be well clear before the KT is in the area.
Rather than drive nose-in to an overwater shoot-out with the Panther, I’m leaning toward starting rearwards and snaking up behind the buildings to K11 or J10 kind of area, hopefully ending with a view to the northern bridge if I can hug the edge of the buildings in J11/K12 there.
Or would it better to keep to the north side of the street along the buildings in K10? I need to print the map out here and start laying rulers down: too far along those and I’ll be back in the Panther’s sights.
Post Script: Any idea what Tim means when he says “The Sherman M4A2(76)W is, I think I’m right in saying, the only AFV involved in the battle with the ability to [redacted].”
Swim? Some other trait I missed beyond my restlessness?
Possibly shoot tungsten rounds? Or smoke rounds.
I personally want to know if I can deploy smoke, either via shell or short range canisters.
@Tim: Can you help out with that?
Yes, the Sherman seems to be the only AFV with main gun smoke rounds.
@Tim: when are orders due?
If possible I’d like to execute a turn tomorrow morning. The turn report would appear on Friday.
It would be helpful if order posts began with ‘ORDER’.
Ammo details for the Soviet AFVs:
T-34-85 (39HE, 18AP, 3APCR) – no ability to ‘pop smoke’
M4A2 (39HE, 28AP, 4S) – no ability to ‘pop smoke’
SU-100 (16HE, 18AP) – no ability to ‘pop smoke’
IS-2 (18HE, 10AP) – no ability to ‘pop smoke’
Remind me of the granularity of Combat Mission’s ammunition management abilities: can rounds be manually unloaded, or must they be fired?
Or is all that simulated offscreen, and a single “smoke” command covers unloading AP, loading and firing smoke, then repriming with AP?
The current order in combination with the friendly TacAI determines how ammo is used. Sadly, as I mention below, in WeGo persuading a unit to, say, refrain from using ‘special’ AP, or sling a single smoke shell, is almost impossible.
ORDER:
initial facing NE, go top speed to J4SW via i3N. Hunt to H6N. End facing SW. Preload AP rounds (assuming that is a valid order).
ORDER:
Mines at l2W, k2E if possible, or k2E k2N if not.
Initial facing S. Move to i2N (avoiding mines!). Hunt to g1SE.
Slight amendment: target arc a1-a3 while hunting.
Well done with the first blood!
OK, with the Tiger no longer going to be covered by our TD it looks like open season for the big cats. I’m gonna drive south, either hoping to catch the KT in the rear, or else at least put some distance between me and T. I’m hoping that their slow turret traverse means I’ll get the first shot off as long as I’m not head to head.
ORDER:
Start C13w facing south, unbuttoned
FAST C14w
FAST B14n
FAST B15-
COVER ARMOR south to B17, as wide and south as it will go with the corridor
My rationale is that the tiger won’t come south this turn as it knows I’m starting in that keyhole. By the time he finds out that I’m not, I’ll be in another instead. However, if you would like me to add a 20 second delay of watching the planetarium before I move location I will happily do so.
I figure it will go on the west side of the church even if you’re there. Go ahead and hurry to the new location.
I’ll be surprised if we make it through all this in the first 60, but that’s better than reaching command end and idling (I think?) I’m not sure of the lifespan of smoke rounds on the battlefield, but I figure lets get some out there sharpish.
ORDER:
– Start facing east, unbuttoned.
– Fire 1x smoke at bridgehead I16
– Load AP
– Quick Hunt N14nw
– Quick Hunt M13n, target arc 180 degrees facing W
– Hunt to K10W, hugging the northern line of buildings
– Fire 1x smoke at the building in G11
– Load AP
– Wait 20 seconds
– Reverse to L11s between building and roadway.
This order is beyond WeGo CMRT, I’m afraid. While the order system can combine multiple waypoints, movement speeds, and cover arcs (tanks can follow complex paths pretty well and alter turret direction multiple times during a turn), I’ve never discovered a way to persuade an AFV to loose single smoke shells at multiple targets in one sixty-second action phase.
A-okay, I thought it might be a stretch. We’ll save the smokes till we need them. Does the initial smoke still work?
REVISED ORDER 1:
– Start facing east, unbuttoned.
– Fire 1x smoke at bridgehead I16
– Quick Hunt N14nw
– Quick Hunt M13n, target arc 180 degrees facing W
– Hunt to K10W, hugging the northern line of buildings
– Wait 20 seconds
– Reverse to L11s between building and roadway.
There is a TARGET BRIEFLY order for regular shots, but I don’t think there is one for smoke. Expect your gunner to unload all four smoke rounds at the spot you pick.
Also, is QUICK HUNT a new command? There used to be QUICK and HUNT, with the latter being somewhere between QUICK and MOVE on terms of speed, but with HUNT you stop moving on contact.
Hrm, quick-hunt was my go to in CMSF, but they may have retired that speed, or my memory might fail me. Quick > Hunt. I may write out a third one here if we’re still waiting on the Germans…
Right, I’ll figure it out here eventually. Downloading the CMRT manual was worthwhile! If it’s not too late here (and A-okay if it is)
REVISED ORDER 2:
– Start facing east, unbuttoned.
– Quick N14nw
– Move M13n, target arc 180 degrees facing W
– Hunt to K10W, hugging the northern line of buildings
– Wait 20 seconds
– Reverse to L11s between building and roadway.
@Tim: Would it be possible to include the overhead map on future Mess posts? It’s a pain to switch between the two articles when writing up orders on a phone. Thanks and appreciate all you do.
The Krauts sure are taking their time making decisions. I don’t want it to get too quiet in here, lest they think they’re out-thinking us. (Confusion to my enemies.)
Guesses for what the German units will do:
P: overwatch on c6 is the obvious one. A daring alternative would be to rush the north bridge to join the JP, however, which turns the JP’s position of weakness into a position of strength.
T: he has a tricky start position because of the SU-100’s overwatch. Working south somehow to join the KT is probably the obvious one, but if the P vacates c6 to go north/east, the T can take up c6 overwatch pretty readily. Alternately, maybe the T works north to try to cross the river and support the JP.
JP: can’t really stay put without support, IMO. If he tries to reverse across the bridge, I may be able to peek around the corner at f4 and blast him in the next 60. If he stays put facing south, same deal. Maybe he tries coming up Vinegar Street, but that’s into the teeth of two enemies and doesn’t seem likely.
KT: duel with the T-34, plausibly, since they’re both relatively sheltered from other players in that corner of the map. A factor counting against the daring northern sweep is that it would leave the KT on its own, potentially against two tanks that can outmaneuver it and easily pierce its side and rear armor.
The idea of that northern sweep has me a little nervous about being so far forward—I could cover the SU-100’s flank just as well from l2 or so—but maybe I gamble on the other side not being that aggressive.
Yeah, my guess for their delay is that they are debating whether to send the Panther north. While that C6 spot has some utility in denying us access to a lot of the map, it’s not likely to actually score any kills, as barring a pathfinding snafu we will be avoiding LoS to it. Static firing positions just aren’t worth that much in this battle unless it’s pinning a specific target in place, with a specific reason in mind.
The psychological warfare aspect begins anew!
Are we expecting distinct mess-posts per turn? Or all in this here? Easier to track one conversation, but also: it could grow to be a long one!
Great start – hat-tip to Fishbreath!
A couple of initial thoughts:
Their Panther is now in somewhat of a bind. It’s the only German unit that can defend the north bridge from the potential incursion of the IS-2, but also knows that the Sherman could chose to engage so will be loathe to present rear armour. How quickly do those things reverse?
I can probably pin the tiger in place behind the planetarium by going to h6, if that’s what we want.
Remember that everyone is going to be scared of head to head, so the Panther has freedom to reverse, and cover the north and south bridges. It’s only when two units can pincer that you’re likely to see them pop out in front of another vehicle.
To be clear, I’m not saying that our Sherman *should* engage the Panther, just that it *could*, so the panther is likely to reverse if it wants to cover North Bridge this turn, which is going to slow it down. On top of that, if it wants to cover all three bridges (from A4NW, say) it can’t present front armour to both directions once there (maybe facing E to split the difference?). The IS-2 could also just choose to wait at somewhere like F1N and maybe clock it as it reverses into position, adding another risk. It’s got a difficult decision, I reckon.
Well, that was one of the less likely plays I thought the Jagdpanzer might make, for this very reason. Good thing I got there with twenty or thirty degrees to spare!
The question for me is whether to make the north crossing in the coming 60. It likely forces the Panther to move, if the loss of the JP doesn’t already. If he reverses, I probably have time to get to b2 or so and set up to catch him coming around the corner. If he comes forward and loops to his left around the buildings, he probably gets a shot at my side as I cross the bridge, but exposes his side or rear to a shot from the Sherman.
The main weakness of the IS-2 (beyond the weakness we all share—at distances in the tens to low hundreds of meters, armor doesn’t make a great deal of difference) is reload time, so keeping the Tiger pinned away from a potential tussle with the Panther makes my job easier. That’s also why I think I would hesitate to round the western corner of the university, given that the Tiger could shimmy up to the edge of the map and turn a 1v1 into a 1v2 for a moment.
Now that’s the kind of first turn I want to see. We’ve now put their panther under some pressure, we have opportunities to control the bridges, and I managed not to trundle right into the KT.
Looking at move speeds and turning rates, I think the KT has the option to about face before I can get behind it, and just sit there for a turn, waiting for T to catch up and pincer me. So a backstab feels too risky. If instead KT feels too threatened by me he may drive forward and either swing left or right into cover.
I have to decide if I want to advance SE and try to outpace T, or else turn around and hope to have either of the big cats creep into my view from the North.
I’ll likely be trying to get position on the Tiger this turn, either to keep it pinned away from you or to catch it while out in the open. I’m re-thinking my spot though – the KT reading my trajectory and going to g12 or e10 would put me in significant bother. g4ESE maybe?
Right now the big cats are safe. We have no way to cross the bridges due to the Panther, even if it backs up to A4 to cover the IS 2 approach, and the tigers can just take their time to pin me.
Containing the Tiger to the south does nothing for us. It could get the drop on you if it just decides to face east, knowing I’m not able to hit it from the south, and if it wants to follow me through the streets it can do so before you get to position.
I don’t see the KT going to either of those points though. There’s just too much opportunity for me to get behind it, and even if the Tiger goes east to C12 to cover it I can break west and escape.
The only way I see me getting out of here is if we flank the Panther, push it back from its current spot a few meters, and either I am able to break out to the middle of the map while it’s preoccupied, or we get the Sherman over the river. It’s a knife fight for me: I have to do the unexpected, try to get the big cats to pincer the wrong location, and wait for y’all to pressure the Panther into a mistake.
I suspect reversing to a4 would take the Panther a good part of the turn, and the 90-degree turret traverse between the north bridge and the Boleslav bridge makes it a much more compromised overwatch position.
In terms of forcing the Panther to make a mistake, I don’t think the KT can reach a position to cover the north bridge before I could cross it, and IS-2 front, possibly at an angle as I come off the bridge, vs. Panther side feels like a favorable exchange if he reverses to A4. (In particular now that I’ve done some reading on the Combat Mission forum: https://community.battlefront.com/topic/139068-panther-g-vs-is-2/)
I’m 100% in favor of you going across the north bridge. Just go FAST until you’ve got cover from enemies to the south. Reverse on the Panther can be faster than you expect. Once you’re behind it we can all come at it from both sides.
If you do decide to rush the bridge, then I think I could Sherman scurry up to I9 to poke my nose at the presumably retreating Panther. If I stick to the building I should have sights all the way up to A4 and could definitely stop any cheeky J-hook maneuver on its part.
We might end up trading lead that way, but it should keep that northern bridge clear for crossing.
Perhaps 10 or 20 seconds at I9, then scoot up to the building gap at H7 to peek at the planetarium.
I didn’t consider the J hook. That’s really good insight.
I think we’re better off avoiding the long sight line down A4 until next turn after the IS2 crosses the bridge, so we can do a true pincer. Otherwise we could lose you this turn, leaving the Panther free to turn around before the IS2 arrives.
The cheeky J-hook around the buildings at d6 is my concern, mainly—that would give the Panther a nice side shot at me as I cross the bridge and pull into the b2 region, and it’s possible I won’t even have a loaded gun by then.
The P is still in quite a strong position, looking at it again—he can give at either me or PressPass a hard time, depending on whether he reverses and continues to cover the long c6-a4 line, or whether he scoots around the corner and tries a shot at me.
If you delay a little bit, I could get to G5E before you break cover.
Perfect—maybe a 15-second pause, then a dash across the bridge. Finishing around b2SW (or aiming to finish at around b2SW), I think, sets me up well for future maneuvers south.
@Tim: looking to estimate my speed. Can you let me know at what timestamp I reached my final destination, how long the delay was before I started moving, and how long it took me to make my 90 degree turn?
Destination reached at T+50. Last turn (W to S) was a little messy and took roughly ten seconds. No delay at start of turn.
I’m going to u-turn. That way the Tiger and King Tiger shouldn’t be able to get to LoS on me this turn provided pathfinding goes ok, and I have an emergency exit rushing north if they both go north.
ORDER:
CLEAR TARGET
FAST B15sw
FAST C15s
HUNT C14s
COVER ARMOR north, anything I can see along the corridor as wide and far as reasonable
B15sw, or se?
REVISED ORDER: B15s instead of B15sw
Just get me around those buildings as cleanly as the AI will allow
TURN #2 ORDER:
PAUSE for 15 seconds
FAST to c1S with TARGET ARC from south to west
HUNT to b2SW with TARGET ARC from west to southeast
ORDER:
FAST to h5W
HUNT to g5E with TARGET ARC NW to SW
end facing west
TURN #2 ORDER:
– CLEAR previous orders
– PAUSE 10 seconds
– HUNT J10NW
– HUNT I8S
It might be too late, and I don’t want to quarterback, but I think you might not want a hunt order. Hunt means if you see the Panther you’ll stop future orders and trade shots head to head. A peek with a 15s pause followed by another QUICK or FAST might be safer.
Hrm, yes you’re not wrong there. I’m thinking that since the Panther was on the western edge of the gap, and I’m hopefully tight along the northern buildings, the angles are pretty narrow, and I don’t think an exchange is likely.
I’m thinking that if I catch the Panther he’s hopefully reversing already at that stage, hence the 10 second wait. If he J-hooks, I hope to catch his side or rear. But if he opts to just plant and watch, then I’m in real trouble.
I’m going to stew on it over the next hour or so here.
I should have listened! If only I’d listened!!
Hey hey, this looks like an awesome set of orders. Strong, somewhat predictable, conservative moves with the chance our opponents make a true blunder.
@Tim: how would you feel about making us a new Soviet Mess for the next turn? It’s already getting a bit hard to read.
>> how would you feel about making us a new Soviet Mess for the next turn? It’s already getting a bit hard to read.
I’d rather not create multiple mess posts. Would it help if everyone commenced mess posts with “TURN X” (X being the number of the next turn)?
TURN 2
I approve of this suggestion.
Flurry of activity in the German mess. Oh, to be a fly on that wall.
On that note: one of the next few turns might prove a good time for copperbottom’s trait—as we try to corner an enemy, knowing where he plans to juke would be quite the handy trick.
@Tim: can I clarify whether my trait works on targets in my own LoS only, or those in view of any Soviet tank? I’m assuming the former, but just to check.
@fishbreath: I’ll probably be using my trait at the earliest allowed opportunity. By then time there is LoS to the Germans there’s a solid chance I won’t be around on any future turns anyway.
The enemy unit must be in your LoS.
I do enjoy seeing the “most recent comments” chiming in on the right-hand side there. Looks like the kraut is busy!
I’m very much looking forward to the eventual opening up of both posts for cyber-archeologists to dredge through.
To any future German tank commanders who find themselves after-actioning in here:
“Get stuffed!! But also, well played and with honour…”
TURN 3
Ooft. We are in trouble now. The panther can turn north without much worry and Oneknown is running out of room fast…
TURN 3
Ouch. I don’t know how deep Combat Mission goes into armor simulation, but a hit on the bottom of the Panther mantlet to bounce a shell onto the hull roof below is about as neat a hit as you can as for.
There is nowhere with a good look down at the T-34 and Tigers, is there? Except maybe a bit southwest of the Panther. At least our T-34 is likely to get a first shot off if the Tiger tries to stick its nose in—even a mobility kill to a track or drive sprocket would be peachy, given the isolation of the brewery area.
‘Nothing’ is not what I expected out of the P, but I guess his sense for timing was a little better than ours. Note to self: moving in a straight line is fast, moving with direction changes is slow. Forcing the bridge is certainly a lot more fraught now, but I think I may still be able to reach a point where I can get the IS-2’s frontal armor into play before the Panther could take a shot at it. Or, maybe I play his game, and set up watching the bridges.
TURN 3
Alas staying still was 100% what I thought was most likely, hence my concern about using a HUNT instead of a FAST on the Sherman. We’re now in that worst case of the Panther being free to cover the north bridge.
Still, nothing to do about it now. We’ll miss you TV.
I think I have two options:
FAST north into the brewery, hope to dodge the Tiger with its slow turret rotation and take a shot at the KT rear.
REVERSE and try to hit T through the east keyhole, and leave myself an angle that covers the KT should it advance forwards
Neither is good. I expected the Tiger to go West not East, and now my exit is blocked. Without the Panther a sure kill next turn, I can’t expect any help for several minutes.
Forward seems risky—the Tiger’s slow turret traverse isn’t much of a handicap if he’s lined up on your alley and waiting for your hull to poke around the corner.
Good luck lads! I’m sad, but I had fun, gambled and paid the price!
TURN 3
I have written and deleted about three different posts trying to outline my thoughts for this turn. Suffice it to say that I am conflicted. One more circuitous attempt:
Any chance of saving Oneknown relies on the Panther dying quickly. Doing that requires either recklessness on the part of Fishbreath, or *extreme* recklessness on my own. Even if that works, there’s a solid chance that Oneknown will be dead before help can arrive regardless. In that event, some kind of retreat may be in order, but Fishbreath coming back East would leave the Germans easy access to the Southern bridge. Unless of course the Panther is dead, in which case they could occupy C6 themselves, and we could bottle the Tigers pretty well in the SW corner (at least, until their reinforcements arrive to help out).
Does anyone have a grand plan? A baby grand plan would be fine, too…
Edit:
@Tim – i’m aware that I’m chancing my arm here, but I don’t suppose muzzle brakes count for the purposes of ‘intuitive’ LoS, do they?
TURN 3
>> I don’t suppose muzzle brakes count for the purposes of ‘intuitive’ LoS, do they?
If you want to use your trait this turn, you can, but bear in mind, some aspects/legs of the Panther’s orders won’t be revealed.
TURN 3
I understand that feeling. We went from ‘nice pincer developing’ to ‘Panther can focus on one thing’ again very quickly, and despite it being a 3v3, we’re much less well placed for mutual support.
There are degrees of recklessness up north: I could stay where I am, which I think gives me a line on the south bridge, I could cross the bridge and cover from there (say b1, or so), which gives me a better angle on the Panther trying to sneak north while still watching the bridge, or I could go full send and round the corner on the Panther.
The latter doesn’t seem likely to succeed. Given the Panther’s choices so far, I kind of expect it to turn to cover the northern approach to c6 and otherwise stay put—conservative option but difficult to dislodge.
With the Tiger past the SU-100 overwatch, we will (as Oneknown remarked) have a hard time supporting him. Hardly anywhere on the map has a line into that southwestern corner.
I guess the best bet is still some kind of pincer on the panther, but without a turret I don’t like my angle of approach one bit. If you were to end this turn around a/b3 with me at h6, we could attack on turn 4? Feels dicey.
Very dicey.
Per my CMRT research, I have a decent chance of bouncing a Panther round from ‘fairly close’, but these knife fighting ranges might be closer than ‘fairly close’.
I think the Panther is *probably* more likely to cover north in some cautious, conservative way—reversing to a4, or moving north in some other way, seems a little out of character to me. Covering the north with turret rotation, or maybe moving to a6 to be able to keep an eye on both of us, feels more apt to me.
Oneknown called the Panther’s move exactly last time—maybe he has a better guess.
TURN 3
Don’t try to save me. My guess is the Panther won’t do anything drastic with the middle lane covered by our TD.
I would say getting to B3 as soon as possible puts the Panther in a position where he can’t cover both directions. That pins him in place until his buddies arrive.
Right now I think our best strat is to get control of the center, keep the Panther from joining up with friends, and wait for AI infantry support.
I’ll try to break out and stall for time, but I was always one wrong move from losing this one anyway.
Indeed. A convincing enough feint to get it’s attention to the north might be enough to let me get the first shot on it, though.
(this was supposed to be in reply to Fishbreath above)
ORDER TURN 3
FAST c1S
HUNT a3E, TARGET ARC west to south
PRAY for German missteps
(The Tiger and King Tiger aren’t in play at the moment, and I don’t expect either one to go for a bridge next turn, so closing on the Panther feels right.)
TURN 3
ORDER
COVER ARMOR half circle: North through East to South, say 150m
REVERSE C15s
FAST D15se
ORDER – TURN 3
REVERSE h5E, h5N
QUICK h6N (emphasis on the north, I’d like to be tight against the border with h5)
end facing towards E9, target arc west to south.
TURN 4
Things do not look promising for the T-34. Maybe the driver can get it back in gear fast enough to stay ahead of the Tiger’s gun.
Some Panther peek-a-boo up north. I don’t think I’m going to stick my nose out, but I’m open to suggestions for what to do next.
Tim, does our overhead surveillance extend as far as facing? Did the Panther volte-face before going north, or reverse?
One option would be for you to stay where you are and for me to go to H16, targeting the panther from there.
I expect we’ll see some Tigers attempting to cross the southern bridge, or otherwise move north, in the next few turns, which may stymie those plans. (Being able to catch them in the side armor as they cross would be great.)
If I were to back up a few squares, I could probably get a line onto the south bridge, at the cost of having to divide my attention between the Panther at the corner and longer shots to the south. (Although not too long. It’s only 400-500 meters, right?)
Yes, the Tigers are my concern, and my big question is how far each tank can expect to move in a minute. I’m guessing either tiger could appear at the south bridge early in turn 5 and that I’d be in-or-about position to fire at the end of this coming turn, which is tight for sure. The other moves that could mess me up are the tiger heading to the river bank (G12ish) or the Panther reversing to A6.
Tiger(s) to the south bridge feels pretty likely. I don’t think either one could get to the riverbank in the space of a turn—feels like a lot of maneuvering—but then again, maybe they can, given the KT’s movement last turn.
Was h16 a typo? That’s an awful long way to get in one turn.
My options, I think, are:
1. Nothing. Let the Panther come to me, or let it remain an impasse. Staying put pins the Panther, kind of, if you can get to a firing position on him fast.
2. Attack. I don’t think that’s a winning move either. He gets the first crack at me as I come around the corner.
3. Reverse a bit. If I go backward a few squares, I think I could watch the south bridge from up here, which makes things much harder on the Germans.
Reading the Panther’s mind is the main issue here. If he’s apt to turn again and try to cover you, then obviously I should come around the corner on him. If he stays put, then he probably knocks me out if I come around the corner.
H16 certainly was a typo – I meant h11. There and e8 are the only spots I could realistically engage from, but they would both leave me quite exposed on turn 5 (or, indeed, turn 4 should the panther change turret facing towards the end of the minute…). h11 is much closer to cover, which is why I’m considering it.
Though upon reflection, e8 is closer to cover, just also closer to the tigers current spot. Both options feel dicey, but crossing the bridge might be the lesser risk overall.
An alternative would be me going to somewhere like i8. I’d have a few options from there next turn, but none of them feel particularly strong.
I like any strat that doesn’t involve going head to head. Remember, they’ll probably shoot first in any quick draw.
>> Did the Panther volte-face before going north, or reverse?
No, it reversed a couple of tank lengths then did a 180. It’s now facing NNWish.
TURN 4
I’m basically dead. Even a one second delay and I’m toast. Honestly had the clock stopped 2 seconds before I think I would have the advantage. Still, I’m going to gun it and do my best. Biggest thing is that when I go to turn I’ll stop and turn because that’s how CM does it.
ORDER TURN 4:
REVERSE h5E
QUICK i8W
face SW
E8 and H11 aren’t worth it. Gobser in the Panther has paid attention to my position for the last two turns, and I think they will do so again with something like a reverse to the south. We need to stall for reinforcements and try and draw the opposition to us, if at all possible.
ORDER TURN 4
TARGET ARC WSW-SSW (i.e., the corner of the building, essentially)
PAUSE 30s
REVERSE b2W
TARGET ARC SW-SE (only as far SE as needed to cover the south bridge)
I was pondering waiting for a full turn, which would put me in a good spot if the Panther decided to turn around and pick up the overwatch position again, but I don’t think I expect him to do anything but chill where he is and kinda-sorta pin me in place. I will wait 30 seconds to give myself the best chance of winning the quick draw, though, if he tries to come around the corner at me.
That would be a little out of character for him, but waiting is a little out of character for me, so maybe I’ll get lucky.
TURN 4
@Tim apologies for being a few hours late. Hopefully it’s forgiveable.
Going to give more precise maneuvers than the grid coordinates. It might not matter, but I want to try to circle around the big cat if I can
ORDER
If the AI gave me a Target line on the KT, leave it
If the AI still has my cover arc, CLEAR TARGET, then target the KT
FAST about 15 degrees right, aiming to put me just right of that angled house in front of me, with a little room to turn
FAST about 60 degrees right of my original facing, aiming to put me on those two patches of bare ground
FAST to the spot on the right, center edge of the photo, along the KT’s left side. Probably another 60 degree turn. Might be E17w but it’s hard to tell
FAST to D17sw, then directly west along the buildings
Bravo!
TURN 4
Are you not entertained?!
What a rush. Let’s not do that again.
TURN 4
@Tim: I’m very glad you waited for my orders. Thank you.
Can you let me know if the KT has advanced north after losing sight of me? Do I know its turret angle right now?
KT ends the turn heading north circa c15S.
lodowice04f.jpg (you’ll need to zoom in) shows its current position and turret angle.
Turn 5
Well played Oneknown! Though with German reinforcements due imminently, I fear more heroics will be required soon…
With neither tiger moving toward South Bridge, I reckon that I am clear to dash to h11N to target the panther. I *think* I should be able to see it if I am tight against the bank, though I’d have a big angle to turn through if Gobser predicts it and has their turret turned. I’m leaning towards worth the risk. Thoughts?
My main concern there would be the Tiger moving northeast, and thus able to get a shot off at you as you head south.
My secondary concern would be the Panther commander spotting you anyway regardless of facing, and swinging the turret around to engage even without an explicit order to do same. This also comes up if you aren’t totally in position by the end of this 60, but the SU-100 seems to be pretty sprightly.
I think the former is a bigger risk than the latter, but that depends on the Tiger divining your intentions.
TURN 5
I’m in a fairly strong position now, I think, able to react to any northward Panther moves while still covering the bridges. My mobility is relatively limited, though—I can’t really go forward on the river side of the university, since that gives the Panther an opportunity to get behind me; I can’t advance since he’s waiting for that; and I don’t gain anything by reversing across the bridge.
I’m inclined to stay, maybe adjusting facing a bit to present some unfortunate angles to the Panther.
As for the other German units, I think expecting Oneknown’s demise explains their choices—the T heads north because the T-34 is cornered, the KT expects to get the kill then join it on the way up to pincer me and/or pin the SU-100.
We’ve been pretty reactive so far—does anyone have thoughts on a longer-term plan, some way to get the numbers in our favor?
As an aside, I’ll be traveling this week—on British time, as it happens!—so may not be as able to contribute to planning discussions, on account of phone commenting is tough.
I think being largely reactive is an inevitable consequence of the circumstances (no fog of war, close range engagements, deathmatch victory conditions). That said, the big complicating factor approaching is the AI infantry reinforcements, with Germans coming from the SW and our own from the NE (I haven’t hallucinated the last part, right? Just to check, as I can’t find the post where Tim gave that info). As it is, I think we are currently a bit over-extended and if we hold current positions we are likely to face combined arms from the Germans before our own infantry support arrives. Broadly speaking, I think that falling back a bit until we know what kind of forces are coming and where the AI is going to send them makes sense.
There is a good reason we are so far forward – Oneknown’s starting position and trait combo threw a veritable pigeon among the cats, drawing both sides’ attention to that corner. But I think the time is approaching where the T-34 will have to attempt a breakout northwards regardless. Getting rid of the Panther really would help both you and Oneknown, so I’m inclined to go for h11 this turn. Thereafter, I think that our derring-do quotient is pretty much used up and it’s time to fall back.
Fair enough! I wonder if moving a little will help keep the Panther’s attention on me, even if I’m not in direct line of sight.
Does the combat AI consider sound contacts in determining where to point a turret?
TURN 5
I think I need to get in and fight this cat before it corners me. Aggression will be the name of my game. I’ll set up an ambush in case he tries to flank me, then charge forward if he doesn’t.
Ideally I’ll be in a position to threaten the Tiger next turn, but it’s all on a bit of a gamble right now that the KT won’t just hunker down and hit my side as I go by.
But the Tiger doesn’t need to head south again just yet. It can just cover the middle and knock out our TD while it repositions. I think we need to line ourselves up where both of you can hit the Panther on the same turn, and to do that we need to get across that bridge. I think hunting across it, and not going too far, could get us what we want.
Remember, we lose in most head to head situations.
ORDER
CLEAR TARGET
COVER ARMOR 90 degrees, from northwest to northeast, pretty far
FAST B16se, trying to keep the building to the east so I can’t be hit by a flank shot
PAUSE 20
FAST B14-
TURN 5 ORDER:
Face SSW
Keep the same target arc as Turn 4
ORDER, TURN 5
FAST h9SE
FAST i10SW
QUICK h11NE
HUNT h11N, close to the river bank, target arc NNW to NWW
End facing a4-, same target arc.
I won’t be crossing the river in a turretless tank in a hurry. I think we are already pretty far forward and don’t fancy my odds of getting back across again. I’m not super concerned by the tiger (this turn, at least) as it has to concern itself with the T-34 again and I don’t forsee it moving towards the river bank. Head-to-heads are rough for us, but I’m hoping my path will reduce the time it takes to turn and address the target.
TURN 6
Ouch. Well, 3v2, and I think my next goal is to get back across the river. There are an awful lot of Germans over here, and not a lot of distractions for them, anymore.
North bridge, or center? I can make the north bridge happen, or start to happen, this turn, but the center bridge lets copperbottom cover me.
(A drawback to being on Tim’s side of the Atlantic is that I have to wake up, and then wait, for the morning update.)
If you want to cross back, I’d choose North Bridge. It’d be more than a turn just to get to Boleslav Bridge and you’d be almost guaranteed a tussle with the tiger en route. The Panther is unlikely to advance next turn due to my current angle, but I don’t want to stay there – the two tigers may well be looking to pincer me soon, I need to start withdrawing too. I can’t go back north via Willow street due to the tiger, so I think I’ll be heading East and coming up past the Church. I could end next turn around i9 to try and keep the germans from chasing for another turn, but then I probably need to be gone.
I should also say that, as I’m getting married on Saturday, I’ll need to get my order in early. If there’s a specific action you’d like me to take please let me know soon!
>> I’m getting married on Saturday,
Congratulations! I think that calls for a special logo tile.
ORDER, TURN 6
FAST i10NE
QUICK i9SE
end facing NWW, target arc W to NW
As above, my initial thought is to stall the panther and tiger by giving them reason to pause, before probably retreating east the turn after. If you have objections I’ll reconsider, but want to get a preliminary order in now.
With the Panther pinned and the Tiger tucked away, I’m pretty comfortable running across the north bridge this turn. Maybe we’ll luck into one of them trying to stick its nose out while you’re still on i9 or thereabouts.
We may be able to set up some interlocking fields of fire to cover the bridges and the easy spots for taking shots across the river, but we’ll have to leave that for the next turn–this is difficult to do on a phone, and between your wedding (congratulations!) and my travel, there are distractions aplenty ongoing.
Tim, would it be possible to set the deadline for the turn after this to, say, Thursday the 10th? I should be back at a computer and de-jet-lagged by then, and copperbottom’s spouse-to-be might appreciate a few days extra!
>>Tim, would it be possible to set the deadline for the turn after this to, say Thursday the 10th?
Yes, no problem.
TURN 6 ORDER
FAST d1SE
FACE S
TARGET ARC approx WSW to SSE (covering the north edge of the university and what I can see of the south bridge)
Modification if possible and not too late: target aft, on the way up to the bridge, in the event the Panther tries to cross the SU-100’s line of fire and come up for a shot on me.
TURN 6
A darn shame, chaps. I suppose I should have listened to my own advice that a head on head probably wouldn’t go my way. Alas that’s how it goes. Good luck in the remaining turns. I’ll be rooting for you.
Feel free to stick around and strategize!
After tomorrow’s update, I’m going to try to work out a way to bait them into coming into someone’s line of fire.