Control one of the German AFVs in THC’s 2023 play-by-comment Combat mission game? Use the comment section of this password-protected post to discuss tactics with your comrades, and communicate orders to me, the GM.

Control one of the German AFVs in THC’s 2023 play-by-comment Combat mission game? Use the comment section of this password-protected post to discuss tactics with your comrades, and communicate orders to me, the GM.
Comments are closed.
I now see three possible ways to bring Lions of Lodowice to a conclusion:
1. Restart with random spawns and ‘golden goal’ rule (first kill wins the game) in place. (a_monk not keen on this option)
2. Declare a draw.
3. Completely ditch FoW and declare Boleslav Bridge a VL (Control of this at the end of the game will determine outcome).
I’ll go with whichever option gets the most votes (this message will also appear in the other mess).
Tim,
Option 3 is quite an interesting Conclusion/Challenge. Since I’m not too familiar with VL, could you precise what you mean by control of the Boleslav Bridge?
Does that mean that we need to have forces at both side of the bridge?
VL = Victory Location. If the game ended with neither side controlling both ends of the bridge, I’d assess the situation and pronounce accordingly.
I think my preferences would be 3, 2 then 1. The problem with 1 is it doesn’t address the issue of everyone just sitting on their side of the river and waiting for the other side to get bored and do something rash.
Is Boleslav the middle bridge BTW?
Sorry for being absent for a spell, I got quite suddenly and quite savagely incapable of commanding any unit, or even respond/read (read, very ill).
I’m back on track.
Option 3, declaring the Boleslav Bridge a sole VP seems the most productive AND spectacular for the readers, but I would also offer a strict shortened turn limit perhaps, so that we don’t beat around the bush too much.
The Soviets, of course, will have a little bit of a disadvantage, it seems, but this would be the same regardless
@Tim, Thanks for your confirmation. I vote for the option 3 then.
@VFRHawk, Yes, Boleslav Bridge is the central bridge.
@Gobser, Welcome back!
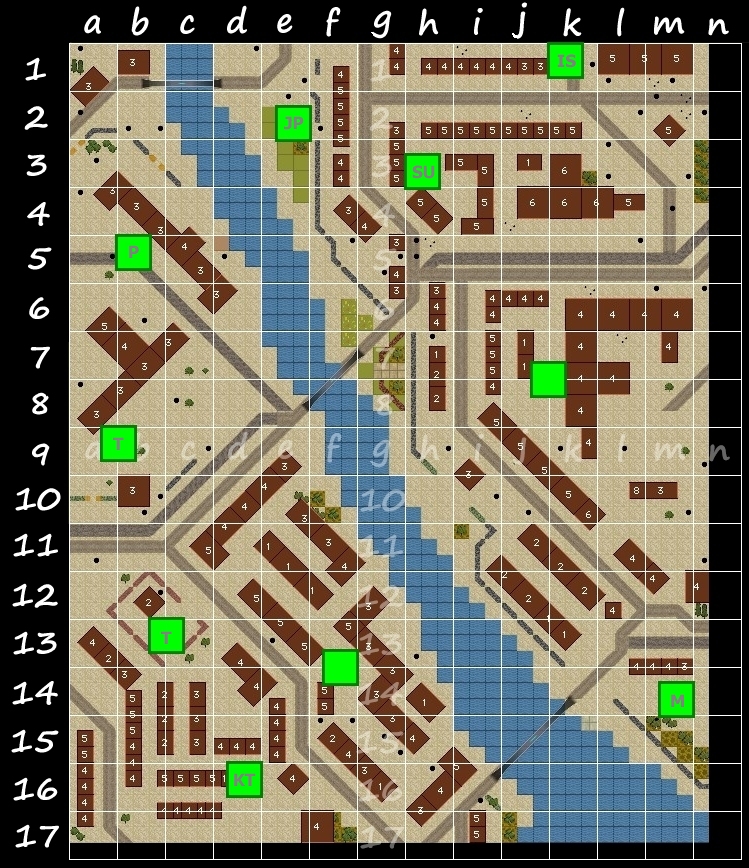
If the option 3 is chosen, we will need a plan for the incoming turns. At the moment, I think the best strategy is to use the south bridge to bring force to the building circa J11. For example, one PF (Anti-tank) team and one scout team. Then, push with other troops from the central bridge. The Tiger or a truck can be used as a transport for the infantry. One of the PF team could also try to sneak near the half-track in J8 to neutralise it.
I plan to move the Tiger to E10 for next turn.
For Infantry, we have at the moment 2x Scout Team, 2x Anti Tank team (both aboard trucks), 1x LMG Team and 2x crews of survivors (1x from the Panther and 1x the King Tiger). That’s not much, but if we move fast enough, we could keep the advantage.
I’m not sure what would be better, move the pf team from the central area down to the south bridge, pick up the scout team and truck them across with the LMG team covering, or use the scout team on foot across the bridge first, so as to flush anything the other side, then move the pf team across if it’s clear? One is slower but safer, the other quicker. Probably prefer moving the scout team across on foot first but it does signal our intent..
Well, we have now 2x PF team: one in the truck in D12 and the other one in the second truck in A14.
So, we don’t really have to choose. We can leave the team in D12 near the central bridge, while the second one near A14 goes to the south bridge. In any case, if option 3 is accepted, there will be no more Fog of War (“Completely ditch FoW”). So secrecy will not be our main concern.
We can launch the scout on foot, while the LMG team cover them from the building and use the truck to bring the PF team across the bridge to join the scout team. Or the truck with the PF team makes a stop.
By the way, to keep track of who’s who, I think that we should give names to each infantry team. My suggestion:
– Team Gobser for Scout Team in E9
– Team Panther for the surviving crew of the tank of the same name in C5
– Team King Tiger for the surviving crew of the tank of the same name in E9
– Team Hawk for Scout team in I17
– Team Condor for the LMG Team in I16
– Team Eagle for the anti tank (PF) team in the truck in D12
– Team Falcon for the anti tank (PF) team in the truck in A14
We could also gives name to the trucks. Maybe something like Arnold (for D12 truck) and Lothar (for A14 truck). Let me know what you think of this idea.
My alternative move is not “Or the truck with the PF team makes a stop”. But rather, “Use the truck in A14 with the PF team and pick up the scout team in I17, then cross the bridge.”
Both moves are not without risk, but once the Fog of War is out, I expect the Soviet forces to adjust their position to ours. I also suspect that the Soviet have more infantry than us. So, acting quickly might be our best option, since we can’t rely on surprise anymore.
I don’t think that team Gobser crossing the bridge will achieve anything beacause we have no ability to put pressure on the enemy and lack concentrated firepower at range. Should we cross in the open – the team is dead and for no gain, I’d say.
To effectively cross, we’d need to have TIger slinging HE at anyone who dares to open up at us. And, anyway, it seems quite possible that we will get pinned in the middle of the bridge regardless
@Gobser.
We have been moving the trucks for a while now, so the Soviet must be aware that we are up to something. While I suspect that they may have more infantry than us, I doubt that they have a significantly superior force (at least for now). I also expect that they moved their infantry near the bridges to survey them, just as we did.
Personally, I would suggest to be aggressive now, even if we don’t have that much fire power. Using the FoW as cover, we could move team Hawk (Scout) from I17 through South Bridge to the house in L13-L14. They have the support of team Condor (LMG) in I16. We also have team Falcon (PF) en route to F16. We could send them to support team Hawk using the truck in order to mitigate the risks and move more quickly.
It won’t be easy, as we can expect some ambush from the Soviet infantry. If we successfully gain a foot on the eastern bank, Team Hawk would become a priority target for them, especially once the FoW is lifted. On the other hand, it could distract enough of the Soviet forces to the South to open the Boleslav Bridge to us. I think it is worth the sacrifice, even if it is very risky.
As an alternative strategy, we could choose to be more conservative and concentrate our forces on the west side of the river in various buildings and wait for the Soviet to come at us. Then, once we have the advantage and/or more fire power, try a push through the bridges. But with no more FoW, our infantry will become visible, so the Soviet SU-100 will be able to target them as soon as they are on the open. It could also fire directly at the building if it can target them.
Anyway, we will have a better idea of what we are up against by the end of next turn. We still have some time to discuss about our next move, so let me know what you think for next turn.
@Tim, could you tell us if more reinforcement is en route for us? Or do we already have all our forces?
I agree that pushing the scout team (team Hawk) across the bridge under the cover of the LMG team is a good start. I’d suggest holding the pf team (team Falcon) in F16 until that crossing is complete and the scout team can provide some more cover. At least if the scouts take some heat we haven’t lost any of our big hitters..
Option 3 it is. FoW will completely vanish for a reason yet to be determined during turn 16. Control of Boleslav Bridge by turn 30 is now the name of the game.
I’m going to be AFCMRT (Away From Combat Mission Red Thunder) until Tuesday night so let’s make that the new order deadline. I’ll aim to post a turn report on Wednesday morning.
—————————————————————————–
ORDER – Turn 16 Tiger
Keep Move Fast to E10
Set Target Arc H4-L9
—————————————————————————–
If possible
ORDER – Turn 16 King Tiger Crew
Clear any previous order
Move quick to G12 Building, top floor
Avoid bank, go via E10-F12
Once in position, observation only, survey H9 to L14
—————————————————————————–
ORDER – Turn 16 “Team Falcon” (PF) in Truck in A14
Do not dismount truck once its stops
—————————————————————————–
ORDER – Turn 16 Truck “Lothar” in A14
Move Fast to A16E following the road, then turn left to F16N, keep Fast speed, via C17.
Avoid the soviet tank.
Stops at F16E
—————————————————————————–
ORDER – Turn 16 “Team Hawk” (Scouts) in I17
Move as fast as possible across the southern bridge to the 4 storey building in L12 – the one that stands on its own on the south side of that square.
ORDER – Turn 16 “Team Eagle” (PF) in truck in D12
Dismount and move on to the top floor of the building nearest the central bridge in E9 as quickly as possible. Think those are its existing orders, but if not, that is to replace the existing orders. Target anything crossing or approaching the bridge from the East.
@a_monk I’m assuming thats what your after given your order to move the other pf team south in Lothar?
Yes, this is as I suggested.
Damn! We almost made it!
I’m a bit concerned by the lack of cover for the northern bridge. We appear to only have a tank crew our side, and they have both a scout and tank hunter squad there’s.
@Tim what are the tank crews armed with? Anything more substantial than a pistol?
Three men bailed out of both the Panther and the King Tiger. All of the survivors except for the KT’s TC (who is armed with an SMG) tote pistols.
Yeah, it is a shame for Team Hawk.
For the northern bridge, we didn’t put more forces because of the fog of war and also because the north bridge is partially blocked by the IS. I’m afraid that the tank crew won’t be able to do much against the soviet forces. Unfortunately, with our current forces, we can’t do much to defend the north part of the map.
After last turn report, our plan failed. With our current force, we can’t launch a direct assault. And I don’t really know how we can use effectively the Pak 40. At the moment, I can only think of defending our position. I have no idea how we can take that bridge.
I guess we could move the pf team from E9 to C7, that’d still give them some view of the bridge as well as northwards, though I doubt they’d be able to look both ways at once so I’d suggest have them look at the bridge initially once they get there, move the new AT gun up to maybe A12, sighting along the bridge. Once the AT gun is in place the pf team turns to look north instead?
Not ideal but I can’t see a way of covering all 3 bridges against an infantry incursion as well as armour. The other pf team in the truck down south probably needs to dismount and cover the south bridge – unless we move them back to cover the central bridge straight away and move the other pf team as above, though that would leave us without AT cover of the south bridge, and I’d prefer the AT gun covered the actual VL personally – though it could go to G17 or G18 I suppose. My gut feeling is as we assaulted across South bridge and they can see there’s a pf team near it they’re less likely to come at us that way – if they attack at all. We may end up back to the stalemate we were trying to break here.
After taking another look at the map, I don’t think we should move the PF team Eagle from E9. There is a sniper team in J9 and the SU-100 seems to be taking position in G4. So, I think we should keep Team Eagle in E9 for next turn, as they could have a try at shooting the SU from where they are. Don’t know if it could work, tho.
Regarding the PAK40, it seems to be a formidable force. It is composed with a team that handle the cannon, plus three men that can defend it with rifles. They also have a support team of two men with additional ammunition for the cannon. So, it could defend the northern part of the map by itself. But I don’t think it would make sense. The north bridge will be difficult to cross for the Soviet.
Another possibility could be to bring the PQK40 to the south, in I17 and have a shot at the scout team in K12, to avenge the scout team Hawk. But the position could be exposed to the Sniper team in J9.
The last option I could think of is to bring the Tiger to the South and let the PAK 40 cover the Boleslav Bridge. That way, it could also provide support should the Soviet comes from the north anyway.
Let me know what is your plan for next turn?
For next turn, The Tiger could:
– Support Gobser team in trying to cross the bridge
– Attack the SU-100
– Suppress the Sniper team in J9
– Move south to attack the scout team in K12
At the moment I think leaving the LMG team in place is best, so I’ve not really got any plans for this coming turn.
I think I have a window to try and cross. Should I?
(sorry for being unresponsive, my country is now suddenly at war, so I had to take care of some concerns.)
@Gobser
No problem, there is priority in life.
Where do you want to move? Do you need some assistance from the Tiger?
I think you should be careful tho, as there is a Sniper team in J9 and the SU100 seems to be willing to take position in G4. Both have a good view on the Bridge.
If you want to cross, it could be a good idea to have suppressing fire first. The Tiger could do that on the sniper team or the SU. The Team Eagle (PF) can also have a try at the SU should he shows up at G4. Alternatively, The Tiger can carry them through the bridge.
Let us know what you want to do.
SU is always a priority, but if the Tiger could area fire some HE and/or burst from its MG, I think it would suppress the sniper well enough. I am not really worried about the SU, as it is unlikely to waste time, shots and positioning trying to pin a scout team, and even if it does – easy pickings for TIger’s 88, which our lives well spent.
So how about team Gobser delays for 15-20 sec, so that the Tiger can shake the sniper, and then theydouble time it across? I do not expect to complete the move, but if we synchronize, I’d say we could overwhelm their reaction.
Not foolproof, but could help us win the initiative.
If I am somehow delayed with my orders, i delegate my team to those who will be willing, with this idea as a guideline, unless it is deemed stupid.
I will try to check on the communication sooner, but I want to have a precaution in case I am myself delayed
I’ve run a few tests to see how we can do this.
The bad news is that the Tiger needs to move forward to be able to attack the sniper team, which expose him to the SU. I also check the PF team equipment and I think they can’t reach the SU. It’s too far for their Panzerfaust (they need a Panzerschreck to reach the SU). So, the Tiger will have to attack the SU first. I think the Tiger need at least 30 seconds to deal with it.
There is also the issue of the Sherman Team in H7. Unless they are in panic, they are dangerous for your scout team, so I would like to avoid loosing more troops if possible.
The good news is that the LMG team (Condor) can provide suppressing fire on the sniper team. Once the SU is destroyed or retreat, the Tiger will be able to focus on the Sherman Team and the Sniper team with a couple of shell. But I’m afraid it could delay the crossing of the bridge by one turn.
For your information, I also check the PAK40. They can move only at the standard speed by themselves. In other word, they need quite some time to reach a position or to move to another one. We need to think carefully where we want to place them, as it will be difficult to move them around. To move them faster, we can use one of the truck (maybe Arnold in D12).
Tim,
I have a question regarding the equipment of the PF team in E9 and F16. Are they equipped with Panzerfaust or with Panzerschreck?
@Tim,
Sorry to repost, but I have a question regarding the equipment of the PF team in E9 and F16. Are they equipped with Panzerfaust or with Panzerschreck?
Here are my order for the Tiger and few other teams. If it need correction, let me know:
—————————————————————————–
ORDER – Turn 17 Tiger
Set Target Arc F3-I3
Move Fast to E10, Adjust Target Arc F3-I3 or Target directly the SU if possible.
At T+30, target Sherman Crew in building at junction of H7-H8
At T+45, target Halftrack in I8-J8
Tim, if the last two orders are too complicated to implement, priority goes to targeting the Sherman Crew in H7-H8 building
—————————————————————————–
If possible
ORDER – Turn 17 King Tiger Crew
Clear any previous order
Move quick to F15 Building, top floor
Avoid bank, go via E10-F12
Once in position, observation only, survey H9 to L14
—————————————————————————–
ORDER – Turn 17 PF Team in Truck in F16
Dismount truck, move quick to I17N,
Enter Building, move to top floor
—————————————————————————–
ORDER – Turn 17 Truck in F16 + PAK Team and Ammo Bearer Team in A17
Let the PF Team disembark.
Then, move Fast to A17. Avoid the soviet tank.
Pick PAK40, embark its crew and the Ammo Bearer Team
Move Fast to A10 using northern path A13
—————————————————————————–
ORDER – Turn 17 Truck in D12
Move Fast to F16E
—————————————————————————–
ORDER – Turn 17 LMG Team in I15-I16
Target Soviet Sniper team position in J9 Building for suppressing fire
—————————————————————————–
Team Gobser ORDERS:
1) wait 15s
2) fast move to E8S
3) Fast move to F7E
4) move to G6NE
It will take time for the Tiger to suppress the soviet sherman crew. I fear that a delay of 15 seconds may be too little. At the very least, I would recommand to wait until t+20s
correction on ORDERS:
1)delay 20s instead of 15s
—————————————————————————–
ORDER – Turn 18 Tiger
Set Target Arc F3-I3
Move Fast to E10NE, Adjust Target Arc F3-I3
—————————————————————————–
If possible
ORDER – Turn 18 King Tiger Crew
Clear any previous order
Move quick to F15 Building, top floor
Avoid bank, go via E10-F12
Once in position, observation only, survey H9 to L14
—————————————————————————–
ORDER – Turn 17 PF Team in F17
Move quick to I17N,
Enter Building, move to top floor, Face NE to survey bridge
—————————————————————————–
ORDER – Turn 17 Truck + PAK Team and Ammo Bearer Team in A17
If not already done: Pick PAK40, embark its crew and the Ammo Bearer Team
Move Fast to F14SE, dismount PAK 40 crew and ammo Bearer
Move PAK40 + PAK Team to F13, target building J9
Move Ammo Bearer Team to G13 building first floor
—————————————————————————–
ORDER – Turn 17 Truck in E14
Move Fast to F16E, then stop
—————————————————————————–
ORDER – Turn 17 LMG Team in I15-I16
Target Soviet Sniper team position in J9 Building for suppressing fire
—————————————————————————–
Tim,
I have a question regarding the equipment of the German PF teams. Are they equipped with Panzerfaust or with Panzerschreck?
Good job a_monk! Finally, a kill.
OK, given they’re probably going to have to try and push down from the north to have any hope now, is it worth moving the LMG team up to the central row of buildings? Maybe the 4 storey one in E10NW so they aren’t in the same building everyone else is?
Leaves the other AT team covering the southern bridge. I’m assuming they have at least rifles not just AT grenades.
VFRHawk, thanks! I m really happy. But I don’t forget that it was a team effort to survive until now.
For next turn, here are my thought:
– I think the best way to stop the northern move is by going there with the Tiger. I need to be careful with the AT team, so I don t now yet how which path I will choose.
– I hope that the Tiger will be enough of a distraction so that the Panther team will be able to help in this fight
– Regarding the idea of moving the LMG team, I don’t think it is needed. There are pinning the soviet scout team, and moving them now would expose them. The Pak40 and its team should arrive soon to the middle of the map, so I think they are a good reinforcement for the scout team and AT Team.
– I really wish we had a company of standard infantry to help us!! Unfortunately, we don’t have any at the moment, so we need to use what we have.
Let me know what you want to do next turn?
Yeah, the LMG team is the only really good anti-infantry infantry we have, so its a coin toss as to where they’re best employed. I’m happy for them to stay put.
As for the Tiger, I can see 2 options to cover the infantry coming down from the north:
A6, specifically to cover them coming around the rear of the river front buildings
or
C11 facing North or North East
I think I’d prefer the second one as it lets that infantry come to us, and presumably could have a target arc to cover the bridge and all the avenues of approach for that infantry. It also gets you back further from the river away from any AT teams that might get there. Up to you obviously, just my thoughts.
I assume the expectation is that the Pak40 will arrive and start setting up this turn?
Well, I’m tempted to move the Tiger up to D5 or C6. It really depends on the time needed for the soviet infantry up north to reach their destination, because I don’t see any other threat in the area at the moment.
Since I want the Tiger to stay safe, the best solution is to keep some distance. But I also need to take into account the Panther Crew safety.
Regarding the PAK40, yes, I hope that it can be in position by the end of next turn. Finger crossed! At the moment, I ordered them to come to G13, so they can deal with the sniper team. After that, I would like to use them to press the soviet from our side of the river, while the Tiger help some of the infantry left to cross the river. But we will see for this part of the plan when we have deal with the soviet troops in the North
Guys, sorry, I completely lost my mental hands on the discussion. I have to ask that you substitute me.
From now on I will only be cheering you on. Go for it, you have almost won!
I’m sorry to ear that. Thanks for your support along the way.
Tim, orders for next turn. It includes other team member, as Gobser retired.
—————————————————————————–
ORDER – Turn 19 Tiger
Clear Target order
Move Fast to D6E, Set Target Arc A2W-D1E,
Try to attack enemy troop from afar if possible, do not come near them
—————————————————————————–
If possible
ORDER – Turn 19 King Tiger Crew
Clear any previous order
Move quick to F15 Building, top floor
Avoid bank, go via E10-F12
Once in position, observation only, survey H9 to L14
—————————————————————————–
ORDER – Turn 19 PF Team in F17
Enter Building in I17N, move to top floor, Face NE to survey bridge.
Defend position in case of enemy incursion.
—————————————————————————–
ORDER – Turn 19 Truck + PAK Team and Ammo Bearer Team in A17
If not already done: Pick PAK40, embark its crew and the Ammo Bearer Team
Move Fast to F14SE, dismount PAK 40 crew and ammo Bearer
Move PAK Team to F13, target building J9
Move Ammo Bearer Team to G13 building first floor
—————————————————————————–
ORDER – Turn 19 Scout Team in E9
Move Quick to F10 Building, Take cover in the highest floor
—————————————————————————–
ORDER – Turn 19 PF Team in E9
Take cover in the floor with better cover
—————————————————————————–
ORDER – Turn 19 LMG Team in I15-I16
Target Soviet Sniper team position in J9 Building for suppressing fire
—————————————————————————–
ORDER – Turn 19 Panther Crew
Open Fire on Soviet Troops, if possible. Do not move from where you are.
—————————————————————————–