
On May 29th, 1981, after decades of dimpik rattling, the People’s Republic of Podrabia pulled said dimpik from its scabbard and thrust it deep into the eastern side of its smaller, weaker* neighbour, Zendora. Podrabia’s autocratic president, Anton Kubman, called the invasion a “border consolidation exercise” and boasted it would achieve its goals in three days. The tin-pot Ozymandias hadn’t bargained for the pluck, determination, and tactical ingenuity of the Zendorans.
* On paper

Powered by Combat Mission: Cold War, this year’s play-by-comment CM experiment recreates the pivotal Strupnic ambush. On June 5th, 1981, aware that a sizeable enemy armoured column was approaching their capital along the M2 highway, the Zendorans hatched and launched Operation Oryx. While one special forces unit seized and blew up the Bile Ribnica dam, inundating the plain traversed by the M2, another slipped through enemy lines under cover of darkness, intending to ambush the confined tank caravan from a rocky protuberance known as ‘King Petar’s Arse’.

The plan almost miscarried. Unable to reach their objective (the flooding was more extensive than the hydrologists had predicted) the ambushers were forced to part company with their MBTs and divert to a less advantageous spot. Delayed and depleted, they arrived on the outskirts of the village of Strupnic a quarter of an hour before the convoy was due to pass. Tally-Ho Corner’s battle choreography begins a minute or two after the jeep carrying Major Trajanov – the architect of Operation Oryx and the leader of the expedition – is flagged down by local resident, Branko Somlac.

Branko warns the infantry-poor ambushers that the village is occupied by a party of Podrabian troops. He volunteers to take Trajanov to his brother’s house on the foe-free southern edge of the village. Viktor Somlac has been keeping tabs on the ‘Pods’ from the top of the local dovecot (Like most settlements in the region, Strupnic boasts a magnificent castellated pigeon tower) and consequently should be able to provide plenty of useful intel about their strength and positions. Better still, he’s in possession of a ‘liberated’ Podrabian vehicle which should prove bally useful in the coming battle.
The Objective

Greetings Comment Commanders! This year your goal is a pretty straightforward one. During the nexty thirty minutes/turns, using the slim selection of somewhat fragile assets available to you, destroy as much Podrabian armour as you can. The number of hostile vehicles that escape across the map’s western edge will impact my after-action performance assessment, as will friendly losses, and damage to local abodes.
The Venue

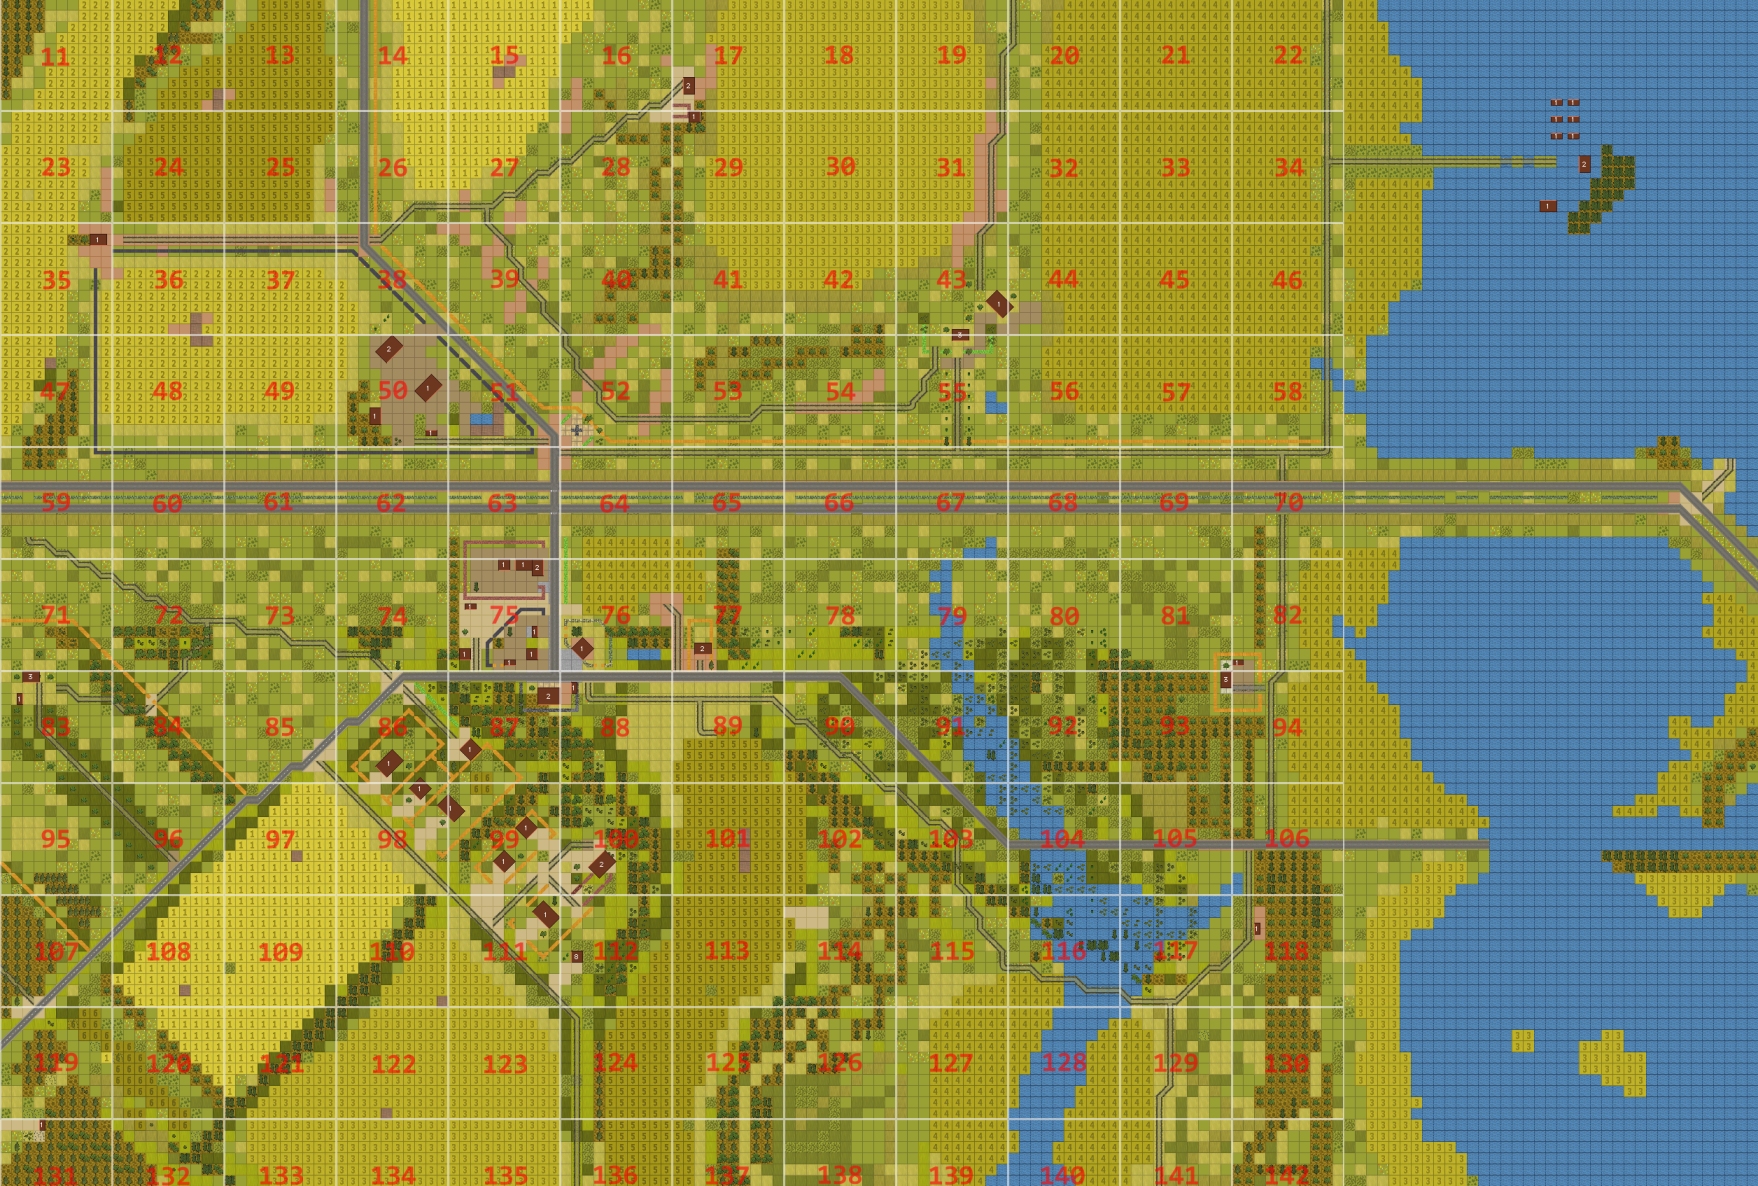
A modded version of a stock map, the 1500m x 840m battleground is basically flat except for the 2m-high LoS-interrupting highway embankment highlighted in pink in the screenshot below, and the 1m-high berms highlighted in purple.

Assuming they avoid flooded areas, ponds, and the handful of walled yards and gardens (the light orange lines on the map represent fences), vehicles should be able to go just about anywhere with little risk of bogging or immobilisation.

I’m trialling a new coordinates system this year. At first glance it seems more complicated than the old one, but I’m fairly confident it will actually prove friendlier. To give a detailed movement instruction, you’ll now need to provide three numbers – the large ‘box’ containing the destination square, followed by x & y coordinates indicating the precise square. In the screenshot above the square highlighted in purple is 62,10x,3y. The one highlighted in green is 63,3x,9y. At times providing x and y info won’t be necessary. For example you may find yourself typing “Target the truck in box 64” or “Reverse back down the road, halting on the edge of box 101”
Various views of Strupnic and its environs:

^ Looking westward. The Zendorans begin the scenario in the woodland in the top-left of the image.

^ The view North across the village. The transparent house belongs to local resistance fighter Viktor Somlac.

^ Looking SE.

^ The village centre. The half-timbered building on the left is the hotel. On the right is the garage.
The Enemy

Intel reports indicate that the convoy consists of around 30 vehicles, the majority of which are MBTs. As most of Podrabia’s tanks are T-62s, expect to encounter a fair few of these Sixties throwbacks in the turns ahead. Since crossing the border the convoy hasn’t exactly dawdled. We suspect it will try to bypass trouble rather than confront it, but anything is possible.
Your Units

In 1981 the Zendoran Army fielded an eclectic mix of NATO, Warsaw Pact, and locally produced equipment. Champing at the bit in the south-west corner of the map at the start of the scenario are…

^ A BRDM-2 recon vehicle with a three-man, LAW-equipped recon team aboard in addition to its two-man crew.

^ The M151A2 ‘Mutt’ transporting Major Trajanov and his radio operator.

^ A Mutt adapted for tank hunting. In CMCW M15A2 (TOW)’s carry an impressive eight missiles, but inexplicably (?) seem reluctant to use the last three unless the launcher is first removed from the Mutt and deployed on the ground. In both configurations reload time is circa 30 seconds.

^ A purloined truck carrying a two-man Dragon AT team (3 missiles, 30 second reload time), a two-man M60 LMG team, and a three-man 60mm light mortar crew (30 HE, 6 WP).

^ Two loaded M113 APCs, one of which is about to depart without disembarking its passengers because Trajanov has just decided that his off-map heavy mortar battery (two 107mm tubes) needs additional protection. (The first player to issue an order to an M113 effectively decides whether it’s the APC carrying the two three-man LAW-equipped recon teams, or the APC carrying the four-man grenade launcher team that participates in the coming battle.)
Reinforcements? Slightly delayed by a map-reading blunder is a second TOW M151A2, and a Mutt taxiing a forward observer team – the eyes of the aforementioned heavy mortar battery. Oh, and be sure to talk to Viktor.
Communal Combat Mission Basics

Just in case you weren’t around for last year’s Dutch escapade, here’s how Play By Comment Combat Mission works. Every turn, via a comment along the lines of “Turn 1 orders here, please…” I solicit written instructions for friendly forces. Orders are accepted on a first-come-first-served basis with individual commenters usually only permitted to ‘move’ a single vehicle, infantry squad, or weapon team per turn. Embarked infantry and their transports are treated as single units until separated.
For example… in Turn #1 Invincible_Vince might direct Trajanov’s jeep to Viktor’s house while Cherubik manoeuvres the BRDM, and SlowDoris does something with the M113. During the next order round Concordski might order the disembarked scouts to investigate the building at 75,2,2, while LMF retasks the APC, and Shropshire_Lass oversees the armoured car.

On the evening before a turn report appears (My intention is to post turn tales on Monday mornings and, possibly, Thursday mornings too) I’ll execute all issued orders and record what happens. Did our nippy TOW-truck nail that cocksure T-62? Did the scouts manage to cross the road unscathed ? All will be revealed.

Keen to reward the readers who, by subscribing, are ensuring the survival of THC, I’ve decided that some of the units participating in Operation Oryx will answer only to Comment Commanders with brown names. If you’ve subscribed and have yet to be browned, or have donated this year and would like to be browned for the duration of Operation Oryx, please contact me and I’ll do what needs to be done.
Order Issuing

You don’t need to understand the intricacies of Combat Mission: Cold War in order to participate. Consider the tactical situation, and provide a destination coordinate and perhaps a clue to pace/cautiousness and I’ll do my best to translate your instructions into successful in-game orders.
During the sixty-second non-intervention ‘action phases’ that follow order issuing, units may encounter a threat or target that causes them to abandon or modify your instructions. For example, vehicles can decide to reverse if they don’t like the situation they find themselves in. Specific targeting instructions may be issued but usually combatants can be relied upon to self-select targets sensibly.
CM’s hidden ‘hotspot’ system can make fine control of infantry tricky, and the game’s mortar limitations may surprise newcomers used to the more relaxed/speedy approaches to indirect fire in other titles.
The CMSF2 demo is a great place to start if you’re unfamiliar with CM play mechanics. I’ll do my best to answer any technical questions that arise, but as I know the original trio better than I know the second gen titles, I’d be very grateful if spectators and players with more experience furnished explanations and proffered advice too.

Good hunting, Comment Commanders, and Slava Zendora!

Turn 1 orders here, please. Commenters are cordially invited to suggest moves for the following units (A maximum of one unit per commenter. Embarked infantry and their taxis count as single units until separated.)
(See screenshot for unit locations)
****anyone****
Truck and passengers (light mortar team, MG team, Dragon team)
TOW Mutt
****subscribers only****
BRDM-2 (recon team aboard)
Trajanov and his taxi
M113 with recon teams *OR* M113 with grenade launcher team (SEE TEXT)
Please start all order comments with ‘ORDER’ and any later revision comments with ‘REVISED ORDER’. This will help me distinguish firm instructions from suggestions and advice.
Combat Mission! Combat Mission!
Initial impressions:
Our best AT asset is probably that TOW, and the most obvious place for it is probably that highlighted purple berm, or the Dovecote.
Engagement ranges for ATGMs should be a lot longer than the WW2 titles, but I am under the impression that Dragons are… not very accurate. I’m not sure whether they should be used as stand-off weapons or for close-in ambushes.
Personally, I’d rather we have more LAWs than a grenade launcher team, if we’re dealing with a tank column.
Although the CMCW manual isn’t very enthusiastic about the Dragon, during my playtests it performed well.
Hurrah it’s here!
100% agree in regards to keeping the law and sending the Mk19 to chum around with the mortars. From what I understand 40mm can damage optics and have a long-shot at tracks, but isn’t going to do much in regards to our armoured opponents.
I’m going to dive in first to get the ball moving, though I’ll happily adjust orders if others suggest otherwise. Order first, then thoughts below.
ORDER: M113 with 2 LAW teams to FAST MOVE along the road to (96, 10X, 6Y) or so, then to take a hard left following the tree line to (71, 6X, 1Y). LAW teams to disembark and FAST MOVE, with the last few metres set to SLOW, using the trees for cover. One to the copse in 72, with good LOS on the road, and the other to cross the road at the far W side of 59 as quickly as possible to (59, 2X, 10Y), then crawl forward to the edge of the woods.
Based on what we have (few infantry squads, some ATGMs, some close range AT), I vote to stay well clear of the village itself (75, 76, 77). It’s not clear to me if the New Farm at 50 is occupied, though I’m not sure if trying to move in will result in unnecessary casualties, as cerderic pointed out.
One possible kill-zone is the stretch of road from 59-62: we could do an L-shaped ambush from the N Woods (47) and the S Woods (71, 72, 84), with the LAWs close to the road and the TOW at the far SE end of the woods at 72. The risk is that the open ground might make it hard to pull back if things go pear-shaped.
NOTE: As CaptainSlackBladder points out, I’m a bit unsure about pushing the LAW team across the road, but my thought is that they’re a small recon team, so limited risk for us. I’ll happily put them elsewhere if people feel it’s an unnecessary gamble.
I´d agree, but I do wonder if the effective ranges for the LAWs are enough to cover the road up to 62 and 63. The open area might also mean several hostiles might draw LOS to them at the same time.
In any case supporting them with a longer ranged unit is a good idea. I´d recommend the Dragon somehwhere west of the village (SW of 86?), hoping for side armour hits. Also, I have hopes of using the Mutt-TOW somewhere else. See below.
Hmm…good point. I agree with your points raised below about keyhole positions, though there’s scant few positions West of the little town. Honestly, it was probably a really good move for OPFOR to occupy and secure the town ahead of time with infantry.
I’ll revise the order to move the LAW teams a little further East.
REVISED ORDER: M113 with 2 LAW teams to FAST MOVE along the road to (86, 1X, 5Y) or so, then head directly north to (74, 1X, 4Y) to disembark both teams, with the trees as a screen. One team will SLOW into the woods at 74 with LOS on the road, and the other will FAST MOVE due north to Square 50 then MOVE to take up position either in the woods or the house at (50, 4X, 3Y), whichever seems best to you, Tim.
Both LAW teams to TARGET ARMOUR only, but with a 360 arc.
All this assumes the line of trees in 63-75 screen movement, but if this is not the case, disregard all this and stick with the original orders.
When the LAW teams disembark would it be possible for them to retrieve the three spare LAWs from the M113 before moving away?
REVISED ORDER: As above, but LAW teams split the extra LAWs on the M113 between them. If there’s 3, the extra can go to the southern team.
Wouldn’t this put those LAW teams less than 100 m from enemy infantry in 75 should the enemy move to those screening woods or get a peek thru them?
I think I found a keyhole.
ORDER: The TRUCK advances down the road, heading for grid 86 at best speed. It takes a right before the road turns to the east and would expose him and stops at, say 86, X8 Y4.
All units disembark.
The MORTAR team heads sets up on that service road. 86 X9 Y5.
The MG team moves to the east, staying in the woods south of the road. They head for 87 X6 Y4.
In regards to the DRAGON team, maybe Tim can help us a little bit with the angles. What I want is to have a LOS cone to the highway at grids 64 and 65. I –think– you can draw a line between the agri-merchant and the house directly south of it. (The one in 75 X8 Y7)
So, I´d say DRAGON team heads for 86 X10 Y2 or one tile to the east. If the keyhole is too awkward, then cross the road and set up in 74 X10 Y9.
REVISED ORDER:
Combat Mission is probably not capable of doing this, but I would also order the dragon team to ignore soft vehicle targets. I´d hate to waste one of our precious 11 ATGMs on some stupid UAZ leading the enemy column. But I fear we´ll have to bite that bullet.
ORDER:
Lets get that recon out for a looksee!
BDRM, move to the meeting of the treelines at Grid 120,10x,1y and Grid 121,1x,1y
Then, HUNT along the inside of the treeline traveling NE to end up Grid 110,7x,10y
At that point I’d like it to vomit up it’s scouty-breakfast and they can start legging it for the dovecot, assuming we make it that far in the course of the minute.
My intention is to keep the secondary berm in Grids 87,88,100 between the BDRM and the road, although I fear the trees may not be enough if there’s a watchful someone on the eastern stretch of road beyond the floodwaters.
Can that dovecot be entered and, more specifically, can recon get onto the roof?
Viktor would know.
ORDER
Trajanov and his taxi to head quickly to just south of Viktor’s house in square 75. Mai Trajanov to then disembark and run inside to have a chat with our partisan.
As I can take an obvious hint and I can’t see anyone else making the order.
Are you sure Viktor’s house is in square 75? By my reading of the map it is in square 99, just north of the fields and east of the windbreak. I think the enemies might be camped out in square 75, since only the southern portion of the village is safe.
REVISED ORDER
Trajanov and his taxi to head to the correct location in square 99.
Good catch! I somehow got spectacularly confused and was working off of the 3 row example square 75 being my best way of reconciling the two…
Good catch! Because I think square 75 might just be hostile territory too
YEESSSS it’s that time of year again.
Finally back round eh? This year is going to be my first time actively issuing orders.
As far as map coordinates go, most people would probably find a left-right, top-down approach more intuitive, because the grid-boxes seem to follow this structure.
So to me 62,10,08 and 63,03,02 would feel more natural.
That said: Good hunting, gentlefoxers!
> most people would probably find a left-right, top-down approach more intuitive
How does everyone else feel about this? If it’s going to confuse Comment Commanders I’d like to change things ASAP.
I initially assumed that the counting started from the top-left corner as well, so the change would work for me too.
I’m used to grid references being E and N, so as per the initial designation here. Bottom-left corner is 01 01, top-right 10 10.
I agree with cederic that the current system is ok. Would it help to add X and Y after values (71, 10X, 3Y) to make it clear for all?
I’d agree that the current system is good. Each larger grid having it’s own “minor grid” makes total sense, and the starting positions track with how my brain reads maps.
This is a very helpful change from past years!
As opinion seems to be divided, I think we might as well stick with the left-to-right, bottom-to-top format. After a few turns hopefully the ‘top-to-bottoms’ will adapt to it.
I like badgerbadger’s suggestion of adding x and y for extra clarity, but Comment Commanders don’t need to bother with this if they’re in a hurry.
Clearly Major Trajanov needs to have a chat to this Victor chap, so I’m thinking we send him straight there in his jeep. If he heads for where the end of the berm meets the line of trees at the bottom-right corner of square 120, and then continues NE up the line of trees, they should be out of sight of any infantry in the north of the village.
[That’s assuming that our intel is correct and the southern edge of the village is safe (for now?).]
I’ll issue the requisite orders on Sunday if no-one disagrees?
More broadly, our orders are to stop as many tanks as possible from crossing the west boundary of the map, and minimising destruction of the village. So, I think we should be looking to get at least one AT unit into the woods in 72 and/or 71 to provide a backstop against any tanks making it through the village. Depending on how things turn out getting more AT into the woods at 47 would cover the northern half of the map boundary.
I suspect the infantry in the village will give us problems, so it might be worth pinning them down with a token force armed with lighter weapons (all the better for not damaging civilian houses), and bypass them where possible.
Shame we don’t have a friendly Bayraktar drone for support 😉
I believe the pigeon tower and a “do not fire” command are the hovering drone surrogate here.
Maybe I’m just hoping 🙂
Branko is confident the southern and south-western approaches to the village aren’t being watched. He recommends Trajanov’s driver bee-lines to Viktor’s house.
+1 on the LAW team over the grenade launcher team
Does anyone have any thoughts on getting a presence north of the highway embankment? I’m a complete noob at this, but to my mind that would be an easy way for the enemy to bypass us if we get lucky and cause an obstruction or two on the highway. Or is this something to discuss only after we’ve spent a few turns scouting/clearing the village?
It does look like infantry and vehicles would be covered by the bank the highway is on if they drop into the fields north of it.
I don’t fancy our chances of getting anybody into New Farm without taking fire and casualties from enemies in the village though. One option might be to get the M113 drop a LAW recon team off then circle back around the South and West edges of the map to drop the other into the trees in 12.
It’ll be able to provide fire support against anybody in New Farm then too, if we can engage there before the convoy arrives.
Even if we don’t do that, I’m not sure whether the flooding in 104 and 116 can be crossed by vehicles and/or infantry, so I’m thinking the trees in 103 might be a nice spot for one of the LAW recon teams anyway. Absolute worse case the convoy passes them and they get some nice rear shots opportunities.
Where are we going to hide our mortar team? There isn’t an olive grove to disable it from effective contribution 🙁
If I read it correctly, the mortar team is off-map fire support, though this raises additional problems of longer response times. We probably won’t get too many volleys off in 30 minutes.
I’d also be worried about any forces to the north being cut off once the convoy comes down the road. With our limited forces it may be better to consolidate somewhere we can easily shoot and scoot rather than splitting up and getting our forces individually picked off. That being said, we are quite mobile so maybe the tow-armed jeep could run around the north shooting from cover and pulling back further north to reload before popping again further to the northeast or northwest. We don’t seem to have the ability to reload it (unless I missed something) so once those 8 or so missiles are gone that’s it and those 3 infantrymen become a scout team effectively.
Seems we have on-map 60mm with HE and only 6 smoke so thats more of a brown-moment reserve should the column spot our forces and start engaging (hopefully we can smoke and run, but I cant remember how many turns it takes for on-map light mortars to start firing, at least 1 I think).
Not sure what rounds the 2 off-map heavy mortars have at their disposal but I’m hoping they can at least take out supporting IFV’s and APC’s, maybe Tim can clear that up for us?
Oh yes, I had missed the mention of the 60mm in the truck.
I wouldn’t rely on those off-map mortars for taking out IFVs, aside from lucky direct hits. It might be useful for suppressing escorting infantry, or clearing out odd town buildings.
Stacked close to the two 107mm off-map mortars are crates containing 60 M329A2 HE and 40 M328A1 WP rounds.
>>I’m not sure whether the flooding in 104 and 116 can be crossed by vehicles and/or infantry
Those flooded areas are impassable to all infantry and most vehicles. The visible roads are a quirk of the map editor.
I’d agree that if anyone is crossing the 60 line then the NW is the place to do it. Maybe we get some units staged just on the south side of the highway, and only push over once we’ve got some scouting from the tower.
It´s that Combat Mission time of the year. Excellent!
I am assuming our assets start near 119 behind the berm, judging from the screenshot highlighting them. While I can´t see the truck it´s probably coming down that road.
My first thoughts are that we should definately talk to that civilian and our commander would be the right man to do it and do it soon. Let´s hope for partisans or IEDs,.
Also, if there are really about 30 mission objective targets, we absolutely do not have enough anti-tank munitions. There is almost no margin for error, say misses or non one-shot kills. I say we take the LAW-team option for the M113.
Tactically speaking, we have a short-range AT weapon carried in the BRDM, possibly two more in the M113 and two long-range platforms, only one of them realistically capable of any form of shooting&scooting, the Mutt-TOW. (mutton?) And we lack any force that can screen these assets from enemy infantry, should it dismount.
Actually we must hope to lure some of the hostile AFVs off of the main road into terrain where they might bog down. Mobility kills are kills too in this context.
Given that we are so unfavourably outnumbered I would assume keyhole defilade positions would be preferable to high up perches for the long range missiles, like the dovecot. If several tanks come around a corner simuötaneously and with no way of getting away quickly a position with good LOS would be doomed.
I am a bit split on what to do with the Mutt-TOW. Three more shots could mean all the world, but I am very much liking the idea of leaving it mobile and sending it to somewhere to southern 112. Once there it could fire&retreat once the enemy appears from behind the woods near the corner at 90. I fear, if we wait with engaging for too long too many hostiles could exit the village to the west at once, saturating a kill zone there too fast for even a well-placed ambush.
But I guess the Mutt-TOW would also be our best bet to get some eyes north of the main road soon. Although it´s mobility and range would be somewhat wasted there, once combat has begun. Maybe the M113 could drop one of its LAW teams in the woods in 74 instead.
No strategy will succeed without robust implementation. Two orders issued so far, this still to move:
Truck and passengers (light mortar team, MG team, Dragon team)
TOW Mutt
****subscribers only****
BRDM-2 (recon team aboard)
M113 with grenade launcher team
I took command of the truck. The Mutt-TOW is still waiting for orders. As is the BRDM.
I think we do not have a second M113. It was a M113 with 2 LAW teams -or- one with a greande launcher team if I am not mistaken.
If we’re sending someone north of the road to recon then, well, the recon unit – in the BRDM.
I’d like to keep the Mutt-TOW where it is for the moment. It can use its pace to move around behind the small patches of wood on the West and the berm in 120 to take opportunity shots at distracted armour. That also puts it where the TOW crew will want to be when they dismount for their final three shots.
(Yes, I’m being optimistic that they’ll last that long)
Disregards this.
There is no way in hell to kill that many MBTs with such a small force… But part of the objective is not to let them pass. So how about creating a road block of vehicles at some narrow point, say, by positioning one or two of our vehicles there. At the very least it will slow the enemies down and make them easier to kill.
Also, I think a grenade launcher won’t do much good against MBTs. But the rest? At least it has more ammo than just a few LAWs.
I wonder if the 107mm mortars might be useful firing onto the road in order to discourage any armoured sprinters.
Usually the AI has no problems to even move infantry through a barrage, I think. At some point, when the unit gets too frightened, the TacAI will take over but not before. But depending on the calibre you can make craters in the road that slow down a vehicle which can even get bogged.
Could we then allready order the off map mortar to start firing on the narrow chokepoint coming out of the water at 70?
That sounds like a good idea to me. They’re not mentioned in the order list though.
Tim, how do we order a mortar strike?
Only the Forward Observer Team can call in heavy mortar bombardments, and they’ve yet to arrive. Bear in mind that they will need LoS to the target area and the stonk won’t be instantaneous (expect around five minutes from request to pandemonium).
Hooray for communal CM.
I love me a BDRM. That 14.5 mm can take out enemy BTRs up to a km, so we should be expecting to use that against the enemy soft targets that don’t warrant one of our 20ish AT weapons. (8 tow x 2, 3 dragon, 3+ LAW).
I do think we might be happier with a TOW dismounted so it’s lower profile, but I wish know CM sometimes likes to reduce visibility to 0m for troops in prone positions.
My first thought reading about us fast moving our M113s is a memory of a truck bursting into flame two turns into our last Tally Ho adventure. If the invaders have infantry in the village that means they have RPGs, which have a surprising amount of 150-200m accuracy in CM. It’s also possible they have an SPG or something like that, so until we hear from our informant let’s be very careful driving two of our three law teams up too fast. Likewise, a single enemy SVD could cripple a scout team if we try to cross the road with them.
I’d like to see our BDRM advance cautiously, deploy our recon team to give us eyes on said village and the road beyond it, and hide out of sight until we know more. I want to hear from our allies before we do a full deployment in the dark. Would love to hear thoughts from other commenters on the best way to do that (I’m always a bit slow to parse the map until a few turns in).
@Tim. CM loves to drop extra AT weapons in transports. How many LAWs does each scout team have, and how many additional ones are in each APC / BDRM?
Each scout team carries one LAW. They can acquire additional ones from the non-TOW Mutts (one per vehicle) and the M113A1 (three available).
oops, wrong comment to reply to
Lots of comments not many orders. Send stuff forward to set up the ambush. Current positioning around 86 & 74.
TOW Mutt
****subscribers only****
BRDM-2 (recon team aboard)
M113 with grenade launcher team
There seems to be a split opinion on whether the TOW Mutt should stay put or move to southern 112. I would be inclined to move since we know that the southern part of the village is safe right now, but it might not be so safe any more if we wait around a few turns. That said, I am not familiar enough with CMCW to know how fast these vehicles can drive. My hope would be we can get to 112 south of the dovecot in a single turn, then next turn peek out to the gap in the trees to the east and fire north, then book it back west as soon as we shoot. Other bonus – if we are ready and waiting by the dovecot, we might get some intel from Viktor that we can immediately capitalize on instead of being one turn behind. I think it’s worth it if the vehicle moves quickly enough, since if there’s nothing to do, we can always turn around and come back next turn.
ORDER: TOW Mutt to drive toward square 112 and position itself south of the dovecot and still behind the berm. This would be the X1,Y1 (southwest) corner of 112, still on the dirt road. Gunner should face northeast. I am ambivalent about trying to stick the roads or go across the fields, whichever one will get us to the destination soonest. If it will avoid a traffic jam with Trajanov, pause to let him go first, or maybe stick a waypoint in the field. I’m slightly concerned about the openness of square 85, but i guess if everyone else is heading through there too then either it’s clear or we’re all mincemeat anyway.
Separate question, does the LAW have enough range to be accurate across 5 large map squares? Ideally we could shoot and scoot from 112,X6,Y1 but if we need to head north into 100 things will get a lot hairier.
Oop, just clicked our vehicle has a TOW, not a LAW. Should be no problems then.
ORDER: BDRM
Unbutton. TARGET ARC 150m circle. FAST to [108,2,2] in front of the trees by most sensible route from starting position. QUICK across the field to [98,4,0]. QUICK to the southwest corner fence at [98,6,9] with the house blocking the right front side and leaving a view north east to the tree line on the west of 75.
If there are any extra LAWs have the recon team acquire them.