
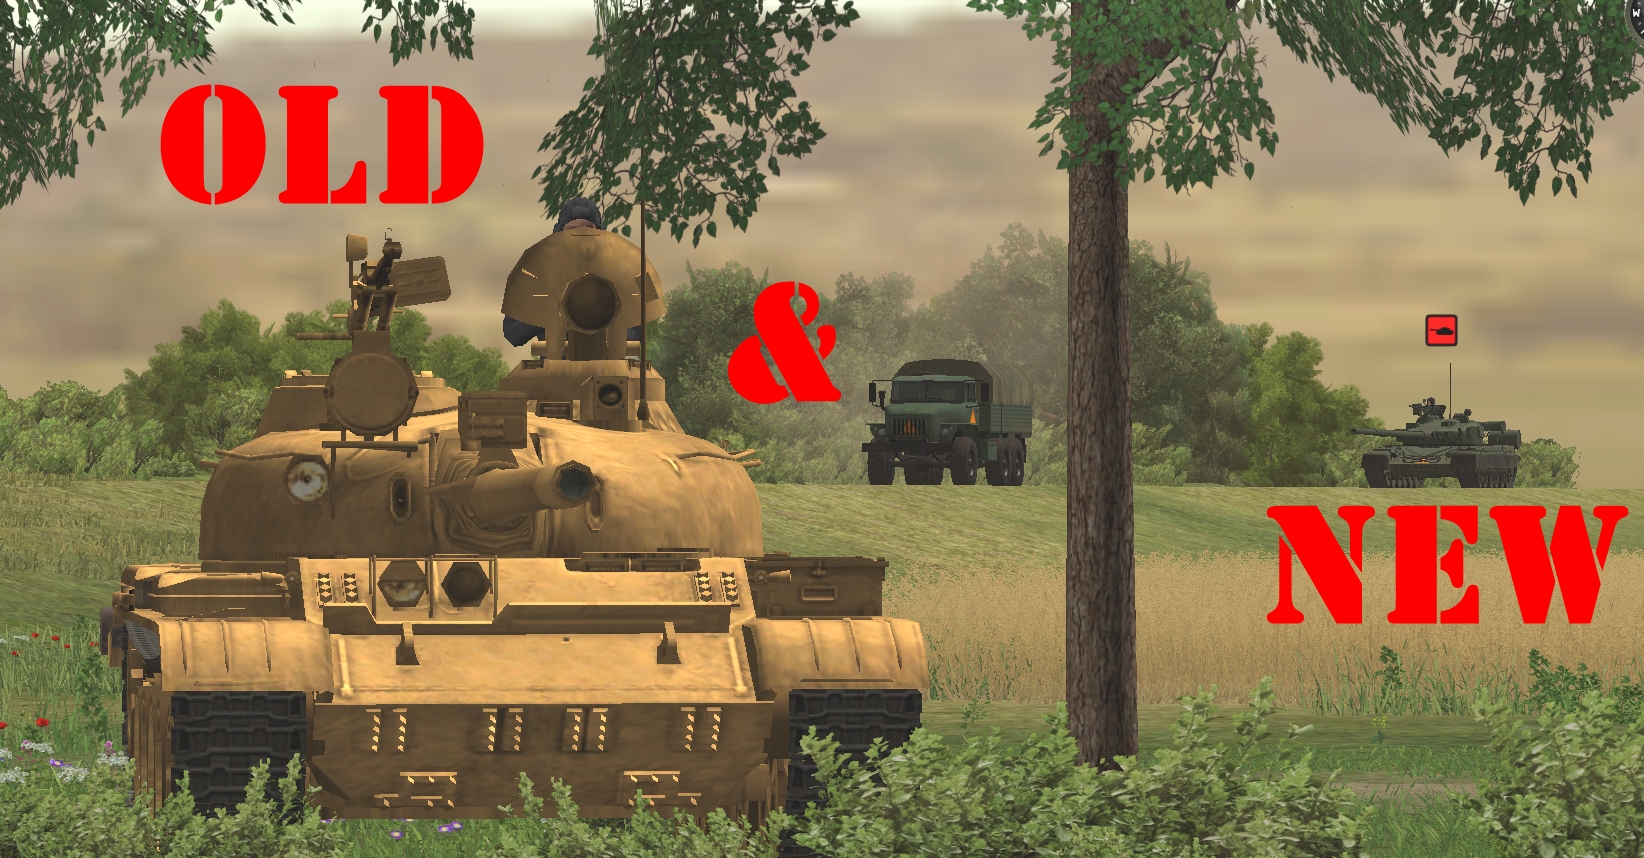
The T-80 the Soviet Union loaned to Podrabia in June of 1980 was for evaluation purposes only. Clause ‘C’ in the contract clearly stipulated that it wasn’t, under any circumstances, to be used in an actual war zone. The Kremlin will be mad as hell when they hear it’s currently motoring towards the armour boneyard that is Strupnic.
(Operation Oryx is an open-to-all game of Combat Mission: Cold War set in 1981. The commenter-controlled Zendoran forces are attempting to ambush a column of Podrabian vehicles bound for Zečin, the Zendoran capital. Each turn covers one minute of WeGo action. For a scenario outline and summaries of earlier turns, click here).

Early this turn, the sole survivor of Recon Team Bravo gets a fleeting glimpse of the dangerous demonstrator near the angle of the highway embankment. Like the T-55s, the T-80 is unbuttoned and moving purposefully in the direction of the village.

It disappears at T+6, reappearing at T+58 a little further down the road. The only friendly that can see it when the clock stops is our Forward Observer atop the dovecot. Tereza might have had LoS too if it wasn’t for the brown-out she’d unwittingly generated.

Our T-72 fires two on-the-money dust stirrers this turn. Unfortunately, both of the vehicles wrecked by the rounds are speeding trucks.

For a moment it looked like Viktor and Co. might also bag a stationary Shilka, but dust hid the SPAAG before Tereza’s gun could be aligned with its hiding place – the clump of trees on the elbow of the embankment.

The second truck to fall to our T-72 completes a ZIL-131 hat-trick. Ten seconds earlier, our relocated LMG team had riddled the Vostok Memorial truck after it decided to make a dash for the western map edge.
In other news…

Lesov Junior is still alive and kicking. He plugs at least one enemy tankist this turn.

Droopy and Muttley are now in new positions. Although neither can see any unfaded red icons at the start of Turn 21, Muttley looks relatively well positioned to deal with a T-55 glimpsed by our snipers in woodland in the top-right corner of box 92.

Our Light Mortar Team is following the westward progress of a truck in box 63 when the action freezes. Given the fate of the Vostok truck, I can’t see this one getting much further.

Although our Sniper Team and the Forward Observers expended no ammo this sixty, it’s thanks to them that we know the current positions of…
- The two T-55s and the UAZ+RPG team in boxes 44 and 56 (A)
- The T-55 and UAZ in box 70 (B)
- The T-55 in the wood (C)
- And the T-80 (D)

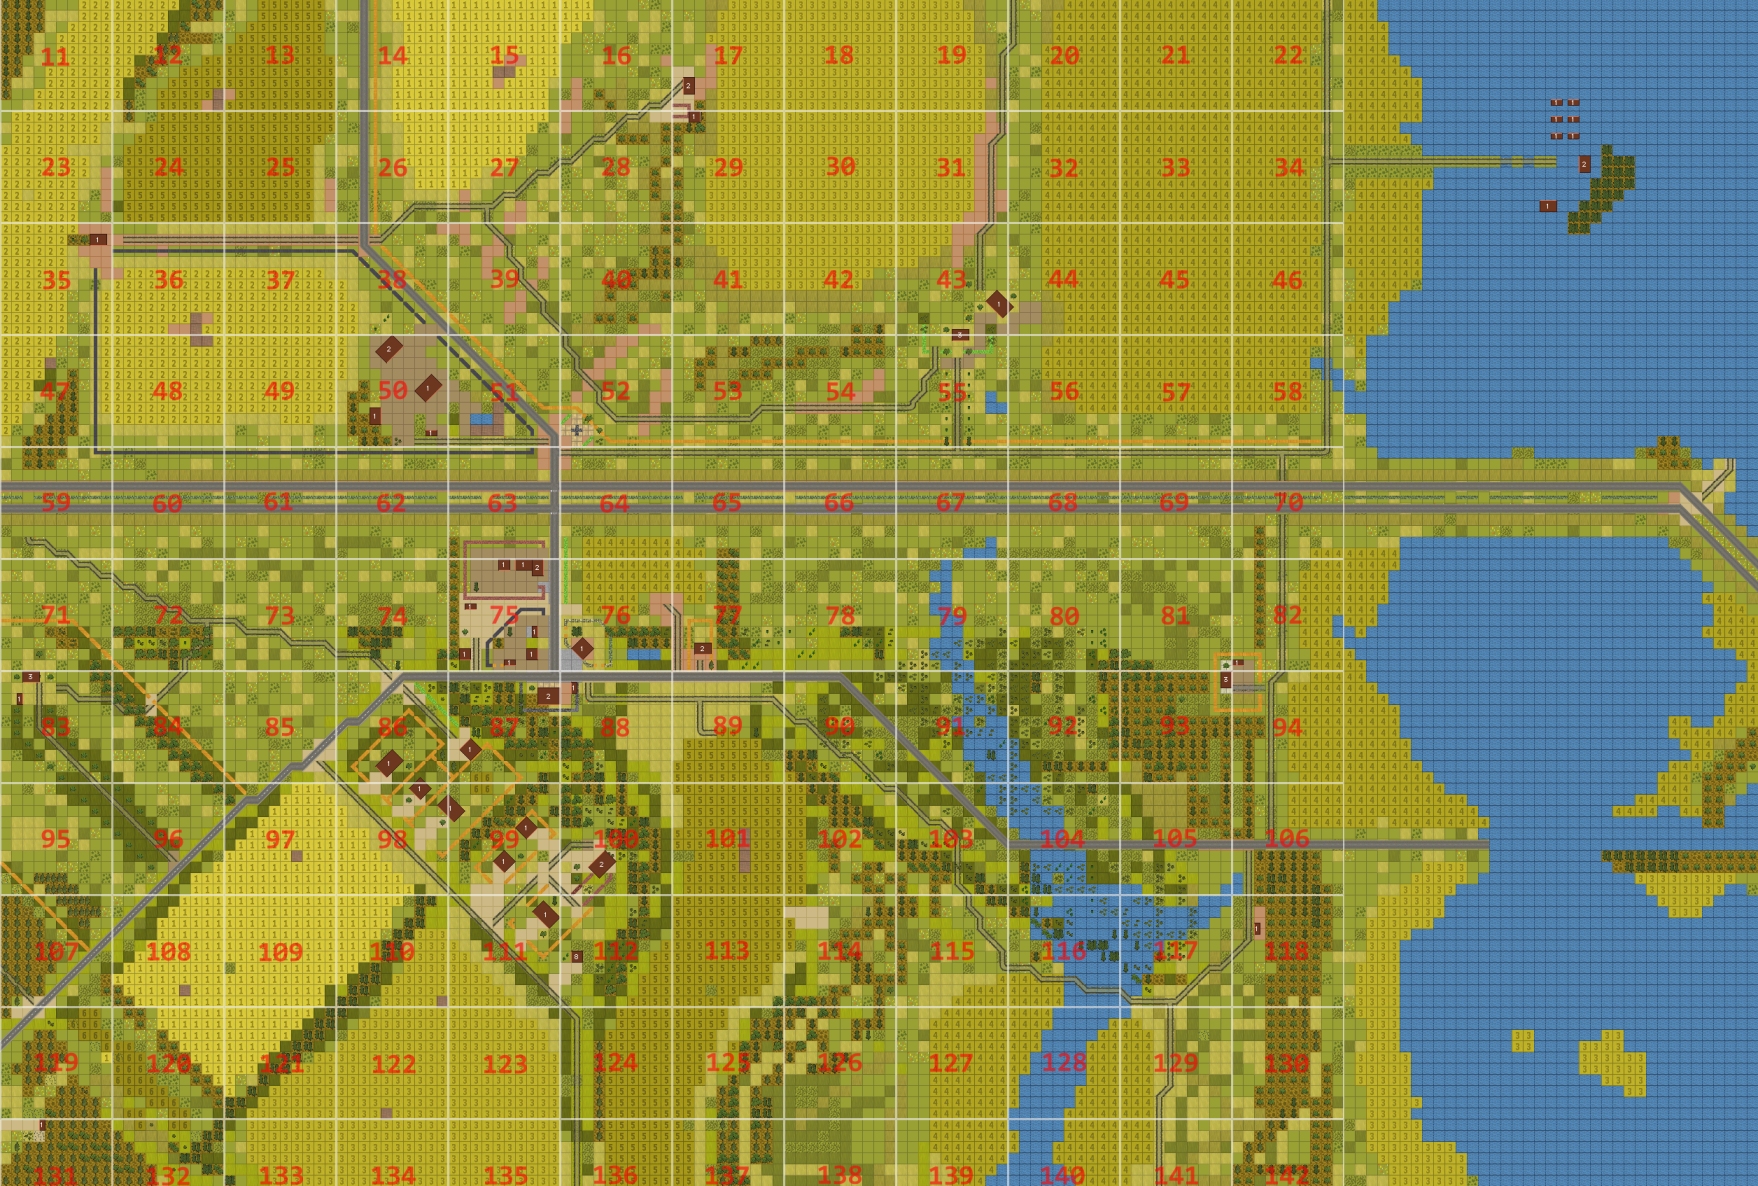
Turn 21 orders here, please. Commenters are cordially invited to suggest moves for the following units. (A maximum of one unit per commenter (subscribers can move two if they like). Embarked infantry and their taxis count as single units until separated.) Turn execution: probably Monday morning.
****anyone****
Light mortar team (tube deployed) [BOX 47]
MG team [BOX 86]
Dragon team (ambushing) [BOX 72]
Recon team B (1 man, hiding) [BOX 75]
Recon team C (3 men) [BOX 87]
Otto and Branko (sniper team) [BOX 100]
Forward Observer Team (no orders) [BOX 112]
TOW Mutt ‘Muttley’ (5 x ATGM) [BOX 100]
TOW Mutt ‘Droopy’ (4 x ATGM) [BOX 23]
Mutt ‘Scrappy’[BOX 87]
****subscribers only****
Trajanov [BOX 87]
Truck [BOX 86]
Milan Lesov (RPG x 7)[BOX 74]
M113 [BOX 99, unbuttoned]
Tereza [BOX 17, unbuttoned]
BRDM commander [BOX 77]
ORDER:
Droopy moves to the south western corner of the little building he is hiding behind and the ATGM crew starts to dismount.
Ideally they would have LOS to 67-68-69 passing the New Farm to the north and to the middle of grid 63 passing it to the south. I -think- 35 X8 Y8 would do the trick. Please adjust as good as possbile should I be mistaken.
REVISED ORDER:
Droopy´s ATGM crew dismounts where they are at the moment and set up their gear.
ORDER: Forward Observer Team to call in some lethal rain covering squares 44-56. Preferably in a North-South line, in the eastern half of those squares, if that’s possible (i.e. to limit the chance of a stray mortar hitting the building at the edge of 43).
Cheers for that, i’ve been meaning to do something with those off-map mortars for a few turns now but real life has temporarily elbowed in the way of thoughtful comment commanding!
I’m a little bit concerned at the tanks breaking south at B and C. Still, let me jinx it and say, little time left for it to go too badly wrong!
Looks like the water in squares 79, 91, and 104 will block them from traversing directly towards the town. They could set up overwatch there for the rest of the convoy, but otherwise they will have to steer north again to the road if they want to head any further west.
Looking at the map it seems like the road does pass through 104 – looks like maybe a bit of flooding – could the tank ford across that?
IIRC Tim mentioned the road looking like a `ford` being a quirk of the map making tool. I think it is not functional.
Personally I am worried about the two tanks (A) veering north more than any overwatch position. With the bulk of our forces west of Strupnic there is not much to see, but the route north of New Farm is not covered by a lot of our AT assets. Just Droopy and the (low on ammo) Dragon team for the last leg of the journey.
And the Shilka… It is perhaps even more dangerous to us than the tanks. Its small calibre guns are more than enough for our fragile units and its turret traverse and optics are above average. Ideally we take it out with Tereza, which is our only unit capable of surviving a return salvo. At least at range and even then sub-systems could take damage. But I would not like to pop out Tereza´s head right now to engage it at range. Maybe later, but that would give it time to come closer. Any ideas?
I agree, the units around A are the biggest threat. Regarding the Shilka, I would leave Tereza where she is, and wait for the dust to settle. Assuming the Shilka stays put, she should be able to knock it out from there. But it’s a big risk, She could find herself getting flanked by the units at A.
How many more angry houses / furious flatettes / belligerent bedsits are we expecting to arrive on the scene? Is it worth giving our heavy mortar new orders for a bombardment around 44-56 (i.e. where group A is now)? It’s unlikely they’ll still be there in 5 minutes time, but it may discourage any further Pod tanks from diverting north off the highway and flanking Tereza. Or would we just be kicking up unnecessary dust again?
Would a dust cloud at 44-56 really be a big problem? It might just compartmentalize the next wave and/or discourage the current wave to loiter about, which doesn´t sound too bad to me. I would recommend to just do it.
g948ng Very concerned about moving Droopy so he can be seen not only from the road but also the T-55s in the trees.
The road has been a problem for both of Droopy’s last kills, since the tanks only need to turn their turrets a little to draw a bead, and now travel time for the missile will be a greater problem than for the previous tanks.
I had him north of the building so he could pop any T-55s that go north and threaten Teresa, and cover the last few hundred yards near the Dragon should any tanks break through.
So if you’re cool leaving it I can’t stop you, but I think it’s not a good idea to put a single ATGM up against potentially three tanks with LOS to him.
I seem to be missing something, since when I draw LOS lines from 35 X8 Y8 on the grid map tank C is blocked by the farm and both A tanks are either blocked by the houses right next to them or the trees to their west. I could only draw a bead on the single tank at B.
But erring on the side of caution is not a bad thing at all. I´ll adjust the order.