
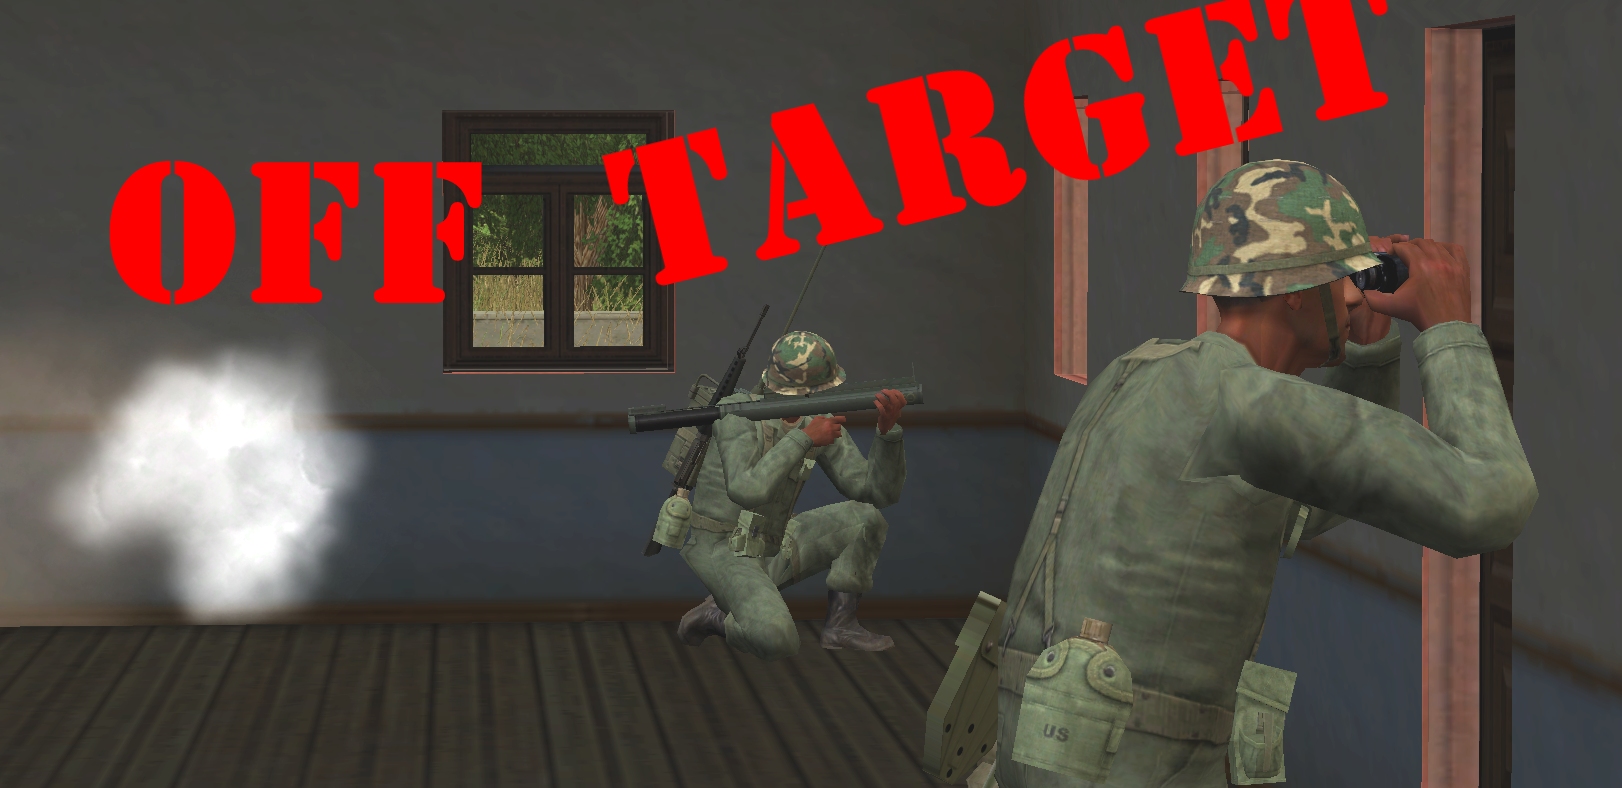
I’d be surprised if the anti-tank rocket fired by Recon Team Charlie this sixty didn’t turn out to be Operation Oryx’s most wayward shot.
(Operation Oryx is an open-to-all game of Combat Mission: Cold War set in 1981. The commenter-controlled Zendoran forces are attempting to ambush a column of Podrabian vehicles bound for Zečin, the Zendoran capital. Each turn covers one minute of WeGo action. For a scenario outline and summaries of earlier turns, click here).

Does the woefully wild HEAT dart clip a window frame as it exits the hotel? Does a hot ember from the smouldering floor above drop onto the firer’s neck just as he pulls the trigger? Your guess is as good as mine, but it’s hard to believe smoke and dust over the embankment is the sole reason Charlie’s last LAW misses the T-62 traversing the crossroads by a country kilometre.

Thankfully some Zen units are able to get rounds on target this turn.

At T+5, through a gap in the box 28 trees, Tereza spots a Pod truck slinking past New Farm and deals with it in unequivocal fashion.

For a horrible five seconds circa T+15 it looks like Droopy might suffer the same fate as Scooby. A clockwise turret adjustment indicates one of the advancing T-62s has noticed our northside TOW Mutt as it hares for the safety of dead ground west of the box 35 barn. The MBT gunner is about to fire when his mount plunges into a fogbank of white smoke – the drifting screen sown by our Light Mortar Team on the southern face of the embankment a few turns ago.

About halfway through the battle replay, a curt “End of mission. Out.” informs the dovecot Forward Observer Team that the off-map mortars are ceasing fire (As there were no specific duration instructions, I went with a medium duration stonk). The bombardment was pleasingly accurate, but at least two enemy grunts are still moving about near the crossroads when the ground stops quivering.

One of these lucky so-and-sos decides to take advantage of the lull to retreat eastwards. He hasn’t bargained for Recon Team Bravo, who cut him down from their new position upstairs in the agri merchant’s warehouse.
When the clock stops…

The two tanks leading the Pod column are manoeuvring around wrecked trucks in box 63. Early next turn both should enter the LoS cones of Tereza and Droopy. Whether they’ll also be visible to Muttley, the Lesovs, and our pedestrian TOW team, I’m not certain. Currently, the only friendly units that have eyes on the most westerly T-62 are Recon Team Bravo and the Light Mortar Team.

This approaching bruiser is making Recon Team Bravo a tad nervous.

A new rash of red icons has appeared at the eastern end of the highway.

Turn 17 orders here, please. Commenters are cordially invited to suggest moves for the following units. (A maximum of one unit per commenter (subscribers can move two if they like). Embarked infantry and their taxis count as single units until separated.) Turn execution: probably Monday morning.
****anyone****
Light mortar team [BOX 47]
MG team [BOX 86]
Dragon team [BOX 72]
Recon team A (1 man, 1 x LAW) [BOX 74]
Recon team B (3 men) [BOX 75]
Recon team C (3 men) [BOX 87]
Otto and Branko (sniper team) [BOX 100]
Forward Observer Team [BOX 112]
TOW Mutt ‘Muttley’ (7 x ATGM) [BOX 87]
TOW Mutt ‘Droopy’ (6 x ATGM) [BOX 35]
Mutt ‘Scrappy’[BOX 87]
****subscribers only****
Trajanov [BOX 100]
Truck [BOX 98]
The Lesovs [BOX 74]
M113 [BOX 86, unbuttoned]
Tereza [BOX 17]
ORDER: Move the cover arc of the Dragon Team West to a N/S line at [61, 3, xxx] and the left side of the arc stretching west to the map edge. I want it to cover the area west of Snoopy / Tereza’s arc as a backup, rather than potentially having all three units target the same spot.
@Tim: Where can Muttley see? Is he set to hit the same area as Droopy and Tereza? I don’t want all three of them throwing first strikes at the lead tank.
UPDATED ORDER:
When adjusting that TARGET ARMOR arc, please make sure it’s a Target and Hide order. Don’t want our Dragon team deciding to pop their heads up prematurely.
ORDER: Recon team Bravo to HIDE with a 30m circular cover arc.
Let’s keep their heads down so they don’t draw fire from the tanks.
ORDER: The Lesovs to have a target arc from a line out north of their position, anti-clockwise to a point just south of the highway on the eastern edge (the border between 59/71).
The goal being only to engage units that are side-on and/or moving away – no wasted shots to front armour. The line north should prevent any interference with the Tereza/Droopy Death Zone. I was wondering if the arc should go all the way back round to 3 o’clock to cover detours through the town too, but thought that might dilute their attention. Happy to modify
ORDER: Trajanov to pull his bootleg tape of AC/DC’s “Thunderstruck” out of his thigh pocket, slip it into the boombox hoisted on his shoulder, hit play, and saunter on over to 87,2,5 to get the lads well juiced up.
(Yes, it may seem like a musical anachronism, but it’s a little known fact that the band had recorded a demo of the song nearly a decade earlier when on tour in Zendora. An even lesser known fact is that the riff was stolen wholesale from a local act, Zen and the Art of Tractor Maintenance, and their 1980 underground hit “Thunder Thighs”. Pro-Western fervour at the time led the AC/DC version to all but erase ZATM’s original from the annals of music history.)
Saunter? Surely duckwalk.
I was worried about the Light Mortar team being outgunned by a squad piling out of one of the trucks; that doesn’t seem to have happened. I’m still expecting crew to bail out of enemy tanks as they get knocked out, and don’t want them shooting up Droopy with small arms.
ORDER: Light mortar team [BOX 47]
Target Enemy (Infantry, if possible to specify) Arc starting in the New Farm yard (approx. box 50, x7, y8), curving across the highway just short of the knocked-out BMP, and finishing to the light mortar team’s south-east.
Another fantastic writeup, thanks Tim!
No T62 kills this turn, which isn’t ideal. On the plus side, the convoy does seem to be faithfully pathing forward through what is very clearly a kill-zone. I suppose Pod commanders aren’t habitually chosen for their tactical initiative.
Tim, I’m not sure if this is an onerous question, but could I check which units have outstanding orders and statuses? Eg target arcs/special commands/in the process of moving. It doesn’t have to be detailed: I think just an indication of which units are already being commanded to do something.
I believe the only friendlies with hide orders at the moment are the Dragon team and the Lesovs.
The light mortar team has a very short preventive cover arc in place. Other teams with cover arcs…
The Dragon team (armour, extending NE over the highway)
The LMG team (45 degree arc centred on crossroads)
Unusually, no units have unfinished movement orders at present. Charlie seems to be the only fatigued unit.
Thanks Tim!
After all the work it took to get that LAW to Charlie I’m not super pleased with the result, but honestly we’ve been seeing 50% hit rates with them at shorter ranges with fewer obstacles.
On the other hand I’m really happy that our AT assets are all fixed on the town exit point. That first kill from Droopy was premature, and we were lucky that he was able to get away from the rest of the enemy platoon. Now we are ready for them all to stumble into our 2-3 directional ambush.
I’m kind of tempted to give no orders. Our forces are set up and there are no new threats nearby.
Our Dragon is hiding while waiting for the enemy to break through. The LAW and RPG troops are ready. The TOWs are primed. And Theresa seems perfectly ready to cover the highway.
Thoughts from the other commenters?
I have questions 🙂
Do we need to ask the heavy mortars to fire again now their mission is complete, and if so, is it another 5 turns to wait even if we don’t change the target?
Does the “hide” order on the Lesovs/TOW mean they won’t fire unless we tell them to stop hiding?
Do we need to worry about Tereza getting an unseen visit from the north-western farm(?), if not the road itself?
Exciting stuff!
I think there is a time bonus if you call in another artillery strike from the same unit. It might take 3-4 minutes instead of 5.
Don’t bank on this. I’ve just run a quick test, and ETA shows as five minutes.
You might be right about that Hide order. I wasn’t sure so had a quick Google : https://combatmission.fandom.com/wiki/Hide
Does anyone know for sure if Hide is indeed a ‘do not engage’ command?
Hide orders in combination with cover arcs = ambushes. Used on their own, they prevent units initiating combat and significantly reduce the chance of detection.
My thoughts exactly. The trap is set. I think there isn’t much to do except wait for the Pods to advance. My only fear is if a Pod tank decides to take a detour through town, hence my order to move Recon C up last turn. I didn’t think they would take such a long shot with a LAW, Sorry about that.
Slightly premature, I feel, to call the trap set. Our units are positioned but there’s finessing to do (target arcs / target units) if we don’t want to go off half-cocked like last turn.
I’m inclined to agree about exercising patience and seeing how the next turn pans out.
I’m also pretty happy with how everything is set up, and especially thrilled that Bravo managed to get upstairs without any trouble.
My only suggestions would be to repeat my thoughts from a couple turns ago – I think it could be worthwhile moving Trajanov up to box 87ish, since I’m not sure the CO is providing much of a morale boost from right at the back. I also think it might’ve been worth moving Alpha to the treeline to the east just to avoid bunching up with the Lesovs, but now that the first tanks have gotten past that treeline, perhaps we should wait for a gap in the traffic.
If in doubt, ask Tim!
@Tim
Which units are currently within Trajanov’s command radius?
Re: Recon Alpha
I think their current position is good (hmm, shouldn’t use the plural as there’s only one of him now). I see him as helping defend the Lesov’s against bailed-out crew. Any closer and he’d have trouble firing up onto the elevated highway.
Re: LAWs
It might just be chance, but I get the feeling there’s something in the code stacked against the first shot.
I might be mis-remembering, but didn’t Charlie miss the PT-76 / BMP?
Recon Alpha vs BMP – 1 miss then 1 hit
Recon Bravo vs MT-LB – 1 miss then 1 hit
Currently, the Dragon, LMG, and light mortar teams, and the Lesovs and BRDM commander, have no C2 links to their commander. They are all radio-less so would need to get closer to establish voice or eye contact.
On Recon Alpha, my thinking was that if either he or the Lesovs get detected, they’ll attract shelling from the highway, and if one misses their target, it’s likely to hit the team crouched just 10m to the east (or west). Whereas if Alpha is in a different patch of cover, then counterfire won’t end up hitting the other team by accident. Also – and this is probably overly paranoid – but i was a bit worried about backblast from their rocket launchers potentially hitting one another. I’m not sure if separate units are smart enough to stay out of each other’s way. But since they’re distributed east/west and firing north, that probably won’t be a factor. In the end i’m not sure it’d have a huge tactical impact moving Alpha, it was just a thought.
Tim’s answer does seem to suggest moving Trajanov would be worthwhile, though.
I agree re: Trajanov. Could be a good boost for the troops. Go for it, alison!
Happy for you to give that order 🙂
I can’t move Trajanov, or I would have already! I have an honorary tile for completing a very long cycle ride last year, and have thrown a few pounds in the hat along the way, but I’m not a full brown-text monthly supporter. I welcome any supporter to give the order.
Ah, oops! Didn’t notice that. I can make the order, then.
We do need to decide what to do with the heavy mortars, though. Should we crank up the pummeling again? If so, where? Maybe that’s something you could take care of.
@Tim
Did the enemy tank that was facing SE by the knocked-out BRDM move this turn?
Yes. It bypassed the wreck, rejoined the southern carriageway, and had just entered box 65 when the turn ended. Another T-62 is midway through the same manoeuvre.
Turn execution underway.