
How easy is it to hit a speeding jeep with a rocket-propelled grenade at a range of around 200 metres? Stefan Popov, the Pod grenadier next to the Vostok memorial, has a splendid chance to answer that question in turn 12. Fortunately for the Comment Commanders, he chooses to excogitate not experiment.
(Operation Oryx is an open-to-all game of Combat Mission: Cold War set in 1981. The commenter-controlled Zendoran forces are attempting to ambush a column of Podrabian vehicles bound for Zečin, the Zendoran capital. Each turn covers one minute of WeGo action. For a scenario outline and summaries of earlier turns, click here).

Scooby and his passengers arrive at their destination dust-caked but unscathed. Although a quirk of WeGo CM means they can’t swap Mutt for MBT this turn, Tereza should be ready to quit her hiding place by the end of minute thirteen.

I’m afraid it’s another frustrating sixty for Muttley. Despite moving to a loftier vantage point, our eastern TOW-wow still can’t see the reticent BMP. While the berm in box 100 seems to afford good views of the highway to the NE, LoS northward, to the northern carriageways at least, isn’t great.

Droopy, on the other hand, can see the stationary IFV quite clearly as he hunts towards a treeline in the top-left corner of the battlefield.


Bullseye! Or bull’s arse, to be more precise.

No helping of communal CM would be complete without a bit of bad/ominous news. Definitely worth fretting about in the days ahead, are the MT-LB’s actions this turn. Somewhat surprisingly, the enemy APC close to the crossroads notices dinky Droopy several seconds before he launches his missile. By the time the turn ends, the squat lumberer has pivoted clockwise approximately 100 degrees. Its tiny turret has yet to move, but surely an MG burst is in the offing.

Oh, and Recon Team Bravo glimpse these two antiques in the dying moments of the sixty. Steel yourselves, folks – the cavalcade of angry houses isn’t far away!
Also this turn…

The first spotting round fired by the off-map heavy mortars lands in pasture east of the diagonal New Farm road.

Remnants (?) of two Pod infantry squads move eastward along the embankment in boxes 62 and 63. The larger party (four (?) men with an RPG) draw fire from the M113 just before the clock stops.

The light mortar team scales the embankment.

Trajanov and Scrappy part company. Engine limitations prevent Recon Team Charlie from jumping straight into the vacated seats.


Turn 13 orders here, please. Commenters are cordially invited to suggest moves for the following units. (A maximum of one unit per commenter (subscribers can move two if they like). Embarked infantry and their taxis count as single units until separated.) Turn execution: probably Monday morning.
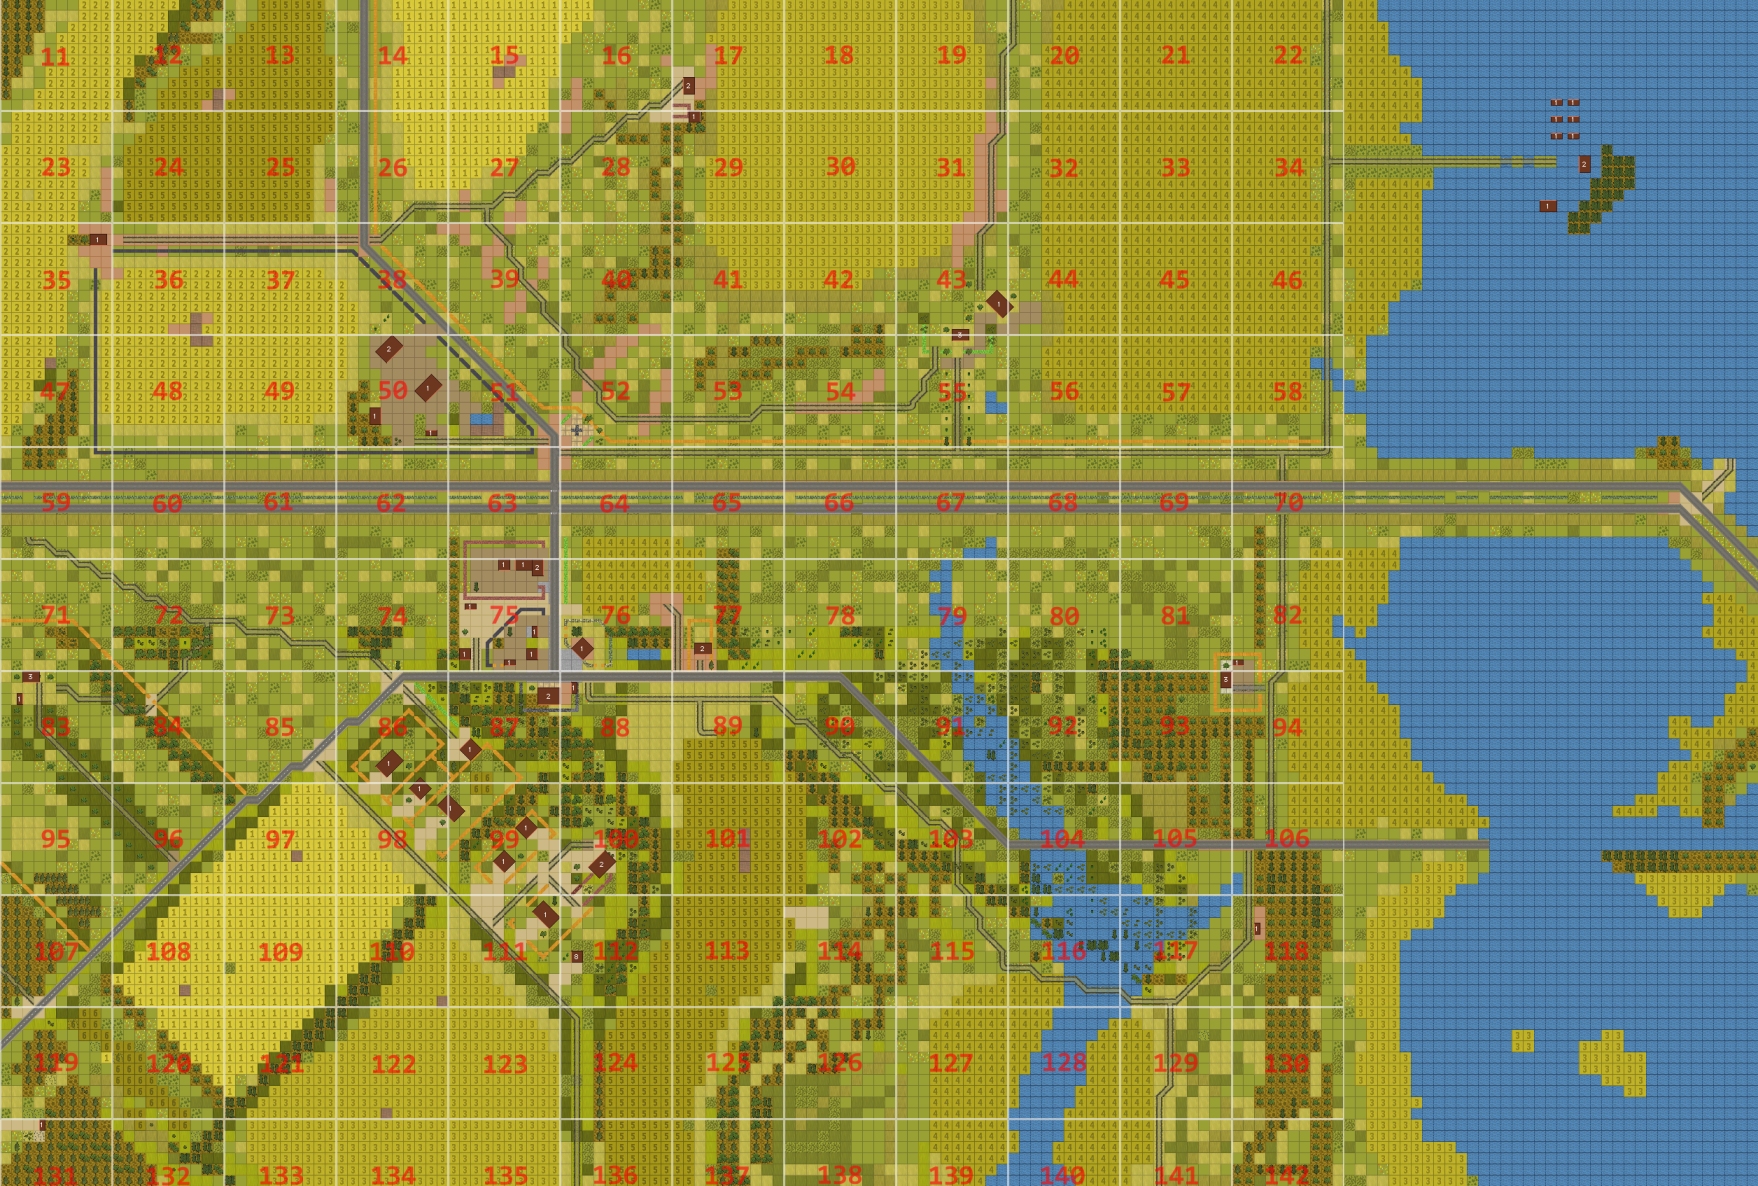
(See screenshot for exact unit locations)
****anyone****
Light mortar team [BOX 59, moving]
MG team [BOX 86]
Dragon team [BOX 72]
Recon team A (1 man, 1 x LAW) [BOX 74, treating second casualty]
Recon team B (3 men, 2 x LAW) [BOX 63, at foot of embankment]
Recon team C (3 men) [BOX 100]
Otto and Branko (sniper team) [BOX 100]
Forward Observer Team [BOX 112, top of dovecot, heavy mortars due to commence firing in around 1 turn on box 51 road)
TOW Mutt ‘Muttley’ (7 x ATGM) [BOX 100]
TOW Mutt ‘Droopy’ (7 x ATGM) [BOX 12]
Mutt ‘Scrappy’ (1 x LAW on board) [BOX 100]
****subscribers only****
Trajanov [BOX 100]
Truck + The Lesovs [BOX 74]
M113 [BOX 74, unbuttoned]
Mutt ‘Scooby’ (1 x LAW on board) [BOX 17]
Viktor and Tereza [BOX 17/29]
ORDER: Muttley (Box 100) to back down the embankment sharpish and FAST along a covered path to somewhere like (87 X2 Y2) or thereabouts in the little cluster of houses in Boxes 86/87/98. The aim is to have a covered position behind a house, facing Boxes 60-62 and aiming to hit the rear of the convoy as they drive past.
Rationale: With that BMP gone (hurray Droopy!) there’s no point sitting on the embankment to get spotted. From that firing position, even hull-down, the first TOW launch runs the risk of being spotted by a whole conga-line of angry houses. The infantry contact in the village makes me wary of taking a position further north, and anyway our Dragon is sited at the far west so we should concentrate our efforts. I am open to counter-proposals.
The main problem I can see is that Tereza’s best position seems to be to aim at 62-64 and we risk splitting our ambush and being defeated in detail, if they detach tank to deal with us. But Tim suggests that won’t happen.
ORDER:
We need to get that house in between Droopy (BOX 12) and that APC, and ideally shield it from that RPG too.
I cannot tell which way Droopy is facing, but I want it out of there as fast as possible.
If facing north-east, REVERSE to [23, 3, 7]
If facing southish, FAST to [23, 3, 7]
If east, REVERSE to [22, 2, 11], then FAST to [23, 3, 7]
ORDER:
Lesovs to dismount the truck and make themselves as inconspicuous as possible in 74,3,4.
If I’m also allowed to tell the truck to move on: have it wait 20 seconds to ensure the Lesovs have fully departed, and then head for the relative cover of the road in the lee of the MG team’s building ~98,3,8 (is this too far away for a useful RPG reload later?)
Thoughts: I believe there’s a concern that the Lesovs will make themselves known too early, so should we also give them a NW-facing firing arc that will prevent them from targeting anything east of an imaginary north-south line centred on their position? Or is it better that this coming turn that they hit anything they can see, and once the convoy gets a little closer lock them down?
I’m really not confident in my understanding of the cover mechanic and effective distances, so please tell me if I’m about to get these guys wasted…
It looks good to me! i personally don’t like fiddling too much with firing arcs in CM, but this looks sound. ‘Close range’ is about right for an unguided RPG if we want it to be accurate.
Thanks very much. I’ll leave things as ordered for this turn then, in case that APC rolls into view. Maybe we can discourage them from being the first to fire next turn
ORDER:
Recon team B moves one tile to the south. They want to be right under the tree we see in the last screenshot. Then they face north-east again. They do all of this stealthily.
Maybe I am too skittish, but I am worried a bit about their isolation when the tanks arrive and also about how very, very close the hostile infantry on the highway is in that screenshot. And ambushed vehicles might disgorge more infantry or armed crewmen just as close.
ORDER: Light mortar team [BOX 59, moving]
Finally time to make themselves useful?
I’m not sure what orders they have remaining from last turn, but I’d like them to:
1) set-up, presumably on the northern carriageway, and preferably out of sight of the MT-LB (hopefully there are enough wrecks / bus stops in the way), where they can…
2) rain death upon enemies near the Vostok memorial (approx 52, x3, y1) – Popov the Pod RPG-ist and the truck that’s appeared
ORDER: recon C get on board scooby and pick up the LAW. Drive to somewhere inconspicuous around the middle of box 87.
Looks like the Lesovs are fully rested and re-armed, where would they be most useful? And how near to that place can we get the truck?
There seem to be a shortage of good positions in the South. Does anyone know what that sound contact in the village is? A BMP crewman?
It’s possible the copse of trees in 74 might actually be the best spot available without tearing across the road to the North, and I wouldn’t risk driving our truck across now that the enemy main force is barreling down it.
74 isn’t a bad position to be in, but I guess that would make them the ones to start firing on the convoy, along with Droopy. Having said that, getting them set up in 74 now might be useful to dissuade that MT-LB from taking a shot at Droopy.
Edit: I’m also concerned that 74 would put the Lesovs far too close to the action.
OK, thanks all. I’m going to put an order in shortly, but very open to adjusting it as I’m not hugely confident in my understanding of what constitutes effective cover!
So just to clarify, we’re aiming to halt the convoy somewhere around the crossroads, boxes 63-64? Are we ready for the FO team to order in a second mortar strike? Tim noted last turn that annoyingly, the FO team don’t have LOS to the crossroads, but we could either order in that linear target line from 63-64, or target slightly east of there. By the time the mortar lands the convoy should be in about that position.
EDIT: My apologies for the somewhat overbearing tone. I meant all of this as food for thought and as a suggestion:
Since time is running out major redeployments are out of the question. I think we must settle into our final ambush positions this turn or the next.
For the point where we try to stop the T-62s in their tracks (no pun intended) we do not have alot of options anymore. As it is right now, most of our AT weapons are trained at the western exit of Strupnic, not the crossroads. That is the highway at the border of box 62 and 63. Box 63 is the real bottleneck, but box 62 is easier to see from the whole western hemisphere. NW, W, SW and S. Spotting and momentum might mean some tanks might reach far into 62 until they are fired upon anyways. I´d take that.
In fact I´d prefer if we layered our engagement ranges somewhat. Meaning some aimed at the border of 62/63 and some drew their firing arcs only to the middle of box 62. The reason is that I do not want our limited AT weapons to double up on individual targets. ATGMs have high one-shot kill probabilities, but they are slow. I´d hate to waste 2 on one target. We have to be frugal.
We have three mobile outrider elements, but have run out of time to use them anywhere else than where they are right now. Tradition and practice dictate to keep them hidden until our static western group is engaging, or we risk half of our assets not contributing while the other half fights for its life. So, phase 1 would be stopping the convoy, phase 2 would be the ambush from the flanks.
-Tereza is not in a bad position. Hide her in phase 1. In phase 2 she can stay creep westward step by step once battle is joined to move her keyhole slice of the crossroads. She will most likely fight the middle of the convoy.
-After Oneknown´s move this turn, Droopy can see the centre of 62, where we plan to stop the front of the convoy. If we synchronize it with Tereza, we can easily move back north again to attack the middle/end of the convoy for phase 2.
-Muttley is somewhat exposed to the approaches of the convoy, but slightly nudging him behind the berm should keep him safe. Once we start phase 2 he can pop up and engage the tail end of the convoy, which I suspect would be somewhere in box 65 or 66. Should the convoy bunch up a move east to snipe at its rear is coonceivable, if risky.
Questions we need to think about are:
1) Recon team B is pretty much alone in drawing LOS far east into the crossroad. Do we draw them a bit south, to get cover by the agri merchant? Or do we hide them at first and then pop up?
2) Recon team C was moved pretty far away from where we anticipate action. Do we want to put them back into the village? Maybe sync an attack the crossroad with Tereza? Should we leave them where they are to guard Muttley and the open field, should the convoy try to bypass Strupnic?
3) How can we best use our off-map mortars? The crossroads are obscured, the western exit would be dangerously close and aiming too far east might mean the convoy might slip through. Would smoke instead be of help?
4) Can the brass-balled light mortar team stop the convoy by manly standing in their way or will they just be rolled over?
No apologies necessary – I am as green as they come to CM and these are some good thoughts.
My 13 CFA Francs’ worth:
– I think Recon Team C are okay where they are for now, guarding a potential southern diversion by the convoy while remaining relatively hidden for a future attack on the rear of the convoy.
– While risky, I don’t mind the idea of the off-map mortars targeting 63-64 despite lacking LOS. It could go awry, for sure, but you would think by that stage the convoy should be bunched up in those squares and it should hit something, regardless. Even if it does only spook them, they don’t really have anywhere good to divert to, with Droopy and Tereza covering the north and multiple units covering the village.
My original thought with Recon C was to get them back north to occupy the hotel floor once we stop the convoy front. But captaincabinets makes a very good point that they are in a good position to provide a reserve in the south should Muttley be overwhelmed. That being said, they’ll only have 1 LAW, so they are less effective than our Recon A and Bs were.
I also want to point out that I think Droopy will be dead or dismounted this turn. It’s completely unarmored, and a couple MG bursts could easily knock the whole team out before they manage their reverse order. We shouldn’t make big plans this turn expecting we can always rely on them. Taking out the BMP was great, but we probably overplayed our hand there. If they survive the next turn, we’ll see what happens.
As far as heavy mortars, I think a continuous light barrage at the crossroads is ideal, even if we don’t have LoS to the whole area. The hope is that when we knock out enemy forces or they dismount their infantry gets wrecked before they can re-occupy the town.
Droopy is definately in danger, yes. But I think (hope?) that the MT-LB has just as terrible optics as the BMP-1s. If Droopy manages to reverse just a few metres it might loose the spot again.
Tim, is that our unhorsed BDRM commander at 77,5,3?
If so, is he still taking orders, or otherwise occupied grieving for his metal & fleshy companions?
My general thoughts:
– recon B feel very exposed to me, particularly if we are planning to drop mortars in that area.
– recon C have one LAW. If they get an armour kill that’s a lovely bonus, but imo their greater value will be in surpressing infantry. The crossroads is already quite busy, and that’s before (hopefully) destroyed vehicles start disgorging their passengers. I vote for getting them back into the hotel.
– assuming they survive, our TOW mutts get four more mobile shots, but then need to be deployed to fire their last three. How long does this take, and where should they go to do so?
I’m in the country again this weekend with only limited access to the net on my phone, so I will try to comment my thinking on our western infantry, but if someone else can make the order that’d be great.
Originally I was hoping to move more of our guys to the east so they could wait until some vehicles passed and then shoot them in the (less armored?) rear, but unfortunately it seems we don’t have enough time for that. I do agree with the thinking that our primary kill box should be in the section of highway between the village and new farm.
For recon team B, I think they are okay to stay where they are until they fire their first LAW. Ideally they’d shoot and scoot – firing one to the east (head on), then moving south a few meters to duck behind the fence and take their second shot to the north or west as the convoy passes.
Personally I think our dragon team is in a good position to cover recon B right now. We could have recon B take first shot, then dragon team, then recon B again. In a perfect world between the two of them we might be able to hit three vehicles before getting wiped out by counterfire.
I am not opposed to moving B south a little bit before their first shot, but then I think we do need some other assets able to harass the convoy before they spot the dragon team. Maybe that’s the mortar, I’m not sure.
Anyway, I’m off on a hike, so I wish you all success on this turn’s orders if I don’t get to log in again before Monday. Let’s go!
Arg, meant to reply in response to my own question regarding the commander…
Follow up question: what state is the BDRM in currently? From the screenshots, I can see it’s not a flaming wreck, but has it been KO’d or just pillboxed?
I’d like to order the commander to re-crew his vehicle if he can, which I understand the new generation Combat Mission engine supports. But I’m not sure on his status or the vehicle’s functionality.
It’s KO. As far as I know CM doesn’t really model abandoning and recrewing, though it could just be that the titles i play (SF2 and Black Sea) are so lethal that there’s no AFV left to recrew after being struck.
The BRDM is kaput and its commander is still too rattled to take orders.
Turn execution underway.