

Three contiguous clashes supply most of the drama for today’s battle update. Looking north and working from left to right, the first involves a previously undetected Pod sniper, and two Zen scouts who are endeavouring to patch up a wounded team member.
(Operation Oryx is an open-to-all game of Combat Mission: Cold War set in 1981. The commenter-controlled Zendoran forces are attempting to ambush a column of Podrabian vehicles bound for Zečin, the Zendoran capital. Each turn covers one minute of WeGo action. For a scenario outline and summaries of earlier turns, click here).

Emerging from the M113 having acquired the last of its LAWs, two thirds of Recon Team Alpha scamper back to the shady spot where the remaining third lays bleeding. Wound dressings are being unwrapped and a morphine auto-injector readied when a Dragunov bullet whips through the foliage felling one of the would-be medics.

Only a timely intervention from our repositioned M60 team prevents the Pod sniper, who is prone in long grass close to the BMP KOed by Recon Team Alpha in Turn 7, from wreaking additional havoc. The sharpshooter ends the sixty unscathed but uncomfortable.

Scrolling right brings us to a firefight between Recon Team Charlie and a squad of Pod grunts. Although outnumbered, the former, lead and grenade dispensing from the top floor of the Traveller’s Rest hotel, fairly quickly persuade the latter, aligned along a hedge in the centre of the raised highway, to retreat. An enemy rifleman is slain and a RPG-7 toter lightly wounded during the hasty withdrawal. Zen M16 fire then shifts to a fleeing PT-76 crewman with deadly results.

Recon Team Charlie is also involved in the third of the trio of tussles. Its injured LAWman spots a vehicle – the last of the Pod’s three BMPs – beetling towards the Lesov residence fifteen seconds into the turn and takes appropriate action.

Trees and target speed mean it’s not an easy shot, but he’s made up his mind.

Damn. A miss.

The BMP isn’t the only vehicle making for the Lesov’s house this turn. Our BRDM is going there too! By chance bricks and mortar hide the AFVs from each other during their advances.

For a spell it looks like the turn is going to end with the two trundlers parked on opposite sides of the abode, but then the BMP, possibly spooked by the LAW, decides to reverse. Our armoured car can’t believe its luck and deluges it with accurate KPV HMG fire.

A second or two before the clock stops, the peppered BMP comes to an abrupt halt. For a moment it looks to be baling out then turret movement shows it’s stopped for a more ominous reason.
Elsewhere this turn…

- A Pod truck was observed reversing near the Vostok Memorial (more on which in a future turn report). Judging by sound contacts, this was its approximate route.

- Once again, Droopy stopped before completing his move orders after seeing enemy infantry on the embankment, and the light mortar declined to fire despite a generous NE-facing cover arc.

- The Forward Observer Team called in a stonk on the the NW-SE road next to New Farm (slightly askew alignment caused by LoS difficulties). It will probably be around five minutes before the bombardment begins.

- Various units – our truck, the Lesovs, Otto and Branko, Scrappy and Trajanov – converged on a screened spot not far from the dovecot. Bound for the hotel, Otto and Branko don’t plan to stop.

- Mid-way through the turn an APC/IFV sound contact appeared circa 42,1,1.
The only Zen units with eyes on foes at present are the BRDM (BMP), Droopy (box 64 infantry), and the LMG team (sniper).
Turn 10 orders here, please. Commenters are cordially invited to suggest moves for the following units. (A maximum of one unit per commenter (subscribers can move two if they like). Embarked infantry and their taxis count as single units until separated.) Turn execution: probably Wednesday morning.
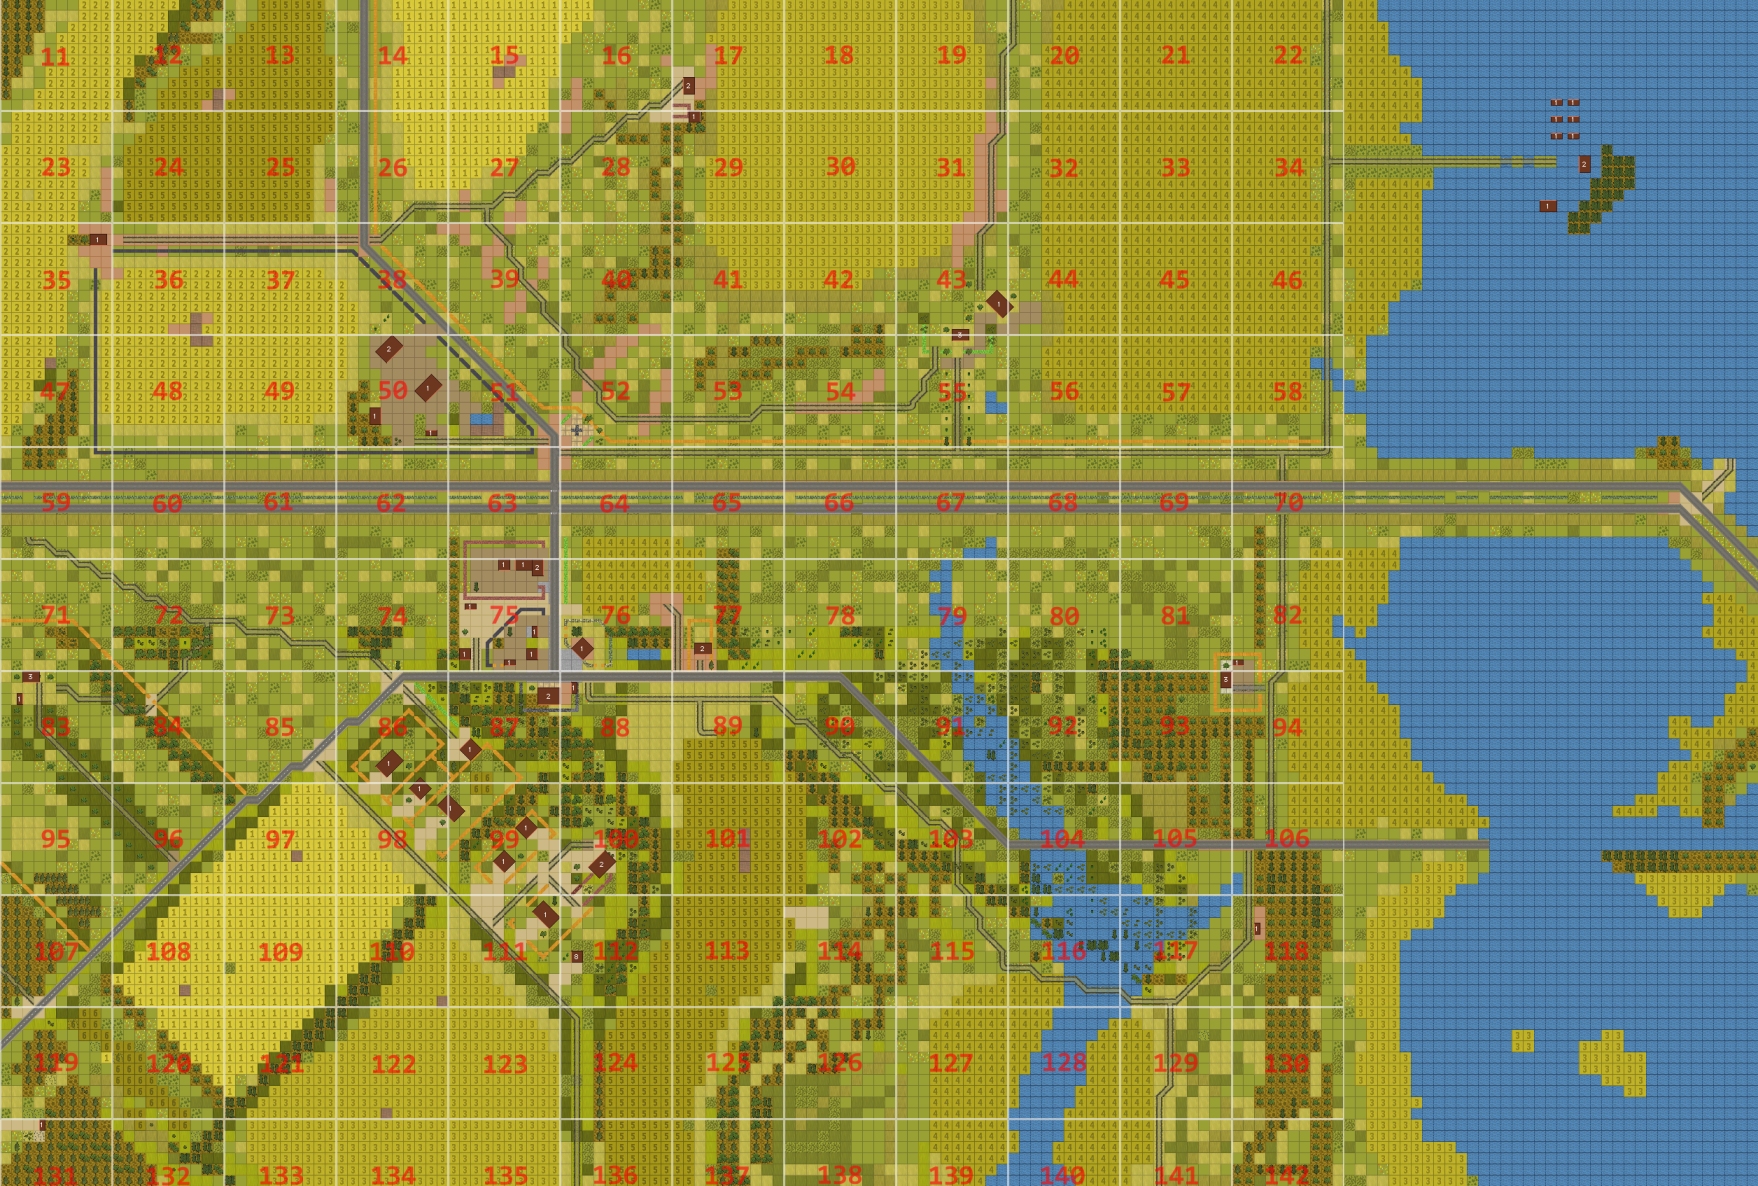
(See screenshot for exact unit locations)
****anyone****
Light mortar team [BOX 84, weapon deployed]
MG team [BOX 86, prone]
Dragon team [BOX 72]
Recon team A (1 man) [BOX 74]
Recon team B (3 men, 2 X LAW) [BOX 63]
Recon team C (3 men, in hotel) [BOX 87]
Otto and Branko (sniper team) [BOX 112, heading for hotel]
Forward Observer Team [BOX 112, top of dovecot)
TOW Mutt ‘Muttley’ (7 x ATGM, reloaded) [BOX 100]
TOW Mutt ‘Droopy’ (8 x ATGM) [BOX 71]
Mutt ‘Scrappy’ and Trajanov [BOX 111]
****subscribers only****
The Lesovs [2 men, BOX 100, tired, in need of RPG-7 ammo]
BRDM-2 [BOX 77]
M113 [BOX 74, buttoned]
Truck [BOX 99, contents include 8 X RPG-7 ammo]
Mutt ‘Scooby’ [BOX 35, Viktor’s T-72 crew aboard]
Please start all order comments with ‘ORDER’ and any later revision comments with ‘REVISED ORDER’. This will help me distinguish firm instructions from suggestions and advice.
ORDER: Muttley to push forward slightly with a hunt order, in order to lie in wait for the BMP if it comes forward in between the house and that copse of trees in 76.
Hull-down/concealed for preference.
I think our BRDM has had it, sadly, and it’s just about closing off that axis for now.
Up the bank, or hiding behind it? We’ve been assuming it’s hidden if it’s behind.
Definitely please not over the bank onto the other side.
It’s hard to get a sense of terrain without being able to see in detail, but yes, I’d prefer hull-down behind the bank and in concealment rather than exposed.
I’m not really sure if the ‘bank’ in practice is substantial enough to conceal our jeep.
Probably futile, but in the off chance that the BMP misses:
ORDER: BRDM top speed to 77,3,2
Could this order affect a possible snatching of victory from the jaws of defeat? Tim has since mentioned below that:
> It’s not out of the question that it will nail the BMP.
> The fact our armoured car held its ground suggests
> it thinks it has a chance of a kill.
I have no idea of the relative angles, armour, calibre btw, just curious
It very well might, yeah. My guess was that the odds are better getting into cover and attempting to draw the BMP into our TOW mutt’s LoF, since the BMP is now showing mostly frontal armour. If the AI thinks my order is suicidal there’s a solid chance they ignore it anyway. Either way, I don’t fancy our chances.
If the Lesovs don’t already have an order to get to the truck with the RPG ammo:
ORDER: The Lesovs QUICK to that truck by any kind of reasonable route that affords cover / concealment.
@Tim: Let me know if they’re already en route and I’ll post a different order.
The Lesovs are heading for the truck and will board it and collect as many RPGs as they can carry once they arrive. Feel free to use your orders elsewhere this turn.
Mortar Team packs its things and heads along the fence to 71 X6 Y4. They should be told to hurry. Once there they are free to engage whoever they think appropriate. I trust they have enough range to engage any target along the whole highway.
ORDER: M113 to unbutton like they’ve been waiting 20 minutes in the Glastonbury loo queue. (Although hopefully they’re more accurate than at Glasto when they open fire)
If only that BMP rolled back a few more metres, it’d be a whole lot easier/safer for Recon B.
ORDER: Recon team B [BOX 63]
IF: they are able to target the BMP from somewhere between the wall and the slope up to the highway & that’s within 30metres of their current position (say 63, x3, y3)
THEN: make such a move. But return rapidly to their starting position after 40 seconds.
IF NOT: crawl north sufficiently to improve their view to the east, but prioritise maintaining concealment.
Ah…well…it seems we’ve settled the scientific question of whether 14.5mm can pierce a BMP’s hide.
What a rotten trick by that Pod sniper! Using a wounded man to lure out his buddies. Sorry everyone, for getting another man killed/wounded. Only a remarkable stroke of luck can save our BRDM now.
I don’t think there was ever any doubt about our (lack-of) effectiveness from the front arc.
@Tim: Does the BRDM have any smoke launchers on it by chance?
Wikipedia again: The front armor is immune to 20 millimeter … cannon fire from ranges greater than 100 meters. The side, rear and top armor protect the BMP-1 from 7.62 mm small arms fire … but do not protect the vehicle against 12.7 mm heavy machine gun fire from close distances.
>> Does the BRDM have any smoke launchers on it by chance?
I’m afraid not.
It’s not out of the question that it will nail the BMP. The fact our armoured car held its ground suggests it thinks it has a chance of a kill.
That didn´t turn out as I expected. Really disappointed by Droopy. If they had taken heart that previously so passive BMP would have been toast by now.
It turns out I was wrong to accuse Droopy of not following orders. Having rewatched the turn replay, what causes him to stop isn’t the Pod infantry in box 64 but a glimpse, seconds later, of the BMP circa 77, 2,7. Unfortunately, before he can fire, the target has disappeared behind trees and buildings.
I retract my criticism of poor Droopy. He´s trying, I know.
With all this infantry crossing the road, do we think maybe we can get the M113 up to cover it, now that we’ve got fewer BMPs out there? Also, any thoughts about moving the light mortar team since they seem so hesitant to fire?
I am considering re-deploying them. They are not doing any good where they are now. I am thinking about going a short distance north near the woods in 72 or even further west, where Droopy is lotering about. If it keeps getting spooked by the Pod infantry it obviously can see them from there. The only problem is by the time the mortar team gets there and sets up the Pods might be somewhere else.
Currently the light mortar can’t see any foes hence its reluctance to fire. It could be strong-armed into firing with an ‘area target’ order, but the last time I used this approach, accuracy and RoF were surprisingly poor.
Hmm reality begins to bite…
Could someone invite the M113 to unbutton?
There seem to be more Pod trucks than we previously had visible, which may explain the number of troops they have. Recon Team C and the snipers (when they arrive) will probably want some help, so the M113 being able to spot the enemy feels sensible.
At the same time I’m not going to suggest pushing it nearer the road to get a better angle, unless we have good sightlines from others to warn of impending armour.
Scooby didn’t move this turn, was that intentional? Feels heading north then cutting East to bring the T72 into play can only help suppress the infantry , and we ought to give them time to get the engine warmed up and position it in the right spot for sniping Pod tanks as they drive past.
The Dragon team must be terribly relaxed and wondering what all the noise is about. Also, nobody’s noticed they’re there, so it may be another ten minutes (turns) before they have anything to do but they’re the insurance against anybody breaking through the rest of the ambush. If it’s an ambush any more. Aren’t ambushes meant to be secret and silent until the trap is sprung?
Although Droopy’s acting as something of a scout at the moment it’s not really equipped to do much to the infantry, while also being an attractive target for them. Should we invite Droopy’s driver to Ferris Bueller the highway much as the T72 crew did, and follow them to a nice ambush spot in the North?
The other team I’d love to move is the LMG team, getting them some elevation so that they can better rain leaden fire upon our enemies. But since they’re saving lives right now by upsetting the sniper I suspect we need to leave them in place, at least until the M113 or another unit can join in.
Overall, and in the moments before the BMP opens fire, we’re still doing remarkably well.
I’ll order the M113. Scooby needs to get moving, agreed. That new APC/IFV ping is a cause for mild alarm, though.
The original plan for Scooby was to go up the left edge , and then top edge, of the map to get to the T-72, but then we noticed the dirt road from their current position all the way to the tank.
We held last go because there was concern about attracting attention from the New Farm, as we’ve been short of eyes north of the highway.
We do need to move Scooby this go however, either we make the call to floor it along the dirt road or move it up behind the trees in box 12
I’m happy to leave the Dragon team where they are: they’re not terribly mobile on foot and we already have two TOW-Mutts. As you’ve pointed out, it’s probably best to have a stopgap for forces that trickle pass our kill zone (which we still haven’t really finalized).
I´d also prefer to leave the Dragon team where it is. With only two shots left, good range and a commanding view of every possible exit south of the highway I consider them as something akin to a sweeper.
At the bare minimum it might be nice for Droopy to roll up to the highway, take a look and/or potshot, then reverse back down again. Right now I think we’re still a bit blind with regard to what’s happening north of the road, which isn’t great.
I would give the order but, given my track record, a botched ambush on a BMP, followed by walking the same unit into a sniper ambush. The Mutt would set off up the highway and the driver would have to swerve to avoid a squirrel and flip over!
I am hesitant to use Droopy to scout north of the highway. I think it is very susceptible to infantry fire and not very stealthy either. And we know there is at least some infantry that just retreated to the northern embankment.
Turn execution underway.