
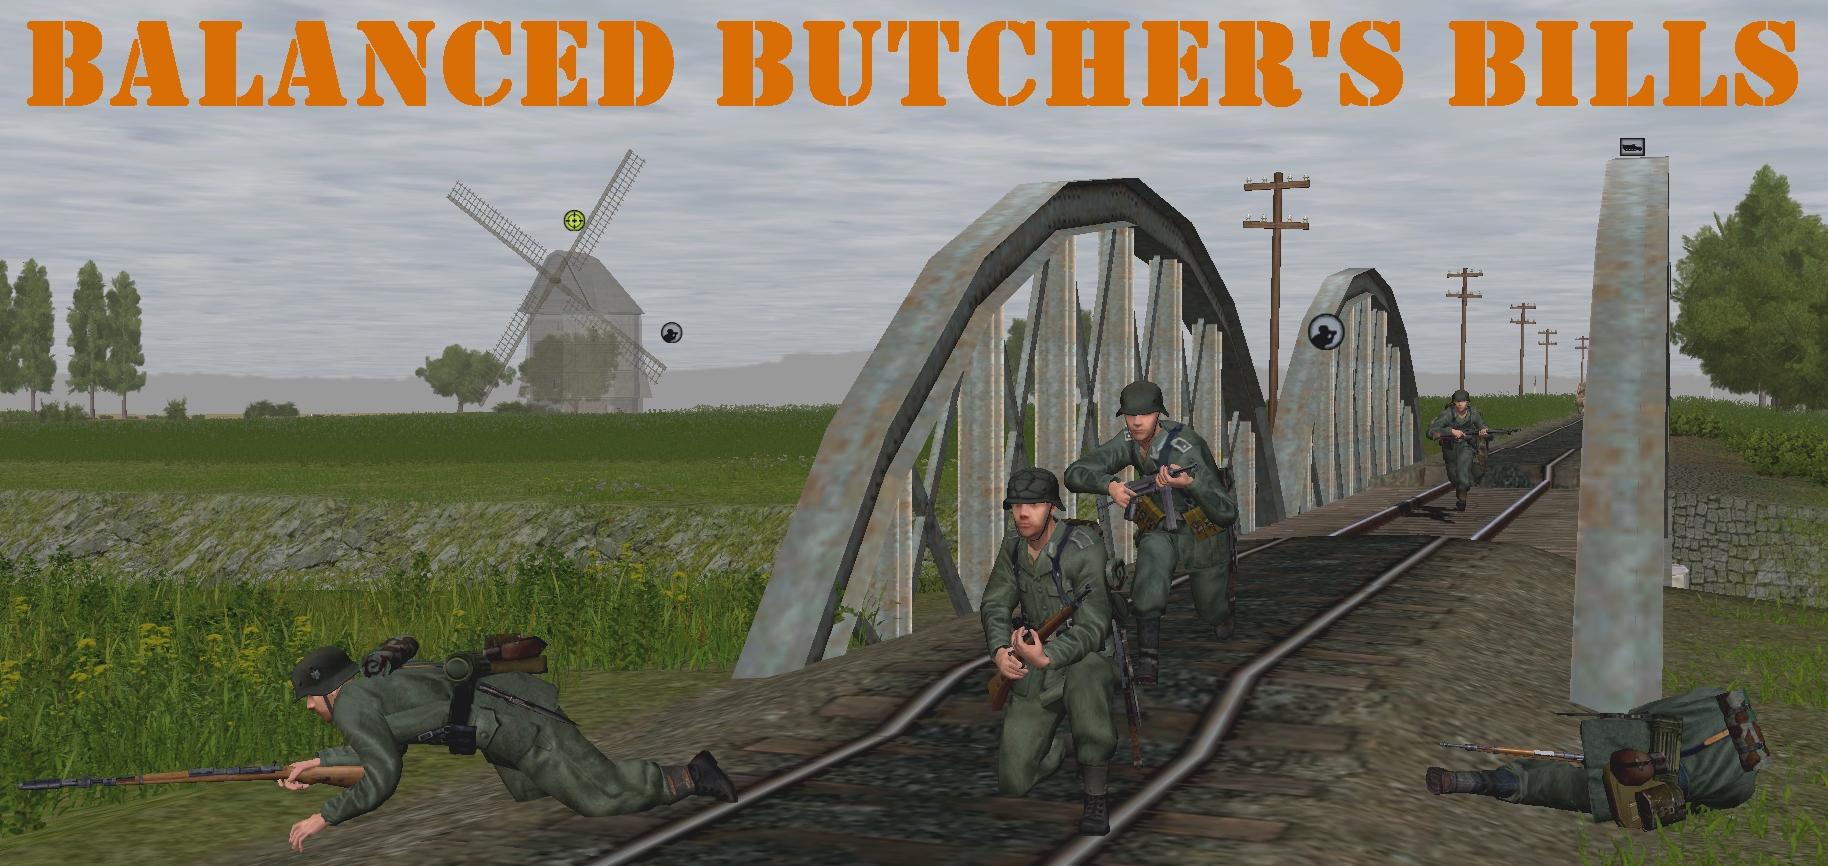
That little green icon over the windmill is bad news for one of Bulau’s men. As the islanders dash across the railway bridge, a round from a scoped Lee-Enfield coaxes sparks from the damp ironwork before plopping, like an alarmed water rat, into the murky water below. A second round strikes something softer – a fusilier’s scapula.
(Brinkmann’s Bridge is an open-to-all game of Combat Mission: Battle for Normandy in which the commenter-controlled Axis forces are out to recapture a Dutch canal spanner recently snatched by Red Devils. Each turn covers one minute of WeGo action. For a scenario outline, click here).

Turn 9’s Allied casualty is a plucky replacement for the Bren gunner mortared to death two turns ago near the canal bridge.

The lionheart in question holds his own in a firefight with Meister’s half-squad until…

…Hirsch’s team decide to stick their oar in.

The jeep warrants a mention too. At T+10 a green unidentified vehicle icon materialises on the road in front of the monastery.

Travelling northward along column red k at breakneck speed, this sound contact transforms into an armed jeep when it passes through the LoS fan of the Granatwerfer team on the windmill crossing, only to change back into an icon when it disappears behind the barn at red p 8/9in the closing seconds of the sixty.

Our Gallic tank and the scouts west of the monastery have relatively little to show for their exertions this turn. At T+60 the pumphouse Englanders are sprinkled with shredded foliage and cowering, but intact.

True, the men at red a30 may be living on borrowed time now our NE mortar team has them in view (The U304 spotted nothing shellworthy after halting and pivoting to face SW).
What else do I need to tell you?

The weary SE mortar team and one-man Vergeltungswaffe Wilberg have almost reached the railway. For some reason – possibly tiredness – Woikin’s crawlers barely moved this turn.

Bulau’s scouts are moments away from entering the sniper-infested windmill.

Behind the conifer plantation, the medium mortar is still setting up. In it, the platoon HQ advances cautiously, with squad 5 (Eichhorn) not far behind them. Untasked this turn, Unteroffizier Deych of squad 6 spent the sixty watching a caravan of shrews circumnavigate a tree stump.


Turn 10 orders here, please. Commenters are cordially invited to suggest moves for the following units (A maximum of TWO units per commenter. Embarked infantry and their taxis count as single units until separated. Split squads also count as single units. Units on the west side of the canal answer to subscribers only.)
(anyone)
– NE group –
*SPW U304(f)-10 halftrack (63HE, 45AP) unbuttoned, [blue k14/15]
*Fusilier squad 1 (8 men) split into two teams – Bulau’s team (6 men) tired [blue k25] and Grill’s scouts (2 men) [blue a8]
*Light mortar team (31 HE) [circa blue k8]
– E group –
*Fusilier squad 2 (7 men) split into two teams – Meister’s team (4 men) [blue l32] and Woikin’s team (3 men) [blue m34]
– SE group –
*Fusilier HQ (4 men) [blue n42]
*Fusilier squad 3 (6 men) split into two teams – Hirsch’s team (5 men) [blue k51] and Wilberg (1 man) [blue m50]
*Light mortar team (38 HE) tired [blue m52]
(subscribers only)
*Panzer 35t (32HE, 22AP, 2CAN), buttoned, [black m42]
*Scout team (3 men, MP 40s) [black p44]
*medium mortar team (4 men) setting up [circa black b25]
*Platoon HQ (4 men) [black h25]
*Fusilier squad 5 (9 men) [black g23]
*Fusilier squad 6 (9 men) [black i23 & l22/23]
*Kubelwagen(black b24)
*SPW 251/1 halftrack (black d23)
*Truck (black e19)
Please start all order comments with ‘ORDER’ and any later revision comments with ‘REVISED ORDER’. This will help me distinguish firm instructions from suggestions and advice.
So as far as I can understand it, this means orders dont get carried over multiple turns, we have to repeat the same order next turn or else it is forgotten? Seing as in turn 7 Fusilier squad 6 (9 men) was ordered from [black g23], to hunt [black N23].
Generally, orders do carry over. I think what happened with 6 squad is that they spotted something while ‘hunting’ to n23…
//tallyhocorner.com/wp-content/uploads/2021/03/bridge09p.jpg
…and decided to abandon their hunt order. A bit odd, but c’est la CM.
Must have been that caravan of shrews.
@Tim
What does the upside-down-T-shaped hedge to the west of Hirsch consist of? Is it bocage like round the Van Barneveld farm?
In the SE I’m proposing to have Hirsch hold position for half a turn to enable Wilberg and the mortar team to get to the railway line; and then to move on NW
– if someone could move the HQ to a position where they can see and shoot over the tracks, that’d be dandy
– Hirsch could hold on a little bit longer if he’s needed to cover 2nd Squad, but I’m worried about becoming a target for the British 3-inch mortar
It’s bocage. Although impassable to most units, if you place infantry immediately behind it they will see and fire through it. Here’s a screenshot showing the ‘T’:
//tallyhocorner.com/wp-content/uploads/2021/03/bridge09q.jpg
Thats good cover for a squad. We should take advantage of it asap.
“Looks like I picked the wrong week to quit Pervitin”, Hirsch grumbles, and searches for something to gnaw.
Tempting as it is, I think I’m going to have to cede that bit of bocage to 2nd Squad (probably Woikin, if they ever stop searching for four-leafed clover). The might’ve-been-expected presence of the sniper in the windmill has got me concerned that Tim has left something similar lurking in the house at [blue c+d, 55]. I guess it’s up to Hirsch to check.
ORDER: SE mortar team [blue m, 52]
Hunt onto the railway tracks at [blue k, 54]. There should be a tree to their west to provide concealment.
ORDER: Fusilier squad 3 (6 men) split into two teams
Wilberg [blue m, 50]
Hunt to top right quadrant of [blue k, 49]
Crawl to [blue k, 48/49]
Hirsch’s team (5 men) [blue k, 51]
Pause for 30 seconds, then move fast to [blue h, 55]. Finally, hunt to [blue f, 56].
Sensible moves.
ORDER: FS2 Meister’s team at [blue l, 32] to stay there another turn and rest for a bit till the windmill sniper is out of play.
ORDER: FS2 Woikin’s team at [blue m, 34] to continue in the direction cederic ordered them last turn, that is toward [blue l, 36]. Maybe pop them up to crouched movement if they’re tired of crawling. I’d order them further south toward the T-shaped hedge, but it seems they’re a bit flustered, so let’s keep it simple. There might still be some troops in the sandbags for them to dispatch anyway.
Want to give the scout team the best chance to kill that sniper. At teh same time, get Bulau’s team out of the line of fire. So…
ORDER: Grill’s scouts (2 men) [blue a8] HUNT to 4th floor of the windmill.
And Bulau’s team (6 men) tired [blue k25] FAST to Blue L24, so they can use the railroad embankment as cover.
Actually, REVISED ORDER (if possible) for Bulau’s team [blue k25] is to TARGET the sniper’s window. Maybe get him suppressed so Grill’s team can take him out.
If Grill’s team take him out, does that mean he’s toast? 🙂
I’ll go away again….
A few turns ago there was some chatter about getting a squad up on that row 18 road in the west – what happened to that? I know our first half-track in the west got wiped out after poking its nose a little too far forward into the main clearing, but now we got that enemy jeep zoomed all the way up to the north, which means there is going to be some work to do up there to avoid getting flanked if/when we go for the pumphouse or the monastery. Can the other half-track have a look around, or is it still too risky?
I wouldn’t like to assume that the woods running East to West along that part of the map are empty, so I suggested a couple of turns back that one of the fusilier squads might head that way on foot. It’d let them flank the pump house, give us another angle from which to attack the monastery and also scout that wood.
Sending a half track feels a bit of an invitation to give Private Hodgekin a chance to reduce the load he’s had to lug around the flat lands of Europe by the weight of a PIAT shell.
Order: *Fusilier squad 6 (9 men) [black g23], hunt [black p22], –> hunt [black w20]
Order: Fusilier squad 5 (9 men) hunt [black o24]
Time’s a-ticking, and we need to eyes on whatever is bottling up all our armour in the west. In that spirit, the Oberleutnant in the platoon HQ orders his men to stop swapping stories about the farm they plan to retire to once the war is over, and to push forward through the trees.
ORDER *Platoon HQ (4 men) [black h25] QUICK to Black K 27 then SLOW to BLACK L 27
Bereft of anything more useful to do, the eastern halftrack is going to lay down some HE at opportune targets.
ORDER: *SPW 251/1 halftrack (black d23) to TARGET BRIEFLY (for about 30s) any known enemy contact that other units can currently see but that it currently cannot. Priority will be if it can get LoF to the units on the Western bank, otherwise to lob a shell at the windmill side and put some fear in that sniper.
ORDER: Fusilier HQ [blue n42] hunt to Blue L42.
I’m not sending them onto or over the rail lines as the vanguard of the attack; they’re a support unit!
Turn execution underway
Hi. It’s a cliché, but long time reader, first time poster here. Excited to see if I can help our Western troops recover from their early blow. Also, I subscribed, but I imagine it’s going to take a day or two to get my brown name.
ORDER: If Pz 35 [black m42] has LoS to the Windmill, TARGET the sniper, or AREA TARGET the top floor. Otherwise AREA TARGET the mortar team at [red m30]. If neither is possible, drop a covering arc from [black 025] to [red i36] (or as close as you can get to those points with LoS).