
“And the angel took the censer, and filled it with fire of the altar, and cast it into the earth: and there were voices, and thunderings, and lightnings, and an earthquake. And the seven angels with the seven trumpets prepared to sound them.” (from the Book of Revelation).
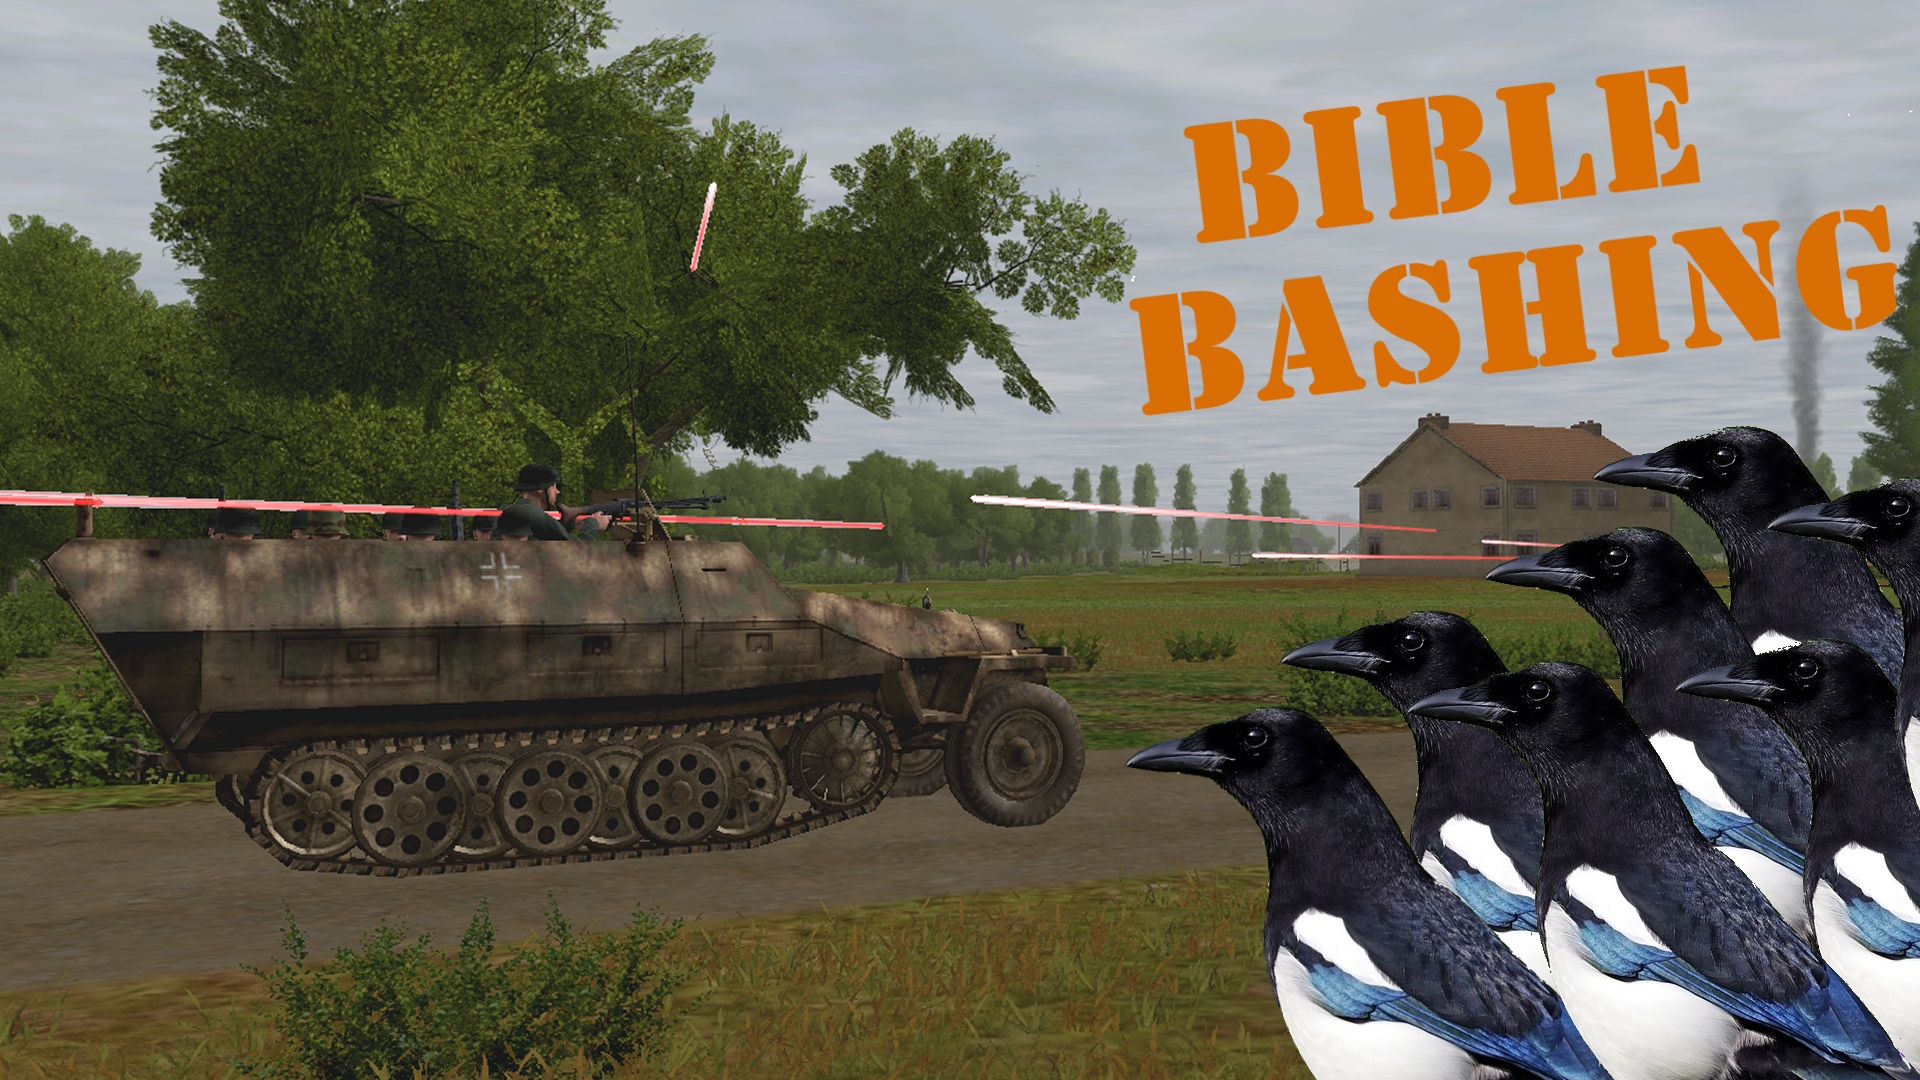
In Turn 7 our pair of Granatwerfer 36s shake, shred, and suppress, and seven startled magpies presage disaster for a speeding Sonderkraftfahrzeug.
(Brinkmann’s Bridge is an open-to-all game of Combat Mission: Battle for Normandy in which the commenter-controlled Axis forces are out to recapture a Dutch canal spanner recently snatched by Red Devils. Each turn covers one minute of WeGo action. For a scenario outline, click here).
Squabbling over a roadside badger corpse at black m26, the gang of piebald Pica picas reluctantly disperses moments before the Comment Commanders’ crowded SPW 251/1 scurries past.

A few seconds later everyone aboard that halftrack is either dead or seriously wounded.
I wish I could tell you who or what fired the shell or shaped charge that wreaked so much havoc in such a short time, but I can’t – the turn movie dropped no hints. What I can say is this…

The HT was braking to disgorge its passengers when it came under telling machine gun fire from the vicinity of the pumphouse.

Hearing his gunner cry out then collapse on the floor behind him, the driver took an executive decision and went into reverse. The retreat was skilfully and swiftly managed (a replacement MG 34 operator did his best to discourage the pumphouse ambushers during the manoeuvre) but evidently there was still at least one unbroken LoS line between the Axis AFV and something hostile at T+35 – the moment the fatal projectile struck and penetrated the lower front hull.
Happily, on the other side of the canal, thanks largely to sterling work by three support units who, up until now, have contributed little, Turn 7 passed painlessly for the men in the coal scuttle helmets.

Things looked dicey for Woikin’s team by the blazing Leichter Panzerspähwagen until the SE light mortar quelled the paras on the other side of the track with an impressively accurate salvo of 5cm bombs…

….the NE mortar overcame its unspecified technical issue, and plastered the foxholes at red y40, silencing, temporarily at least, the Bren gunner who lurked there, and…

…trespassing on the railway, the SPW U304 reduced the British light mortar team at blue j51 by at least one Sten gunner.

While putting a little distance between themselves and the closest foe, Woikin’s mob couldn’t resist hurling some HE too.
Elsewhere during Turn 7:

Meister’s team approached the embankment.


Hirsch’s team and the eastern HQ reached column n.

Elm tended a wounded comrade.

Bulau’s band cautiously entered the green house by the railway bridge, and found it deserted.

The buttoned Panzer 35(t) hunted for targets without success, while, staying low, the scouts crept north.

On the road behind the conifer plantation, 5 Squad (Eichhorn) and 6 Squad (Deych) abandoned the Opel Blitz. The Kubelwagen and second halftrack have yet to deposit their passengers.


Turn 8 orders here, please. Commenters are cordially invited to suggest moves for the following units (A maximum of one unit per commenter. Embarked infantry and their taxis count as single units until separated. Split squads also count as single units. Units on the west side of the canal answer to subscribers only.)
(anyone)
– NE group –
*SPW U304(f)-10 halftrack (63HE, 45AP) unbuttoned, [blue k11]
*Fusilier squad 1 (9 men) [blue m19/20]
*Light mortar team (31 HE) weapon deployed [blue u9]
– E group –
*Fusilier squad 2 (9 men) split into two teams – Meister’s team (5 men) [blue r29] and Woikin’s team (3 men) [blue l33]
– SE group –
*Fusilier HQ (4 men) [blue n42]
*Fusilier squad 3 (6 men) split into two teams – Hirsch’s team (5 men) [blue o48] and Elm’s team (1 man) [blue t48]
*Light mortar team (38 HE) in process of deploying weapon [blue y43]
(subscribers only)
*Panzer 35t (32HE, 22AP, 2CAN), buttoned, [black m42]
*Scout team (3 men, MP 40s) [black o46]
*Kubelwagen + medium mortar team (4 men) [black g18]
*SPW 251/1 halftrack + platoon HQ (4 men) + mortar ammo bearers (2 men) [black d20]
*Fusilier squad 5 (9 men) [black h18]
*Fusilier squad 6 (9 men) [black g23]
Please start all order comments with ‘ORDER’ and any later revision comments with ‘REVISED ORDER’. This will help me distinguish firm instructions from suggestions and advice.
Seems to me that the Pz. 35(t) is fairly well-placed to support the attempt to break out past the pump house—perhaps push it north along the road in an effort to link up with the embattled reinforcements?
(I won’t presume to elevate this to the status of an order—much as I enjoy the communal Combat Missions, I can never follow them quite closely enough to bear the responsibility for actually moving units around.)
Would advise against pushing the Pz35 north in the direction that SPW halftrack just got toasted, until we can identify the toaster. Its position right now is balanced when it comes to risk/reward already.
But do grab that 8cm mortar and its ammo carriers. We need someone to set it up asap. Preferably where its already at.
Second that – the “toaster” could, i reckon, be anywhere near the other end of the clearing. If an AT gun, then perhaps in the lee of the pump house or somewhere in the Monastery grounds. There’s an outside chance of a PIAT in the woods near where the halftrack was emerging from the treeline, but we might have spotted them.
An AT gun watching over the western clearing was certainly on the cards and could also have been responsible for that shell burst near the tank back in turn 2/3… My money is on a gun sited at either [y/z,29/30] or [redb-g, 41], good cover and sight lines…
I’d agree, with red b/c 41 commanding the approach road and covering the bridge. It’s also likely to be less visible to Brinkmann due to the trees in-between.
I’m not certain though – location, or even whether there is an AT gun. The half track was well within PIAT range of the pump house and there’s no shortage of hiding spots for comparably equipped troops near the monastery. I think one in the woods by the destroyed vehicle is much less likely though – to penetrate the front lower, go through the engine and explode sufficiently far back that even the chaps by the exit door are out of the fight does rather suggest a more frontal attack (and strengthens fears of an AT gun on the North edge of the Monastery).
So your caution feels entirely justified 🙂
It does feel like there’s too many unknowns about that AT position. I’m wondering if we should dismount the second half track squad and push through the woods in force, swinging around via the woods north of the pump-house. They’ll draw fire, but we might get a spot on where that shot came from.
Good points. It’s maybe rendered moot by the loss of that first halftrack and occupants but the remaining infantry in the NW are not our ideal scouting material. The command squad would ideally be used to spot for that heavy mortar – requiring it to be relatively stationary and within command range (probably about half a map square – where Tim’s letters and number rows constitute squares).
In conclusion, I agree we have to jetison that normal order of battle now. Set up the heavy mortar in position to spot for itself, despite the risk that entails, and send the command squad to shufti out the Britishers.
doh, scratch that – we have 2 fusilier squads still in the NW, in addition to the command squad …
I wonder how quickly a unit could get across the grass in column a, all the way down the side of the map then east to the house at [black l, 38]? I’m not sure it’s worth trying to squeeze the tank behind there, but having someone with a broader field of vision might help for figuring out how to tackle the pumphouse.
I think the west bank of the canal is short of commanders so do please join in.
I mean, without your assistance we’ve managed to break a half track and most of its passengers, you can only really help improve things from here 🙂
lol – plus ca change…
We didn’t kill the Pz35 yet!
@Tim
– How does the arithmetic for 3rd Fusilier squad work? It says 7 men, but it’s Hirsch 5 and Elm 1; unless Elm’s colleague is back in the fight.
– Has Elm finished tending his mate and taken the MG?
– How much do woods slow down movement? In moving SE mortar team to [blue m, 50], would it be faster to go direct or round the 2nd L-shaped wood?
– Are SE mortar team setting up again because they reached their move destination? I’d rather they didn’t deploy until instructed. (Maybe they’re just resting it on the ground while they stand around).
– Is that a pillbox at [red t, 44]?
– Typo. Unless Elm’s medical skills verge on the miraculous, 3 squad is down to six men.
– No. Give him another turn to apply wound dressings and collect that MG 42.
– Hard to say, but for speed I’d recommend a route that used blue t49 and blue s50 as waypoints .
– That was ‘their’ call. The Granatwerfer 36 deploys and undeploys quickly so if you want them to move again next turn there shouldn’t be much of a delay.
– Yes, but it’s KOed so can be ignored.
Thanks very much for your recent donation.
How complicated of an order can we do? I’d like to have the medium mortar team leave the kubelwagon, deploy in the field next to them [black b 25], and if possible shell next to the pump house [black z 29 or so]. Do they need LOS or do we have to do something to have someone else spot for them?
The medium mortar team will happily leave the Kubelwagen and start deploying their weapon next turn. However, it will take them a minute or two to set up, and until they’re ready, they won’t accept targeting orders. It’s also worth bearing in mind that unless they A) have LoS to a target, or B) are fairly close to an HQ with LoS to a target, they can’t engage that target. You’ll need to use them in concert with the HQ.
I suspect we’ll need their firepower against the Monastery and its environs but no harm in upsetting the pumphouse crew first. Given the nastiness is mostly on that side of the map keeping that wood in the way sounds an excellent plan.
While they’re setting up if the HQ unit moves to the edge of that wood it should be possible to find a spot that gives them line of sight to the pumphouse and the monastery, while remaining in cover themselves. I’d hope that’s still close enough to provide orders to the mortars – the picture of the Eastern HQ shows them influencing more units than I’d anticipated, which is nice.
Having got the Eastern HQ safely to its current spot I’m hoping to leave them there for a turn or two, get their breath back, provide some fire support and keep the troops around them happy.
The two light mortar crews probably need to make some moves. Colonel K’s suggestion of blue M 50 would make them the vanguard on that flank, which is an interesting proposition but they’re also unlikely to contribute much from their current location.
The NE mortars I’m tempted to invite onto the rail track pretty much where the halftrack currently is, on the assumption it will have moved by the time they get there.
At the same time I like the spot it’s in; likely to be at much lower risk from whatever took out the reinforcement halftrack but still highly influential along the edge of the canal.
What I don’t want to do is invite another salvo from the NE team – they used a third of their ammunition on that last one, so assuming there are only a couple of further opportunities to get their fire support I’d prefer to wait for more definite targets.
1 Squad need splitting again but that should probably wait until they’ve left their new home. Seems sensible to give them a turn or two to see what’s visible from the windows and shoot it.
Meister’s team can probably reach the rail line safely now. Crossing it will be fraught with danger though, the wood opposite is occupied (plus anybody that survived the mortars, grenades and other ordinance on this bank) so my instincts are to lie up against it ready for the big push once the other two squads are also ready.
The guys in the south in particular will need a combined push; the monastery is crawling with paras so it’s quite likely the woods by the canal are also lined with eager bearers of sten, bren and Lee En’.
All of which is my way of admitting I’m not sure what’s best to do next.
It does seem like (ironically) the eastern squads seem in a much better position than their western reinforcements.
I agree we shouldn’t be too aggressive to be with the eastern half track: it seems like we have fire superiority there so far, but I don’t want to chance pushing too far.
Anyone else think it might be worthwhile to get someone into the windmill at red z8? It’s a level 4 building and could provide observation and overwatch on the entire North West side of the canal. Or, is that too out of the way to be much help?
That’s a good idea. Tim posted a comment on turn 3 that I remember being “the windmill is windowless”, but now i’ve gone back to check he said “the eastern side of the windmill looks to be windowless”. Pic: //tallyhocorner.com/wp-content/uploads/2021/02/bridge03p.jpg
If only the south side has windows, it’s perhaps a less useful spot for observing the pumphouse and orchard, but having a sniper up there would likely still help us against infantry on the west side of the rail embankment. I’m not sure if we can get someone up there quickly enough for it to pay off, though.
ORDER: NE Group – Bulau’s band (Squad 1, in green house) – Assign two of the lowest-born men to a scout team and QUICK to windmill, taking a route that minimizes the chance of being killed/wounded (e.g. stay East of the rail line up to the road, then to windmill). Once the scout team arrives at windmill, they are to make their way to the upper floors of the windmill (assuming they do not become pinned).
Is that a possible order?
In the first Brinkmann’s Bridge post (“Backstory”), Tim wrote that “Full strength infantry squads can be split into two or three sections”. ie 5/4 or 3/3/3. You can presumably divide into three and send one section off; the remaining 3-man sections should reamalgamate in a turn’s time. Just my understanding…
Order: *Fusilier squad 6 (9 men) [black g23], Hunt [black L27].
Revised order: *Fusilier squad 6 (9 men) [black g23], hunt [black N23]
Ok, lets get the medium mortar team deployed, and hopefully someone else can dismount the the HQ team and creep them to the edge of the woods to spot for them.
ORDER: the medium mortar team leave the kubelwagon and deploy in the field next to them [black b 25].
As a destination for SE mortar team, I’m thinking of approx [blue g, 55]. This should hopefully provide cover from Something Nasty lurking in the south-western woods, while permitting fire on bits of the orchard and maybe also near the pumphouse.
ORDER: SE Light mortar team [blue y, 43]
Fast to [blue t, 49] – past the end of the fence.
Fast to [blue s, 50/51] – whatever terrain near the watercourse is rapidly traversable while also having a low elevation.
Fast parallel to Ruud Gullit watertje to [blue n, 50/51].
Normal speed to [blue m/n, 52].
Finally, crawl to peek over the railway line at [blue k/l, 53].
ORDER: FS2 Meister’s team to move west from [blue r, 29] to [blue m, 29], in hunting mode. If they don’t stop to engage on the way, then carefully crawl forward to [blue l, 29].
FS2 Woikin’s team, no new orders. I think they might still be withdrawing to column m, but if they think hanging around in column l is more useful, I’ll trust their judgement.
ORDER: SPW 251/1 halftrack + platoon HQ (4 men) + mortar ammo bearers (2 men) [black d20]
Halftrack quick to [Black d23], mortar ammo carriers to load up on mortar rounds and dismount to join the mortar team at [black b25], HQ team to dismount and Hunt to [black J26]
Badger, i already sent a squad down the conifer forest. The hq platoon will now be just behind that squad, but that might be your intention? We need some eyes on the east side of the road also.
Ah I missed that!
If I understand the mortar mechanics based on Tim’s comments above, the HQ needs LoS to the mortar team to spot for them.
Would you be open to pushing the fusiliers east instead?
No problem, will do.
In fairness there are two fusilier squads. One going East to flank the pumphouse while the other heads South in preparation for the assault on the monastery might be an option.
Less than 24 hours until I execute Turn 8. Wallflowers at present include the Panzer 35(t), the SPW U304, the scouts, and Hirsch’s team. If anyone fancies tasking a second unit, be my guest.
ORDER: Fusilier squad 3 (6 men) split into two teams
Elm’s team (1 man) [blue t, 48]
– continue his ministrations
Hirsch’s team (5 men) [blue o, 48]
I’ll try to describe it looking at the image of Ruud Gullit Watertje provided earlier:
//tallyhocorner.com/wp-content/uploads/2021/01/bridge00yyy.jpg
Fast to the V in the terrain where grass meets mud [blue n, 50/51]
Cautious to left of the water tunnel, just short of the weeds [SW quadrant of blue m, 52]
Crawl up the slope at an angle (where it’s gentlest) to finish on the tracks above the water tunnel [blue k, 51]
ORDER: NE Light mortar team [blue u9] to pack up and move to Blue L8. They are not to go up onto the tracks (this turn).
ORDER: SPW U304 Hunt south just a bit to [blue k 20]
Turn execution underway!