
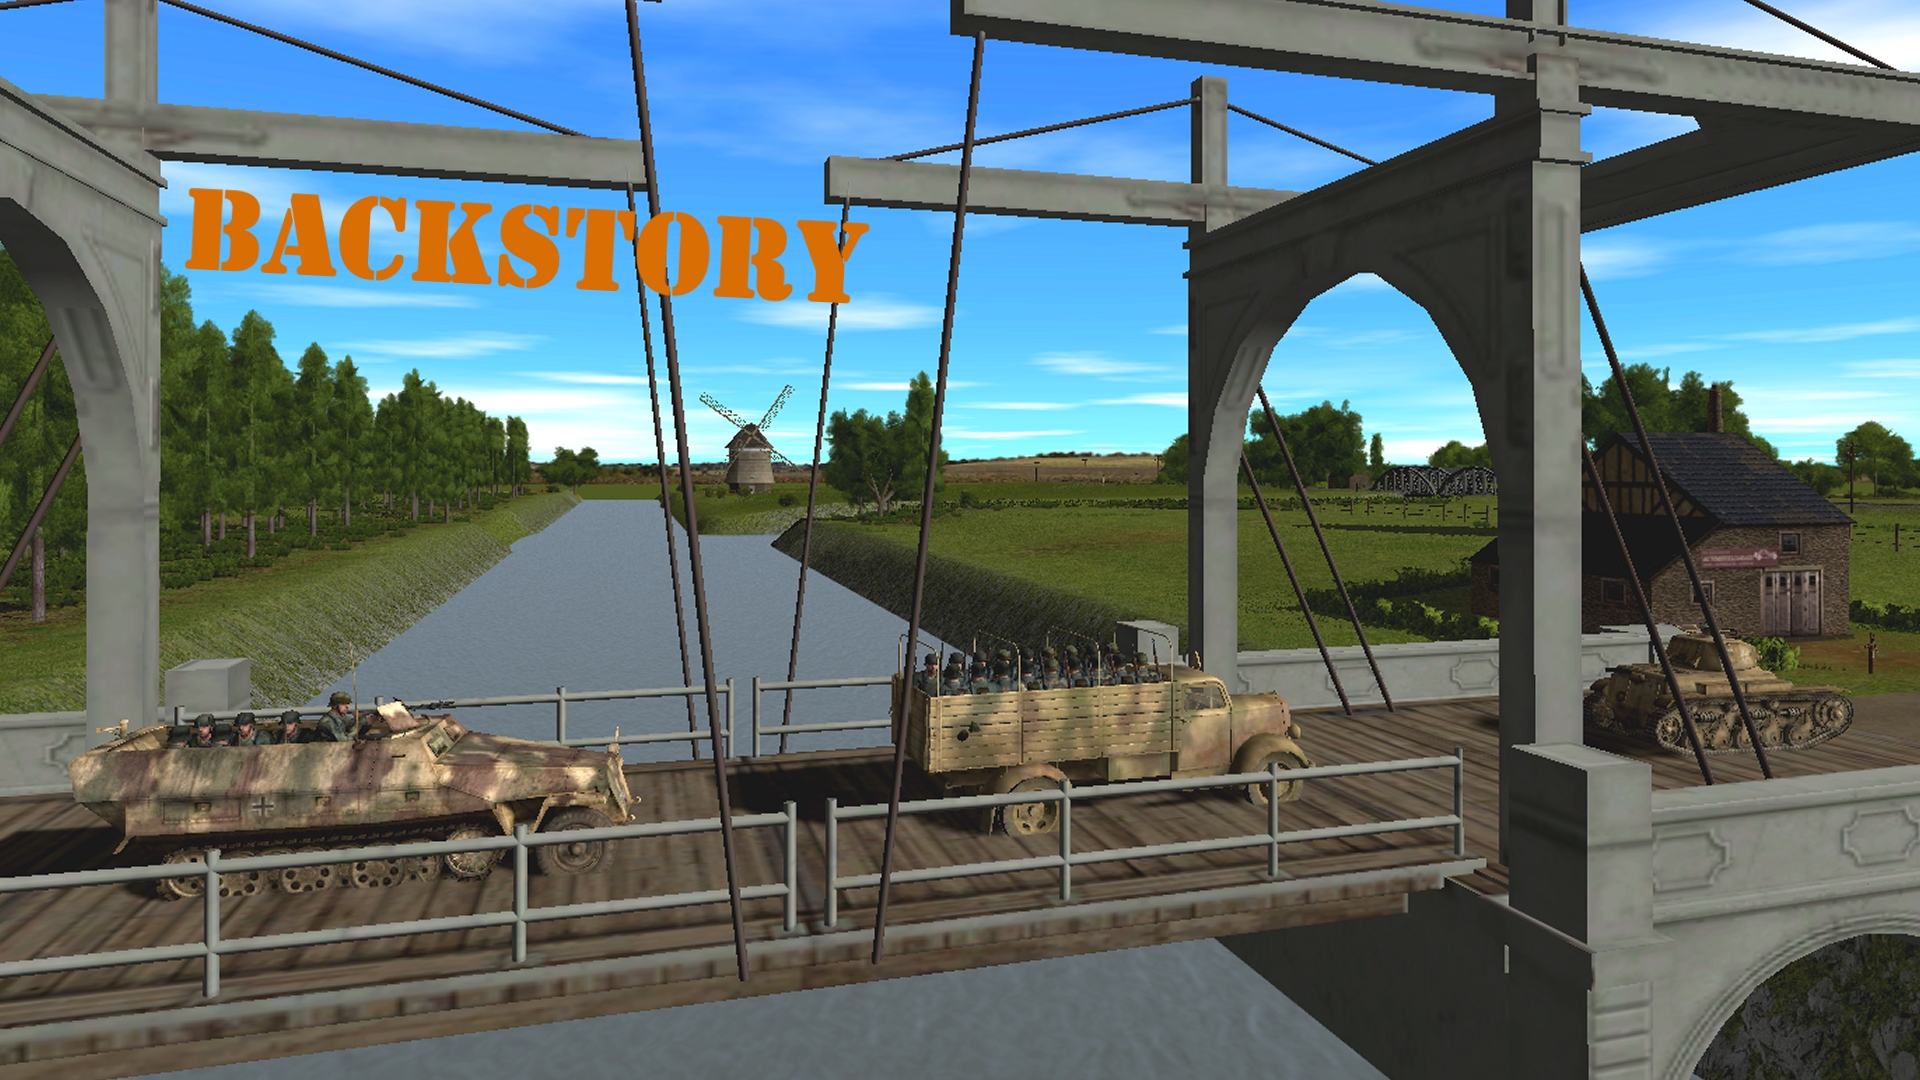
In the early hours of September 17th, 1944, weary Wehrmacht private, Willy Hauser, was walking along a railway embankment near the Valburg Canal in the Netherlands when he heard what sounded like a train approaching. Had the train really been a train, Willy’s smart four-pace retreat would have ensured his survival. However, because the train was actually a heavily laden Horsa glider moments away from sweeping the embankment with its starboard wing, the sleepy Soldat’s evasive manoeuvre proved hopelessly inadequate. Clobbered by a hurtling aerofoil, the unlucky Herr Hauser became the first fatality in the Battle of Brinkmann’s Bridge.

Keen to start Tally-Ho Corner’s very first play-by-comment Combat Mission game, but reluctant to interrupt “normal service” in order to do so, the CMBfN-powered “Brinkmann’s Bridge” won’t, I’m sorry to say, unfold anywhere near as rapidly or as regularly as its six RPS-hosted predecessors. My intention is to post turn tales on Wednesday morning and, possibly, Sunday morning too. That way I’ll still have the time I need to research and write mammoth Friday articles like next week’s A2Z, and help Roman with foxer fabrication.

The structure referred to in the title is a Dutch canal crossing captured by British glider troops in a cheeky nocturnal coup de main attack. Your task, Comment Commanders, is to retake it within 25 turns without accidentally killing one of Germany’s most famous and highly decorated fighter pilots in the process. By chance Oberst Bernhard “Der Sperber” Brinkmann was in the vicinity of the bridge when the Horsas landed. Abandoning his Kubelwagen, the ace fought tenaciously alongside Hauser’s comrades until he realised that he was alone and surrounded. He’s currently hiding out in an attic close to the canal. The Brits have no idea he’s there, and the longer they remain in the dark, the better.
The Venue

Approximately 750 metres by 450 metres, the battlefield would be as flat as a stroopwafel if it weren’t for its numerous impassable watercourses and the low railway embankment that runs the length of column ‘blue k’.

Although there are German forces on both sides of the Valburg Canal, until the bulk of your mechanised infantry arrive on the woody western map edge circa Turn 5, you’ll have to do most of your scouting and scrapping with units temporarily (?) marooned on the eastern side of the map. Fail to dislodge the bridge defenders and these easterners risk close encounters with an Allied armoured spearhead set to cross column ‘green l’ in about twenty minutes’ time.

Noteworthy topography includes the all important canal bridge (red w, 39), the railway bridge at blue k, 23 that must be used by any unit wishing to enter or leave the rectangular ‘island’ in the NE, and the vehicle-impassable conifer plantation in the centre of the western map edge.

Don’t expect the light fog that’s moistening scenery and soldiery to have a major impact on spotting or ground conditions. AFVs should be able to operate off-road without difficulty.

^ Looking west with foliage removed
Most of the grey ‘walls’ on the gridded diagrammatic map above are actually wire fences easily traversed by men and vehicles. The majority of the hedges on the battlefield are low and similarly permeable. Just about the only green line that will prompt a detour, is the pale green one (‘bocage’) screening Van Barneveld’s farm (on the right in the above image).

^ Looking east with foliage removed. The walled complex close to the bridge is a bomb-damaged monastery.

^ Looking SW across ‘The Island’
Your Units

Present at kick-off are three distinct clusters of German units. In the top-right corner of the map a well-equipped* nine-man fusilier squad and a three-man light mortar team keep a SPW U304(f)-10 halftrack company. The latter’s 37mm gun is as happy to hurl HE as AP.
* Their arsenal includes submachine guns, semi-automatic rifles, rifles, rife grenades, Panzerfausts, and a bipod-fitted MG 42.
Awaiting orders in the SE is the remainder of ‘2 Platoon’ – two 9-man fusilier squads, a 4-man HQ, and another light mortar team.

Spooking squirrels on the other side of the map at the start of Turn 1 are a Panzer 35(t) and three MP 40-toting Aufklärer.

At T+5 the lonely westerners will be joined by a convoy consisting of two SPW 251/1 halftracks, a truck, and a Kubelwagen. The convoy brings another fusilier platoon (three squads and an HQ) and a medium mortar team to the party.

You’ve been promised additional armour, but heaven knows when this will arrive. Waiting around until it turns up could prove a very costly mistake.
The Enemy

As the Britishers were delivered by Horsa gliders, Panzerfaust targets are likely to be thin on the ground today. We have no real idea how many men are holding the bridge, but judging by the corpse-strewn glider crash site we passed en route to ‘The Island’ our foe may be a little short-handed.
Communal Combat Mission Basics

Just in case you weren’t around for last year’s Italian dungeon crawl, here’s how Play By Comment Combat Mission works. Every turn, via a comment along the lines of “Turn 1 orders here, please…” I solicit written instructions for friendly forces. Orders are accepted on a first-come-first-served basis with individual commenters usually only permitted to ‘move’ a single vehicle, infantry squad, or weapon team per turn.*
* Embarked infantry and their transports are treated as single units until separated.
For example… one turn Invincible_Vince might send the scout team to investigate the building at black j, 48, while Cherubik manoeuvres the Panzer 35(t), and SlowDoris does something helpful with the SPW U304(f)-10. During the next order round Concordski might decide the scouts need to halt and scenery-scrutinise for a spell, while LMF retasks the halftrack, and Shropshire_Lass tweaks the Panzer’s waypoints.

On the evening before a turn report appears I’ll execute all issued orders posting the results as a short illustrated article the following morning at approximately 0900 hrs GMT. Did 2nd Squad manage to get across the canal unscathed? Did the mortar team nail that pesky Bren gunner? All will be revealed.
Keen to reward the THC readers who are helping me keep body and soul together by subscribing, I’ve decided that some of the units involved in the battle for Brinkmann’s Bridge will answer only to Comment Commanders with brown names (If you’ve subscribed and have yet to be browned, please contact me with your user details and I’ll rectify matters). To keep things simple, units east of the canal can be orchestrated by anyone; units west of the canal are reserved for subscribers.
Issuing Orders

You don’t need to understand the intricacies of Combat Mission: Battle for Normandy in order to participate. Consider the tactical situation, and provide a destination coordinate and perhaps a clue to pace/cautiousness and I’ll do my best to translate your instructions into successful in-game orders.

Full strength infantry squads can be split into two or three sections for tasks like scouting and assaulting, and will fight harder, react quicker, and be less likely to panic if close to an HQ. As infantry like to bunch up in CM, and the game’s MGs and mortars can make mincemeat of crowds, sundering squads often saves lives.
During the sixty-second non-intervention ‘action phases’ that follow order issuing, units may encounter a threat or target that causes them to abandon or modify your instructions. For example, vehicles can decide to reverse if they don’t like the situation they find themselves in. Specific targeting instructions may be issued but usually combatants can be relied upon to self-select targets sensibly.
The CMBfN demo is a great place to start if you’re unfamiliar with CM play mechanics. I’ll do my best to answer any technical questions that arise, but as I know the original trio better than I know the second gen titles, I’d be very grateful if spectators and players with more experience furnished explanations and proffered advice too.

Enjoy the hostilities, Comment Commanders. May Mars treat you better than he treated poor old Willy Hauser.

Turn 1 orders here, please. Commenters are cordially invited to suggest moves for the following nine units (A maximum of one unit per commenter. Embarked infantry and their taxis count as single units until separated)
(anyone)
– NE group –
*SPW U304(f)-10 halftrack (65HE, 45AP) [green k, 8]
*Fusilier squad 1 (9 men) [green j, 8]
*Light mortar team (45 HE) [green k, 8]
– SE group –
*Fusilier HQ (4 men) [green k, 42]
*Fusilier squad 2 (9 men) [green k, 39]
*Fusilier squad 3 (9 men) [green k, 47]
*Light mortar team (45 HE) [green k, 48]
(subscribers only)
*Panzer 35t(33HE, 22AP, 2CAN), buttoned, [black a, 50]
*Scout team (3 men, MP 40s) [black a, 50]
Please start all order comments with ‘ORDER’ and any later revision comments with ‘REVISED ORDER’. This will help me distinguish firm instructions from suggestions and advice.
ORDER *Scout team (3 men, MP 40s) [black a, 50] -> Quick until end of treeline, then hunt to house at [black l, 48]
So glad to see another communal Combat Mission!
So happy to see with your own site Tim. I’ve been enjoying your work since god I don’t know, sometime in the early 2000s or something.
Friday lunchtime just got great again.
Morale +1. Thanks.
Hooray! This tipped me over into subscribing – sorry you have to work hard for it Tim but CCMs are some of the most fun I’ve had on the internet.
Things I’ve noted:
Friendly motorised infantry reinforcements at turn 5
Friendly armour reinforcements at turn?
Enemy armour reinforcements at turn 20
Match end at turn 25
So we may have time to deal with the paras before their armour shows up. The enemy armour may be too late to do much – but they could tip the balance if still in question. There are also some emminently defensible choke points where infantry can slow/stop the enemy armoured column with some audacious CQB/granaten.
ORDER: NE Fusilier squad move to contact at building [blue m, 20]
If no one else demurs or obliges, i’d suggest the NE mortar load up in the NE SPW and head to [blue m, 20], without overtaking the fusiliers.
Also, a clarification Tim: Can the NE fusilier squad scout/target for the mortar? The icon suggests they can…
Ooh, I missed the suggestion about loading up the mortars.
I’m not convinced that Blue M-20 is clear: it’s where I’d put a squad to overwatch that NE bridge, and I’m a little leery of PIATs. Are you alright if I hold that half-track back in an overwatch position at Blue Y-13 to cover the fusiliers?
Nae bother! You’re probably right that the building is already occupied, so the mortar might be more use (and longer lived) if deployed to support our efforts in the NE, perhaps somewhere in cover with LOS of the building & bridge?
Thanks for joining the airlift, Maquisard.
I’m 95% certain that the two light mortar (Granatwerfer 36) teams can only bombard in-LoS targets. Unlike the medium mortar due at T+5 they can’t be tasked/assisted by others.
Forget cadging a lift from the SPW U304(f)-10 too. It’s much pokier than a Hanomag and doesn’t have room for a three-man mortar team.
Righto, thanks Tim! Should have done my homework and checked the references! 🙂
Sorry guys but I’ve had a vision from the future and I hate to say it but we’re going to lose the war. I suggest we just surrender now, survive the war and keep the Panther safe because it’s a lovely tank and we should preserve it for museum visitors of the next century.
No? Oh.
In that case..
ORDER: Brinkman’s Kubelwagon should carefully and discretely prop that fence up.
Don’t tell me our uniforms are also giving you second thoughts? What could be sinister or wrong about having a deaths head as our insignia?
https://youtu.be/hn1VxaMEjRU
Combat Mission! Combat Mission! I am beyond excited.
A quick perusal of a 1944 British Air Landing Company ORBAT (https://www.battleorder.org/uk-glider-1943) gives us some good and bad news.
The bad news is the reference to ‘Horsas’ plural suggests we’re up against an understrength airborne company of up to 4 platoons with 26 men each, and one bristling with Brens to boot. Our fusilier squads tote MG42s, but it’s probably not a good idea to slug it out at a distance with potentially superior numbers ensconced in cover.
The good news is that they have 3 PIATs at most as AT capability (assuming a company TOE), which means we start with a fire-support advantage, and if we can find and deal with them our halftracks and that Panzer can romp up and down the map mostly unopposed until T-20.
POSSIBLE ENEMY POSITIONS:
Houses at Red M-40, Red P-41, and Blue A-37 (overlooking the railway bridge)
Monastery compound at Red B-48 (overlooking eastern approach)
Treeline running along Red S+T 8-38 (overlooking both sides of the river)
Buildings at Red Z-8 and Blue M-20 (overlooking NE bridge)
POSSIBLE ENEMY APPROACHES:
Main road at Green L-44 (Most likely)
Secondary road at Green L-8
A couple of squads in the woods at Green F-39 and the house at Blue X-5 with Panzerfausts and limited target arcs would make great ambush teams closer to T-20.
*4 PIATs at most
It wouldn’t be unreasonable to assume that they may have jeeps and/or bren carriers, and it’s far from impossible that they’ll have light field guns, so we really ought to keep an eye out for those.
For a bridge capture they’ll have sent some Royal Engineers too, they may have a boat or two and obviously there’ll be the folding bicycles. Tread cautiously chaps, the enemy is mobile.
Ah I ruled out jeeps, bren carriers and Tetrachs because of Tim’s comment about ‘Panzerfaust targets being light on the ground’, but had forgotten about field guns! If there are any on the field that Panzer might be in some trouble…
ORDER: SPW U304(f)-10 halftrack (65HE, 45AP) [green k, 8], Quick to Green C-8, then Hunt to Blue Y-13, aiming to use the house at Blue Y-14 as cover.
Priority is to act as fire support for the NE fusilier squad by getting overwatch LoS of the House on Blue M-20
(Question: is it possible to get LoS from Blue Y-13 to the houses on either side of the main bridge?)
Correction: order as above, but pause for 30 seconds before moving so as to
1) not overtake the NE fusiliers
and 2) in case someone wants to order that NE Mortar squad to hitch a ride across the river.
CORRECTED ORDER: SPW U304(f)-10 halftrack (65HE, 45AP) [green k, 8], Pause 30s, then Quick to Green C-8, then Hunt to Blue Y-13, aiming to use the house at Blue Y-14 as cover.
The view from the little house at blue y-13:
//tallyhocorner.com/wp-content/uploads/2021/01/bridge00w.jpg
(The wooden ‘fence’ on the right is actually a footbridge)
Ah, the main road is sunken! Shame, was hoping to use the treeline as a base of fire once the NE was cleared out. There’s still good LoS on the house at Blue M-20, so the current order for the halftrack stands. Thanks for the groundling’s PoV, Tim!
Advocaat all round in the cafe in 19 minutes time!
ORDER: Fusilier squad 3 (9 men) [green k, 47]
Move fast to [green b, 46]. Divide into two sections; sections to move on at normal pace to the western edge of that copse where they have good vision, but maintain concealment [blue y, 46] and [blue y, 48].
@Tim
What are the prospects of using the 51-row ditch (presumably named Ruud Gullit Watertje) to move unobserved from a distance?
The eastern portion of the row 51 ditch (railway embankment at far end):
//tallyhocorner.com/wp-content/uploads/2021/01/bridge00yyy.jpg
Is the building at [green h, 56] a barn (no windows) or somewhere there might be enemy troops posted upstairs covering the whole area from row 44 on down? If the coast is clear, I wonder if it’s worth trying to get a group down to the trees at [green d, 56] to advance toward the van der Voort farm with Colonel_K’s squad.
Also, do we need to watch out for civilians, or is everyone we encounter guaranteed military?
It’s a two-storey barn with windows facing north. If it is occupied then the four units of the SE fusilier group have deployed pretty foolishly.
Brinkmann is the only non-Brit at risk from wayward mortar bombs etc. All the locals have either fled or taken to their cellars.
The mortar team deployed on the south side of the road instead of the north where they could perhaps become immediately useful covering an assault on the van Barneveld’s property has left me conflicted.
I think I’ll try do some recceing with the infantry on the north side of the road.
ORDER: Fusilier Squad 2 to quietly head north along green column l. Split at row 32, deploying the machine gunner and a couple of his chums at the edge of woods (column k) ready to provide suppressive fire if we need it. The rest of the squad to advance toward the canal, with a plan to come at the northern building from behind the northeast tree.
If our buddies up in the NE quadrant get sniped from across the canal, we might want to pick up the pace.
Splitting at Green K42 leaves the MG42 with a view obstructed from half the battlefield by buildings and from the other half by the tree-lined ditch.
No objection to splitting but wouldn’t they have a better initial field of view from Green I40, or a very nice position upstairs in Green D31?
I agree: that hedgerow at row 38 / column blue x is LoS blocking, which might not be apparent from the gridded map.
I might have misunderstood the scenario, because my assumption was that enemies could be anywhere on the map, not just clustered around the bridge. My thought was that we would need to sweep all the buildings one-by-one before advancing. My intuition is that the machine gunner would slow the rest of the squad down in an assault, so better to uncouple him early in a spot where he can at least shoot through the windows if he spots anyone inside.
The way I see the next few minutes on van Barneveld’s property playing out would be to have rifle guys check first the northern, then the southern building while the machine gunner covers the windows, doors and space between the buildings in case an enemy pops out. Then, once we know it’s clear, advance the machine gunner either upstairs or to the tree at [blue x, 30], which looks like it’s hiding a gap in the west hedge with a view of the bridge. Other option might be to move him up to the row 23 canal, depending on what the guys in the NE quadrant see.
Looking at the map, though, I wonder if perhaps he might be better off stopping at row 30 instead of 32, since that would give him direct line of sight to the gap in the hedge. On the other hand, that might take away the very slim angle he has of the building on the north side of the canal by the railway bridge [blue n, 19].
I fully admit I might be making some silly orders because I don’t have a good feeling for how far people can move in a single turn or how many squares they can shoot while remaining accurate. This is my first time taking part in one of these, so I’m definitely open to suggestions. What do you think?
@badgerbadger – I thought the fact that the hedge blocks line of site was a good thing, since it means nobody from the bridge will be able to interfere with us taking van Barneveld’s property, unless they just want to randomly loose mortars or grenades or something.
Hmm…I think alison posted a comment and took it back. I realise I misunderstood her intentions and didn’t realise she was aiming to sweep the farm. The hedgerow doesn’t matter in that case.
I take back my comment above 🙂
@badgerbadger, I tried to edit in a panic to fix a spelling mistake before the counter expired and now my comment is awaiting moderation! But the TLDR is: yes, my plan is to spend the next 2-3 turns taking the farm, then move the machine gunner into a better position once we know it’s safe. I’m not sure if I’m playing it too cautious, though – maybe it’s better to assume the enemy will be coming down the main roads and be more assertive about advancing on the bridge.
It makes sense to me as a plan! At this point we don’t know the enemy disposition. If nobody fires on them from the farmhouse, we can always redeploy the squad.
I suspect it’s wise to keep a squad around the SE anyway, since any enemy armour coming from Row 45 will be funnelled down the road at Row 39 in a narrow column…
Ah, I see.
Now I’m worried I’ve advanced the HQ too far. Oh well.
There are roughly 36 hours to go until I execute Turn #1 and four units – the fusilier HQ, the Panzer 35(t), and the two mortar teams – still need orders. Any takers?
ORDER: Fusilier HQ sprint to Green E42 then move slowly west through the trees to Green A42.
Rationale: They’ll be able to support the Fusilier squad in the trees, without exposing themselves prematurely to defenders at the bridge. I’d like to get them closer to Fussy Squad 2 but they’re across the road and I don’t want to risk the HQ on turn one.
We can adjust once some scouting is done, but this at least stops them getting left behind.
ORDER: Light mortar team (45 HE) [green k, 8] Quick to Blue Y 13 and Deploy there to support the NE fusiliers.
More explodey is always good.
I have a question when it comes to scout team sent to house at [black l, 48]. Is it possible to see beyond the trees to the fields in the area: [black mike and red india 30 up to 58]?
That 35 needs some Mk1 eyeball support to make it shine, and I dont want to send it facefirst into an unscouted field.
This is the view from black l48:
//tallyhocorner.com/wp-content/uploads/2021/02/bridge00xx.jpg
The scouts should be able to inspect the eastern side of the monastery and the field to the NE from this location.
Thank you Tim! Much appreciated.
Order: Pz35 move [black kilo 43] upon arrival face 090 degrees E. Wait for scout team to move further East and report in. If under fire of large caliber gun, reverse to starting position.