The faded sign on the roadside north of New Farm states ‘Strupnic welcomes careful drivers’. What it fails to mention is that the welcome extended to careful drivers who come in peace is very different from the welcome extended to careful drivers intent on invasion.
(Operation Oryx is an open-to-all game of Combat Mission: Cold War set in 1981. The commenter-controlled Zendoran forces are attempting to ambush a column of Podrabian vehicles bound for Zečin, the Zendoran capital. Each turn covers one minute of WeGo action. For a scenario outline and summaries of earlier turns, click here).

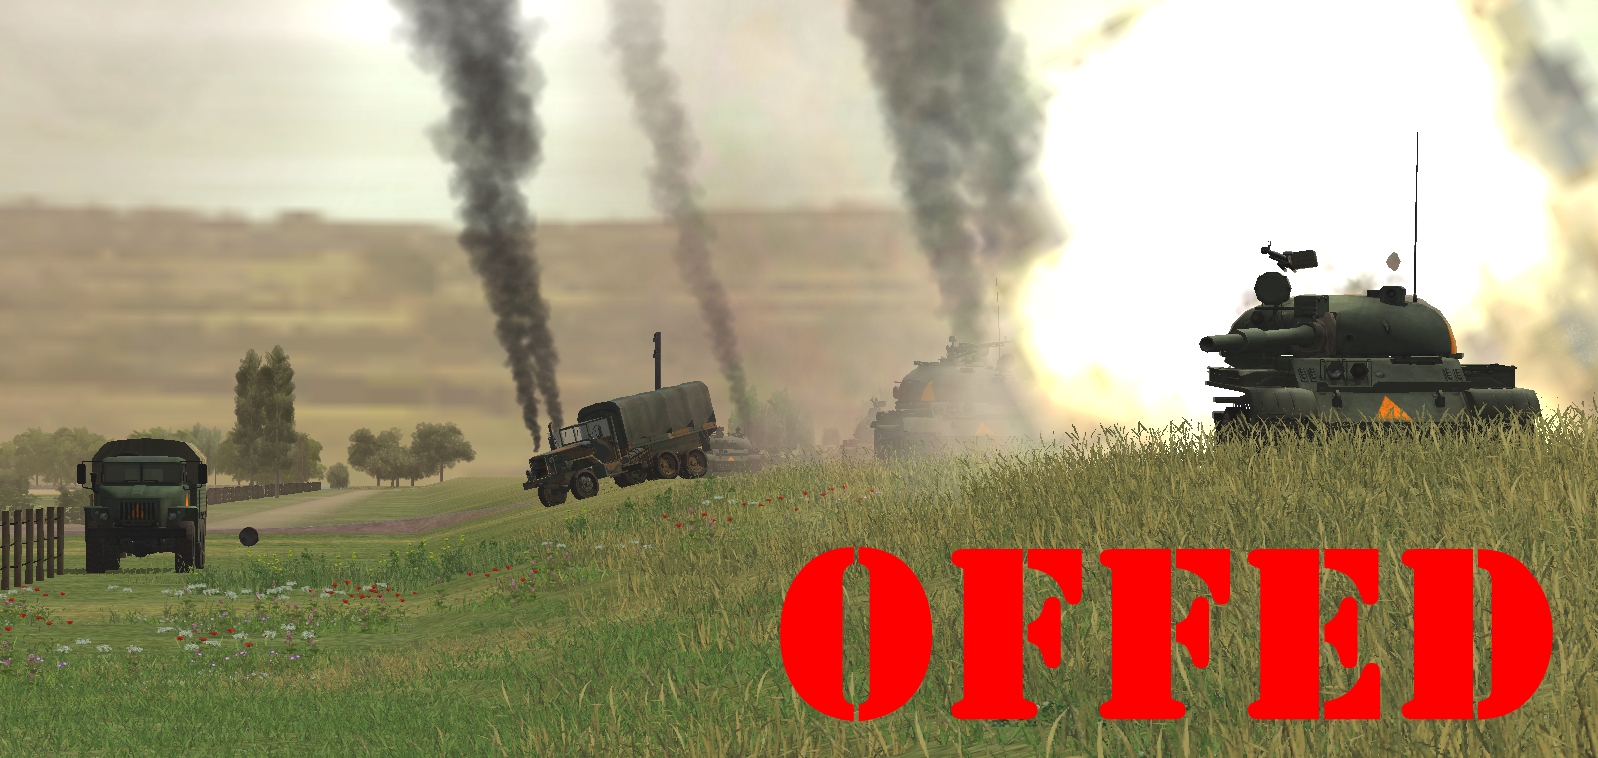
Minute Seventeen starts badly for the Comment Commanders. A hide order comes too late to save Recon Team Bravo from the close-range ire of a sharp-eyed T-62.

The brick-powdering HE blast incapacitates two members of the three-man team and lightly wounds the other.

Two seconds later, at T+5, what’s left of Recon Team Alpha attempts to stop the Pod’s lead MBT with a LAW. CM’s god of war contemplates a hit then thinks better of it. The rocket pockmarks New Farm after narrowly missing its intended target.

Harried by HMG rounds from our reversing-to-safety M113, the fortunate T-62 ploughs on. Its driver might be focused on the western end of the road, but evidently its gunner and commander are surveying a broader swathe of scenery. They spot the cartoon canine lurking behind the box 35 barn and take appropriate action. The tank’s main gun swings to starboard as Droopy aligns his own Drainpipe of Death.

Thankfully, the ambusher fires first, and manages to keep the beetling MBT centred in his sight for the duration of the TOW’s brief flight.

“HIT. Upper Front Hull. Penetration” says the hit text. In other words, we nailed him!

T+20. Recon Team Alpha’s LAW attempt hasn’t gone unnoticed. Not knowing that the firer is now out of AT weapons, the following T-62 decides suppression is the better part of valour and pumps a crater maker into the eastern tip of the box 74 copse. There’s a dirty flash and Alpha ceases to exist in a tactical sense.

This is the situation at the business end of the ambush at T+41. (A), the tank that topped Alpha, is manoeuvring around Droopy’s victim while Droopy reverses and reloads. Not far behind, three other T-62s – (B), (C) and (D) – are navigating the increasingly cluttered section of highway west of the crossroads.

Five seconds later, thanks to timely contributions from Tereza and Muttley, the scene looks very different.

At T+43, firing from the map’s northern edge, our T-72, spots and pots tank (C) and…

At T+46 a missile launched by our southern TOW Mutt trashes tank (A).
Other Turn 17 developments of note:

Recon Team Charlie added two more corpses to the growing collection at the crossroads.

Our snipers opened their account, felling at least one member of this advancing infantry squad.
The light mortar team used their M16s on fleeing tank crewmen. No kills were observed.
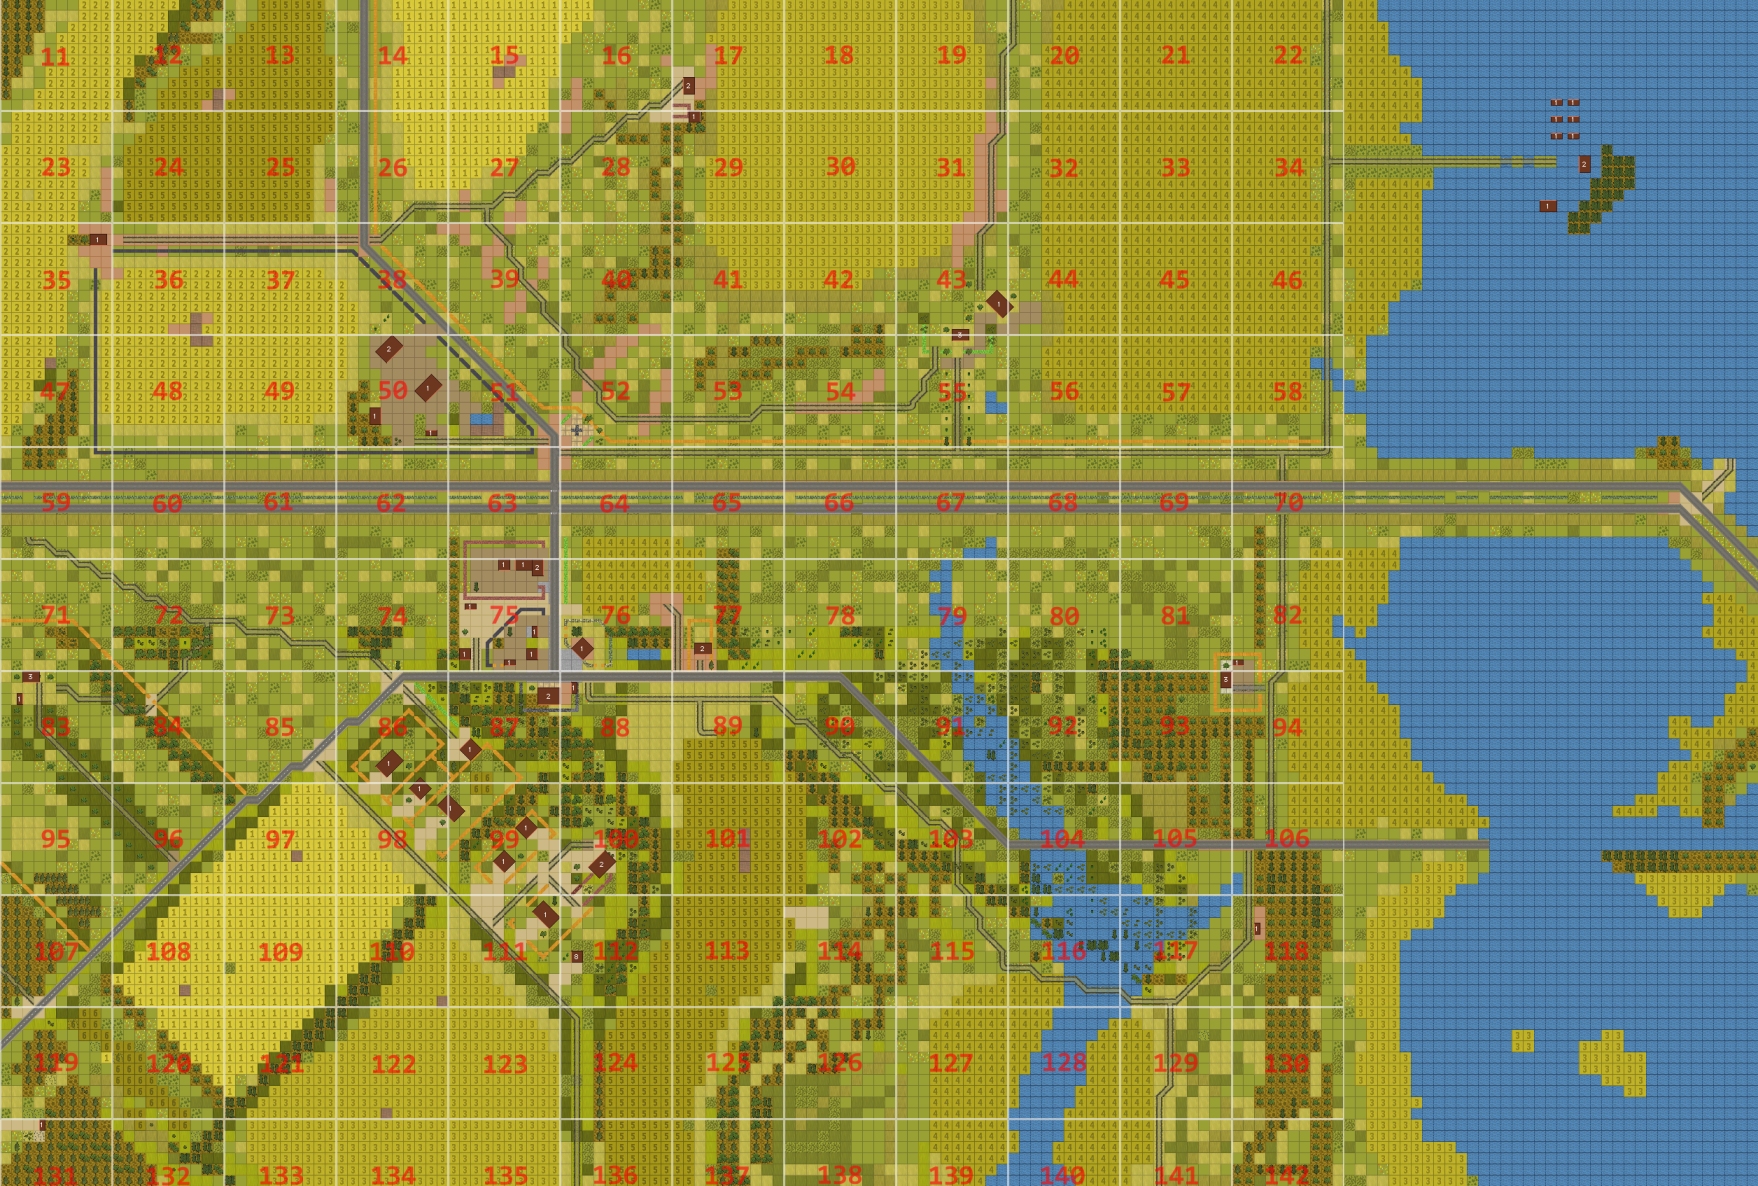
The situation at the start of turn 18:

Turret movement suggests this T-62 looks might have glimpsed a potential target to the south. Either the Lesovs or the commandeered truck are in serious trouble.


Turn 18 orders here, please. Commenters are cordially invited to suggest moves for the following units. (A maximum of one unit per commenter (subscribers can move two if they like). Embarked infantry and their taxis count as single units until separated.) Turn execution: probably Monday morning.
****anyone****
Light mortar team (tube undeployed) [BOX 47]
MG team [BOX 86]
Dragon team (ambushing) [BOX 72]
Recon team B (1 man, hiding) [BOX 75]
Recon team C (3 men) [BOX 87]
Otto and Branko (sniper team) [BOX 100]
Forward Observer Team [BOX 112]
TOW Mutt ‘Muttley’ (6 x ATGM, reversing and reloading) [BOX 87]
TOW Mutt ‘Droopy’ (5 x ATGM) [BOX 23]
Mutt ‘Scrappy’[BOX 87]
****subscribers only****
Trajanov [BOX 87]
Truck [BOX 98]
The Lesovs [BOX 74]
M113 [BOX 98, unbuttoned]
Tereza [BOX 17]
ORDER: The Lesovs target the nearby tank which is aiming for the truck.
Will that override the target arc they currently have?
Yes. But it guarantees they’ll start shooting instead of maybe deciding at some point to target things.
ORDER: M113 to MOVE to Box 99 X1 Y10, pathing south around the houses rather than through them (i.e. a covered route). Just next to Muttley.
I’m a little worried about that infantry squad heading south and I’d like to bring the M113 into a position where we can push it forward if needed.
ORDER: Truck driver to stop wondering where that M113 is off to in such a hurry, put his truck in reverse, and floor it SE down the road a little way – such that the building breaks LoS. If they survive the turn then we can figure out the best way out of dodge.
Order: Tereza to keep doing exactly what she’s been doing, staying mostly hidden and taking potshots at any armour she sees on the road.
ORDER:
Droopy waits 20 seconds then rolls slowly a tile or two southeast, so he can establish LOS to the T-62 aiming at our truck. (if the Lesovs don´t get it first) The order is probably `contact` or `hunt`?
Glad to come back after my enforced absence and see you guys doing so well. Good job.
The foremost tank may be looking to target the truck, but if it reverses out of the way I don’t want a repeat of what happened to Recon B happening to the LMG team.
ORDER: MG team [BOX 86]
1) Hide
2) Wait 20 seconds, then Target Arc along the highway from interface of boxes 61 & 62 all the way to cover the infantry fireteams at box 65.
This does depend on them having some fire-lines to the NE, and I should’ve asked earlier if they do. If they don’t have any sight to the NE then the Target Arc can finish somewhere by the agri-merchant (IIRC).
Ah, I am humbly reminded that Combat Mission basically requires you to make every unit HIDE with a 40m circular COVER ARC unless you want people blowing you up from half a map away. Sorry Team Bravo, we knew ye so little.
My first thought is that Droopy isn’t actually in a very good position. By being so close to the front arc of enemy tanks they can actually turn to shoot him pretty quickly. By contrast, our other forces are shooting at the rear sides of the attackers. Not sure what we could do to get him to a better spot though.
@Tim: Looks like Droopy is once again driving far away from the big bulky barn to put a small twig in front of him as cover. Can you let me know what kind of LoS he has to the road?
@Tim: Can the Lesovs see/target that closest tank?
I agree, Droopy is the most at risk of our main tank killers. With only two tanks of the first group left and the next group still on the causeway. There may be an opportunity to reposition him in the turn after next.
Droopy has good LoS to the road in boxes 59 to 61, and the Lesovs can target the tank with the south-facing main gun.
Getting into the heart of the scrap!
Tim, any clue on what success would look like at this stage? Our small force has wreaked quite a lot of destruction already, but there are a lot more tanks still left to go…
The CCM triumphometer is showing 67% at the moment. You’re doing well, but a sizeable portion of the convoy remains intact and undiscouraged.
Looking at the picture of the tank about to shoot South. I would guess, the truck is his target. The turret has rotated past the Lesov’s position. Although I could be wrong. Too that end is it worth giving the truck driver an order to Bail Out? I doubt he could reverse into cover in time.
I really hope that’s the case, and the driver can get out in time. I really didn’t think the tanks would be worrying about a distant truck but of course the tank hasn’t quite crossed the imaginary line I set for the Lesovs in the last turn!
Might it be worth taking the Lesovs or the Dragon off their Hide / Fire Arc orders?
I’ve taken the Lesovs off cover-arc. I’m tempted to leave the Dragon hidden for one more turn, in hopes that Muttley will reload fast enough to take out the front tank should the Lesovs miss.
>> I would guess, the truck is his target.
I think you’re right. This pic shows the situation at the start of turn 18:
//tallyhocorner.com/wp-content/uploads/2022/08/oryx17q.jpg
Swift interventions by the Lesovs or the Dragon team, and/or some smart reversing might save the truck. If the crew decide to bail, there’s a possibility they will be splash-damaged by the T-62’s shot.
Might be a bit late to ask this, but does our off-map mortar currently have a target order?
I can’t tell you for sure until tomorrow, but I think not.
Turn execution underway.