
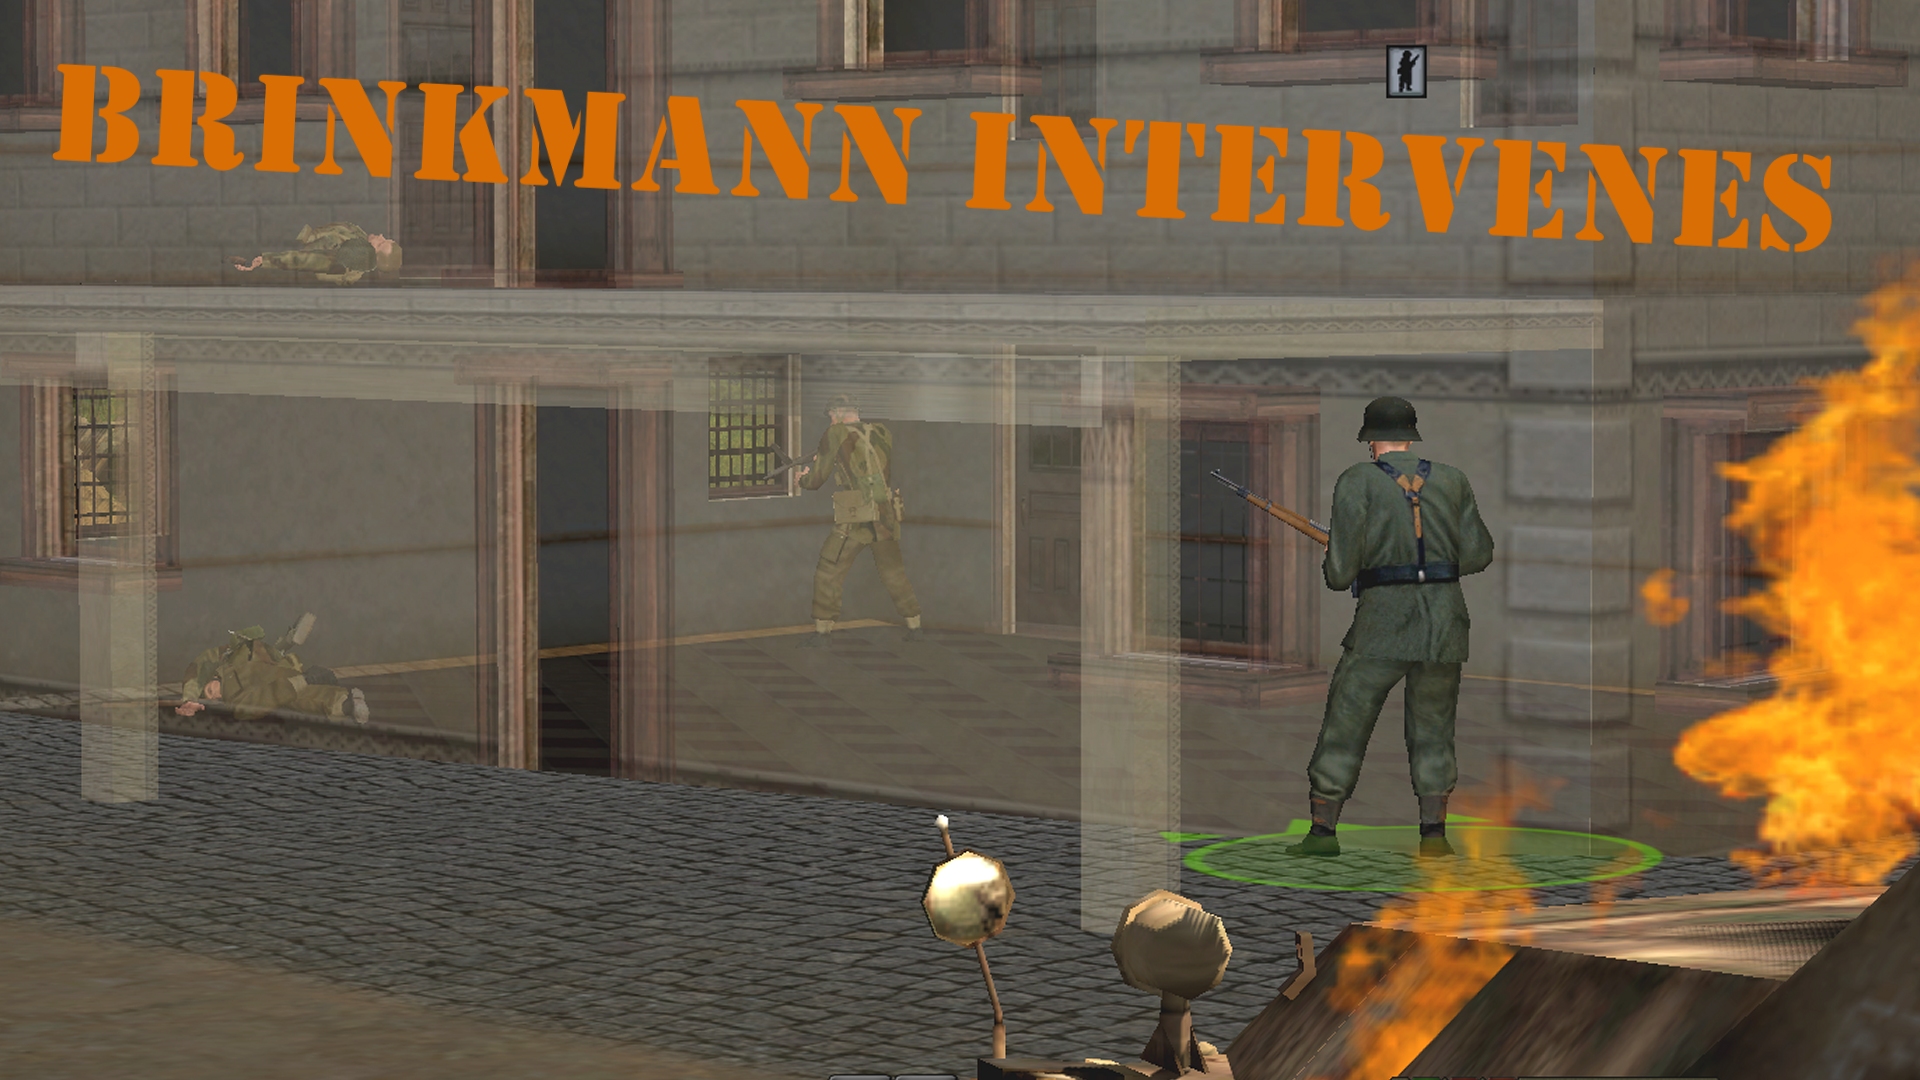
The sight of Belin’s halftrack burning merrily in the road beside the cafe is the final straw for our restless air ace. Oberst Bernhard “Der Sperber” Brinkmann contemplates opening fire on the enemy mortar in the monastery courtyard, before deciding the PIAT team in the white house next-door is the more pressing problem. Rifle in hand he slips out of the Koffiehuis de Onionmancer unobserved, and darts across the alley.
(Brinkmann’s Bridge is an open-to-all game of Combat Mission: Battle for Normandy in which the commenter-controlled Axis forces are out to recapture a Dutch canal spanner recently snatched by Red Devils. Each turn covers one minute of WeGo action. For a scenario outline and summaries of earlier turns, click here).


He’s taking aim at the closer of the two prone Englanders in the smoky, brass-strewn interior of the white house when the chap in question pops up and fires, felling Woikin’s companion.

Revenge is swift. Another shot rings out and the crouching paratrooper crumples. Brinkmann shifts his front sight onto the man reloading a Sten in the SE corner of the room.

Sensing something, the submachinegunner turns smartly enough to take in the crumpled Luftwaffe uniform, the piercing blue-grey eyes, and the levelled Kar 98k, but not smartly enough to save himself.

Eliminated with similar efficiency is the last (?) of the scout slayers in the woods west of the monastery. 6 Squad spy the prone Bren gunner as they hunt eastward and riddle him with their MP 40s and MP 44.

All five of the HE rounds fired by our Panzer 35R during the sixty strike stone rather than sandbags. Although the run of bad luck/marksmanship is disappointing, the flying scalpings, together with the MP 40 and Reibel MG rounds that lash red a41, mean far fewer slugs peck the pumphouse this turn than last.
Other Turn 20 events of note:

Best’s corpse stirs! My announcement of the plucky British AT gunner’s demise was, it seems, a tad premature. Not only did he survive the blast that KOed the 6-pounder, he’s out for vengeance. The howitzer was plinked several times this turn.

Apparently bored of wrecking the garage, the monastery mortar team take a potshot at Belin’s Kubelwagen mid-way through the sixty. The bomb overshoots, landing in a cornfield on the northern map edge.

His nerve steadied by the sheltering conifer plantation, the flighty truck driver halts allowing the HQ and 5 Squad survivor to embark.

Oh, and at T+60 on the dot, these fine fellows arrive at black a50.


Turn 21 orders here, please. Commenters are cordially invited to suggest moves for the following units (A maximum of TWO units per commenter. Embarked infantry and their taxis count as single units until separated. Split squads also count as single units. Units that started the game on the west side of the canal answer to subscribers only.)
****anyone****
*Fusilier HQ (4 men) [red z41]
*Griess (3 men) tiring [red r30]
*Fusilier squad 2 (5 men) split into two teams – Meister’s team (3 men)[red s40] and Woikin, tiring [red r40]
*Fusilier squad 3 (3 men) [blue a48/49]
*Light mortar team (29 HE) [blue e38]
*Light mortar team (NO MORTAR AMMO LEFT) in ‘bocage’ with excellent LoS across canal [blue c46]
****subscribers only****
*Panther Ausf G [black a50]
*StuH 42 [black a50]
*Self-propelled howitzer (3 HE, 2 HEAT, 2 SM) commander incapacitated [circa red h18]
*Panzer 35R (27HE, 22AP, 1CAN), buttoned [black r37]
*Belin’s Kubelwagen [red l11]
*Other Kubelwagen [black b24]
*Truck near conifer plantation (passengers = Platoon HQ + 1 straggler) [black g22]
*Brinkmann [red o41]
*Sniper team (1 man) MP 40, upper floor of pumphouse [black y27]
*Fusilier squad 5 (2 men) downstairs at pumphouse [black y27]
*Fusilier squad 6 (9 men) split into two teams [circa black o45]
*Medium mortar team (4 men) (6S) moving [circa black i31] and ammo bearers (2 men) [black l34)
Please start all order comments with ‘ORDER’ and any later revision comments with ‘REVISED ORDER’. This will help me distinguish firm instructions from suggestions and advice.
Add two more to Brinkmann’s count, still got a little way to go to catch up with Rudel though…
Now the piat is out of the way, the Major doesn’t need it any more and most paras are suppressed I’m half tempted with ordering Belin’s jeep to high tale it down and link up with Brinkmann to allow us to evacuate him.
We also need someone to get the armour up and engaged. Any brighter ideas than just joining up with the Panzer R? Presumably the allied armour will be here shortly from the east but the monastery looks fairly robust still.
I actually recommend we keep the Panzer R separate from our heavies. It’s not really able to take out anything but a halftrack, and by needing to be buttoned to fire, we can’t expect to get the first shot anyway. But, it’s perfectly suited for taking out a mortar squad at close range.
ORDER: Panzer R FAST to [black s48], and FACE [red b 49]
Tim, any chance we’ve spotted a soldier with a PIAT in those monastery foxholes?
No PIAT-armed paras have been spotted within the monastery. That doesn’t. of course, mean none lurk there. The half-squad in the NW corner revealed themselves relatively recently so it’s theoretically possible other British units are biding their time.
If no one else has:
ORDER Belin’s Kubelwagon to Fast down the road to Brinkmann’s current location at Red O39. Then do a three point turn if there’s time to face west.
Not as if we will use it for much else now.
Ah, the Panzerkampfwagen V Aufs. G. By far the prettiest terrestial vehicle of the war, and rather capable of going toe to toe with almost any of the others.
Please don’t break ours. I’d like to sneak it into a barn and come to collect it in a couple of decades.
More immediately I’m thinking of getting the Eastern HQ over the bridge and into the foxholes this turn, although I’ll wait a bit in case others wish to issue orders.
I was thinking we should get the (originally) NE mortar team over the bridge too, but I’m really not sure where to best place them. Their insistence on LoS means we can’t really hide them behind anything, putting a mortar in amongst trees might be allowed by the game but strikes me as problematic and leaving them in the open will probably just leave us short a mortar team.
Ah, I’m afraid you’ll need to pay a pretty penny to protect our pretty Panther 😉 or at least subscribe…
Weak from the sides is our Panther, but robust-ish from the front.
https://www.youtube.com/watch?v=Fh4N_h2RPZY
ORDER: Panther quick to black o39 and face east
ORDER: StuH 42 quick to black o40 and face east
BEST!!!! my foe bestirs *shakes fist*
Thoughts:
Presumably the Allied armour are also arriving around this point and will be driving for the bridge. It’s tricky: they can use the railway embankment as a hull-down position, and whilst our Panther probably will win a straight-up fight, it’s a gamble chucking it head-on at an armoured thrust.
The next available chokepoint is the central bridge itself: our orders are simply to rescue Brinkmann and blunt the thrust, so I don’t see a need for us to defend the East bank (and anyway dead Shermans aren’t good at defence).
If it were up to me, I’d put our new tanks in oblique covered positions overwatching that bridge exit; say, the woods at Black Z22 and Black J34. We could sprint our Eastern infantry across, and leave ones in houses on limited fire arcs to just sit tight and let the armour bypass them.
I hope the Howitzer’s bullet-proof enough: knowing Best he’ll find the one angle to ricochet into the fuel-tank. As it is, time to use up those last HE shells.
ORDER: Howitzer to QUICK south down the road, till it clears the tree-line and has LoS on the monastery foxholes. Then area TARGET to use up those last 3 HE shells.
For 5th squad, they really need their MG back to have any hitting power; I forgot they lost it in the disastrous pumphouse push.
@Tim: I presume the felled gunner is lying out in the open in LoS of the foxholes?
@Tim: I presume the felled gunner is lying out in the open in LoS of the foxholes?
He is. The LMG is about 25 metres from the pumphouse:
//tallyhocorner.com/wp-content/uploads/2021/04/bridge20t.jpg
That’s what I thought. Hum. FS5 will have to do what they can where they are.
Tim, can you give us an update on which squad members are still alive and have a Panzerfaust? By my accounts it’s someone in Baumeister’s Fusilier HQ, and one of the Meister trio from Fusilier Squad 2. Does the sole remaining chap from Woikin’s team still have an MG, or did that get dropped on the bridge?
The only easterners with AT capability are the platoon HQ at red z41 (3 rifles, 1 MP 40, + 1 PF) and Meister’s team at red s40 (1 rifle, 2 MP 44s + 1 PF). The LMG equipped easterners are ‘Woikin’ (I keep forgetting W died dashing for the garage) and Griess.
It’s at times like these I wish CM simulated weapons scavenging better. Not only is it impossible to ascertain where on the battlefield dropped Panzerfausts are, it’s impossible to persuade fusiliers to pick up either of the PIATs dropped near the bridge.
Thanks for the update! And, yes, it’s definitely a bit frustrating we can’t easily pick up the PIATs. I’ll jump back in on the FS2 command this turn:
ORDER: FS2 Meister’s team [red s, 40] and FS2 Woikin’s team [red r, 40] to move into the same square and rest so they can join back up. I think they should nestle into the nearby foxholes, which I believe are at [red r, 41]. Not sure if we have visibility across the canal from there, but they seem like a safer spot to go prone than up against the café’s east wall.
ORDER: FHQ [red z, 41] to sprint across the bridge and take cover in the foxholes at [red t, 38]. They should face east (across the canal) and ready the Panzerfaust.
To our eastern commanders: this leaves FS1 (Griess’ team) without orders. I’d recommend putting them up on the balcony to guard east, or maybe peeking around the café to see what’s still in store for us at the monastery gate.
FS3 and the mortarless mortar team may have a nice view to the west, but perhaps one of them would be better off moving up to occupy the foxholes FHQ is just departing? I dunno, that might just put them more in harm’s way. NE mortars are the most at risk right now. I don’t know where we can put them where they will be out of sight of the advancing armor. We could temporarily hide them behind the garage, perhaps? They might even be able to loose some shots at the monastery from there.
Regarding Greiss/FS1: the east-facing balcony is a bit of a death-trap in the face of an armored column. Easy to spot, easy to plaster with shells.
NE mortars can hide in the house perhaps?
ORDER: Greiss/FS1 (circa Red R40) to QUICK to the second floor of the house at Red P40, then face towards the south-west to guard against any flanking from those sound contacts in the woods.
Alison’s put the HQ broadly where I hoped they’d end up, which is nice. (I’d have had them in ’37 not ’38 for the extra cover from the trees but it’s foxholes either way).
The NE mortars hiding in a house effectively removes them from the battle. I’d rather we get some use from them first.
ORDER: NE Light mortar team [blue e38] to sprint to Red T39 then move steadily North to Red T22, then move steadily West to Red H22, aim an arc towards the bridge.
(If the monastery is sufficiently quelled by the time they reach H22 I’d move them around behind the pump house to get LoS across its Southern edge to the bridge, but at the moment that’d be too dangerous).
It’s a lot of running for them but it gets them into a position from which they can help without exposing them to immediate fire.
@badgerbadger good point on the balcony being a bit too dangerous. It sounds like you’re going to pass by Brinkmann, so wave hello on the way up!
@cederic sorry for putting the FHQ in the wrong place! My thinking was they would have better visibility at 38, because at 37 the garage is in the way. I am assuming this is why the Brits put their HQ in 38 and riflemen in 37. But, you’re right that it leaves them a bit more opened up to the west too. I’ll revise, since I know you’ve been wanting to move that FHQ for a few turns now 🙂
REVISED ORDER: FHQ to the foxholes at [red t, 37].
Generally, I’d have thought it better to have _anyone_ near the balcony looking east rather than _no-one_. I’m not sure how much early warning they might give of what to expect, but finger-crossed it’s more than none.
The most suitable unit to occupy that position would be the lone assistant sniper, but he’s almost 2 turns away.
@Colonel_K you’re right about needing a spotter. What about the Garage on the east bank? Does that have eastward facing windows?
My worry is that any spotter on the white house balcony isn’t going to have a long life expectancy… I’d rather it be a single disposable unit than one of our remaining half-squads.
@Tim
– surely Wilberg still has his MG, unless he’s used up the ammo?
– is it possible to split one man off from a mortar team?
ORDER: Light mortar team [blue c, 46]
– Fast to [blue b, 45].
– Move normally to sandbags at [red z, 41]. Target arc from [red h, 50] to [red h, 41].
(I haven’t decided on their ultimate destination: they might stay at the sandbags, or try hiding in the garage. It’s mostly to keep them within command range of the HQ).
ORDER: Fusilier squad 3 [blue a, 48/49]
– Target arc from [red h, 51] to [red h, 40].
– Wait 30 seconds, then move fast into the bocage at [blue c, 46], facing west and with the same target arc.
– surely Wilberg still has his MG, unless he’s used up the ammo?
I’d forgotten our one-man army. Yes, he still has his scavenged LMG.
– is it possible to split one man off from a mortar team?
No.
I wouldn’t put it past Wilberg to hit the fuel trailer on a Churchill Crocodile, causing an explosion that destroys the entire British armoured assault.
He’s that sort of guy.
Turn execution underway.