Over 7000 Knight’s Crosses were awarded during WW2. Major Belin’s, I’ve just discovered, was one of the 692 awarded posthumously. The three-man HQ team led by our gung-ho gong hunter is one of two German units completely wiped out this turn.
(Brinkmann’s Bridge is an open-to-all game of Combat Mission: Battle for Normandy in which the commenter-controlled Axis forces are out to recapture a Dutch canal spanner recently snatched by Red Devils. Each turn covers one minute of WeGo action. For a scenario outline and summaries of earlier turns, click here).

Belin’s final moments feel like frames from a Commando comic. When, three seconds into the turn, the halftrack’s machine gunner falls to a hornet swarm of SMG rounds, the galloping major immediately takes his place and begins hosing the window from whence the fatal shots came.

A fraction too late, he realises that there’s a more dangerous threat lurking within the white house.

The PIAT bomb flies straight and true.

A terse hit label “Lower Front Hull: PENETRATION”, plume of black smoke, and a sprinkle of red crosses leave no room for doubt. The 1.1 kg shaped charge has done its job well. No-one exits the wreck.

Before I share more bad news, here’s some good. At T+33 the self-propelled howitzer finally bests Best. The German armour that’s meant to be arriving at the end of the next turn won’t have to fight its way past the Britishers’ cunningly sited 6-pounder.

More glad tidings. At T+57 Woikin and his pal make it across the canal bridge despite the best efforts of the PIAT team (Griess proves less gutsy).


Would they have made if the occupants of the east bank foxholes hadn’t spent the sixty peppering the white house and, now and again, lone paratroopers in the red j-n woodland? I have my doubts.

In theory, ensconced in the garage for the entirety of the turn, Bulau’s half-squad should have been one of the safer eastern units. Cruel CMBfN decides otherwise. Ten seconds before the clock stops, the mortar that has been lobbing 3-inch shrapnel sprayers at the Autobedrijf Van Der Ley for the past minute, gets lucky. Consecutive hits shatter tiles, tumble brickwork, and disable fusiliers. The blasts leave Bulau and his companions blood-badged and groaning.

Meanwhile, up at the pumphouse, things aren’t going much better. 5 Squad end the turn two men down and shaken, the sniper team reduced to one man and pinned. The damage is done by an extremely patient/sly British unit. There’d been no indication that the foxholes at red a41 were tenanted until the lead storm that sent 5 Squad scutting for the safety of bricks and mortar. Exasperatingly, the Panzer 35R fails to notice that the pumphouse posse is in need of assistance.
Also this turn…

6 Squad moves without drawing fire or flushing out any more scout slayers.

The rendezvous near the conifer plantation goes awry after the truck driver loses his bottle and decides to reverse back down the road.


Turn 20 orders here, please. Commenters are cordially invited to suggest moves for the following units (A maximum of TWO units per commenter. Embarked infantry and their taxis count as single units until separated. Split squads also count as single units. Units that started the game on the west side of the canal answer to subscribers only.)
****anyone****
*Fusilier HQ (4 men) [red z41]
*Griess (3 men) pinned [red y39]
*Fusilier squad 2 (5 men) split into two teams – Meister’s team (3 men) current order = cross bridge in 30 seconds time [red z41] and Woikin’s team (2 men) heading for red s40 [red t39]
*Fusilier squad 3 (3 men) tiring [blue a48/49]
*Light mortar team (29 HE) moving towards garage [blue e33]
*Light mortar team (NO MORTAR AMMO LEFT) in ‘bocage’ with excellent LoS across canal [blue c46]
****subscribers only****
*Sniper team (1 man) MP 40, upper floor of pumphouse [black y27]
*Platoon HQ (4 men) chasing cowardly truck [circa black g22]
*Fusilier squad 5 (3 men) split into two teams, 1 man chasing cowardly truck at [black g22] and 2 shaken and pinned downstairs at [black y27)]
*Fusilier squad 6 (9 men) split into two teams [black l44 and black l37]
*Medium mortar team (4 men) (6S) moving [circa black d28] and ammo bearers (2 men) moving [circa black f30)
*Panzer 35R (32HE, 22AP, 1CAN), buttoned [black r37]
*Self-propelled howitzer (3 HE, 2 HEAT, 2 SM) commander incapacitated [circa red h18]
*Truck (black g22)
*Kubelwagen (red l11)
Please start all order comments with ‘ORDER’ and any later revision comments with ‘REVISED ORDER’. This will help me distinguish firm instructions from suggestions and advice.
Good thing Brinkman didn’t decide to make a break for it!
The troops that started in the East have had to assault the bridge over open fields, successfully taking their objective and suffering their worse casualties to a mortar spotted in turn 2.
Should’ve held the rail line and refused to budge until that mortar was sorted 🙁
No orders from me this turn, the units I could command are all going to sit tight and let some other clown do the hard work for a bit.
I suspect it’s those sort of negative waves that are causing enemy ghost units to manifest themselves. The railway line used to be clear…
Given that the mortar had already zeroed in on the garage, I should have moved Bulau out of the garage immediately rather than wait 45 seconds.
ORDER: Meister’s team (east bank foxholes) – cancel previous pause-then-advance command – continue peppering the white house to cover advance of Woikin and Griess
ORDER: Woikin’s team continue advancing right up to the east side of the white house (red q40)
ORDER: Griess’ team continue advancing right up to the east side of the white house (red q40)
A short move for the howitzer and it could redecorate the feature wall of the white house in crimson?
Let’s have the howitzer have at it then, preferably only for 30 seconds so that Woikin and Griess don’t become casualties. Who’s commanding the beast?
Me, I suppose! It’s only got 3 HE shells left, anyway, so this is it for fire support. However, if Woikin and Greiss are advancing, I’m not confident about a sustained barrage. Woikin (across the bridge) is already dangerously close to where a HE shell would land.
@Tim does the howitzer already have LoS to the White House? If so:
ORDER: Howtizer to TARGET the White House for 10 seconds, aiming at the lower western end of the house if possible, to suppress rather than kill.
Otherwise Howitzer to hold position.
The howitzer can’t see the white house. It would need to advance to roughly red i29 – just beyond the orchard entrance – to establish LoS.
On second thought, since the Piat team is currently suppressed we can forget about involving the Howitzer. Also Meister’s team doesn’t appear to be necessary as a base of fire because there is another team in the foxholes south of their position that is providing the covering fire.
REVISED ORDER: Meister’s team quick to middle of bridge – pause 15 seconds – quick to east side of the white house (red q40)
Well, that 3in mortar team definitely is winning the “most lethal” award of the game.
Regrettably Squad 6 would have been in position to hammer those foxholes had they not been on the move.
@Tim: I’d like to have the panzer fire on those foxhole troopers. How’s the LoS on that end? Also, the enemy mortar has been on our overhead view for a long time now. Which of our troops have been able to observe that position throughout the battle? Finally, how is Squad 6 looking as far as LoS out of their current patch of trees, both towards the foxholes and the mortar?
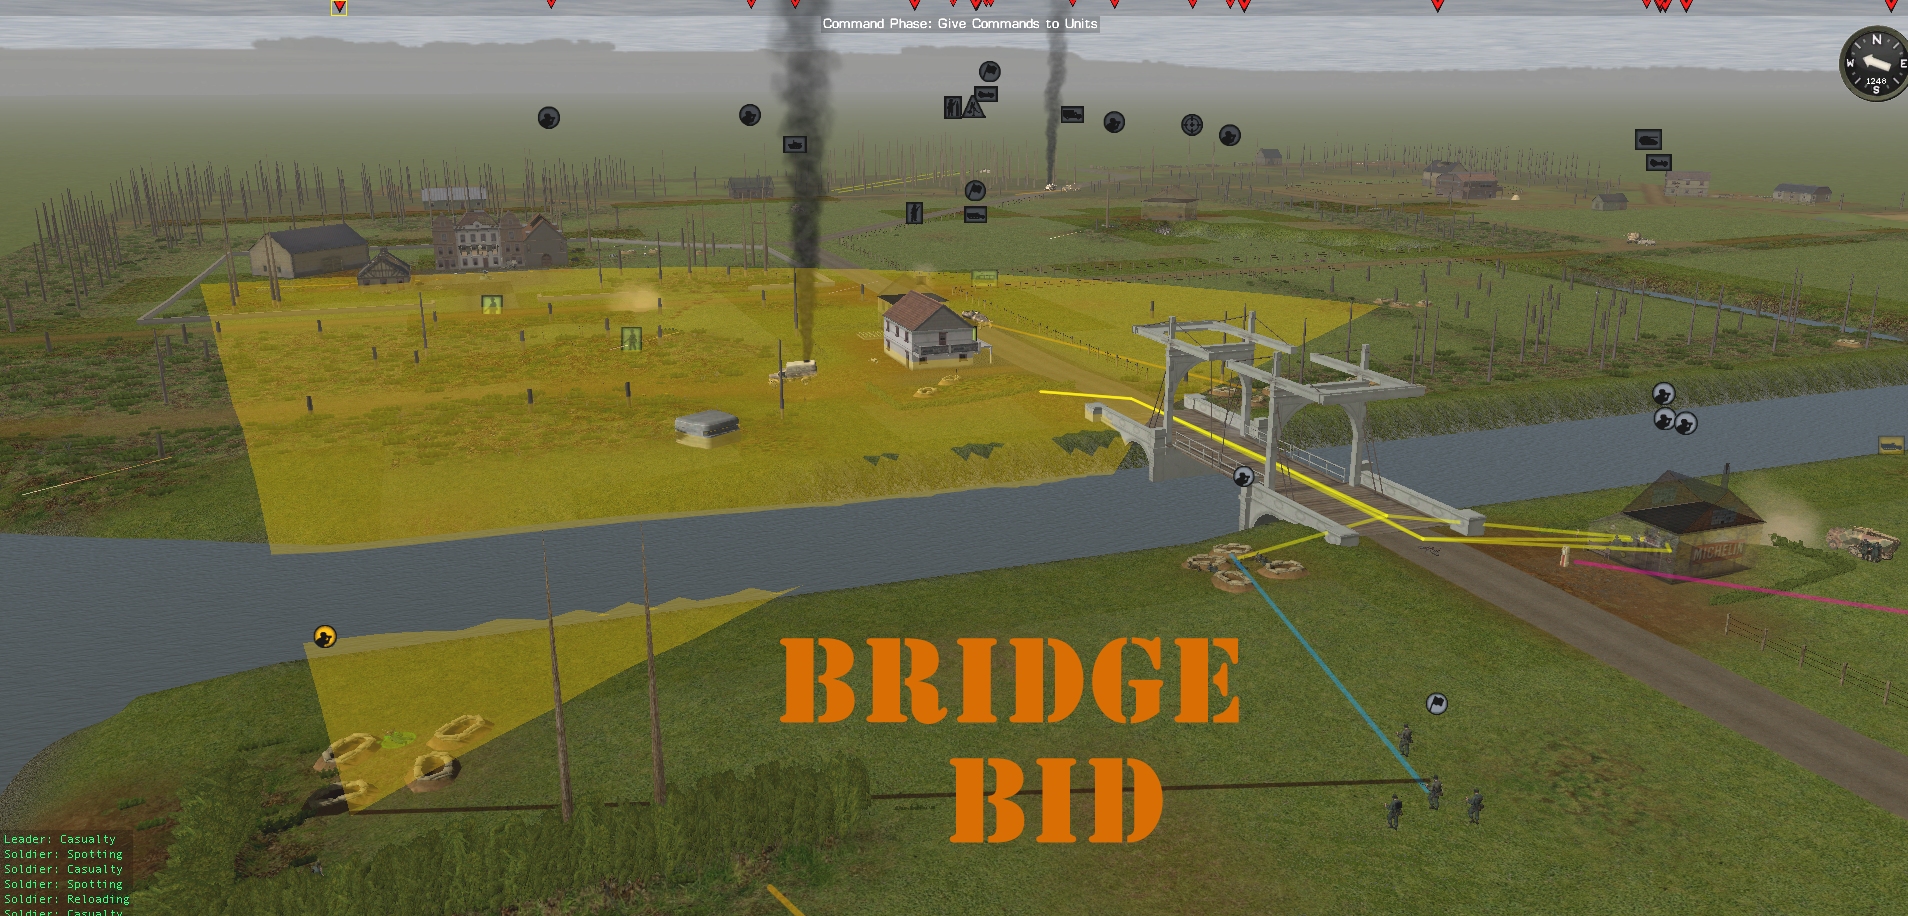
The Panzer 35R hasn’t spotted the monastery foxes yet but can, just about, area target their dens. 6 Squad hasn’t spotted them either. Here’s a pic illustrating the situation. The grey line indicates poor LoS. The blue & pink one, no LoS.
//tallyhocorner.com/wp-content/uploads/2021/04/bridge19t.jpg
The only units that can see the pesky courtyard mortar at present is the ‘sniper’ upstairs in the pumphouse (actually the pinned, MP 40-armed spotter – the sniper himself is dead) and rifle-armed Brinkmann upstairs in the cafe. Should our hidden air ace open fire? A question for all Comment Commanders to consider!
//tallyhocorner.com/wp-content/uploads/2021/04/bridge19s.jpg
ORDER: Panzer TARGET AREA as close to those foxholes as possible.
ORDER: The part of Squad 6 that’s hunting remains unchanged. The other part is going to PAUSE 15 then QUICK to [black o44].
Sigh, I guess I should have left 5th squad in the house: there’s evidently LoS to the AT gun and the monastery.
I have to say, these British paratroops really seem like crack shots. A little annoying that they’ve managed to render ineffective both our sniper team AND 5th squad. We’re running out of units on the western side.
The accuracy of the Sten gunners in particular is borderline extraordinary. I’ve just watched the Turn 19 replay again and the in-cover pumphouse sniper fell to an SMG round that travelled 110 metres.
@Tim, I see the medium mortar (in the west) has only 6 smoke shells. Does that include the ammo bearers load?
Yes.
Clearly Target Arc is the command we’ve been missing to encourage outgoing fire.
ORDER: Fusilier squad 3 [blue a, 48/49]
– a minor refinement to their target arc: [red h, 49] to [red n, 35] ought to suffice.
ORDER: Light mortar team [blue c, 46]
– Target arc [red h, 49] to [red l, 34]
Hopefully they should suppress the white house while keeping an eye out for other enemy movements.
At the risk of telling you what you know already, on the technicality of your order, the target arc (I think) means the unit will cover that area I.e focus their attention there, but still only fire on units they actually spot. Covering fire or area fire (I.e by the mortar or an MG) is effective enough (for suppression if not harm). The problem (or otherwise advantage) with a target arc is what happened a few turns ago with the panzer, it ignored targets outside its target arc. To get to the point, if we know where the enemy are, why not just order area fire on them?
Turn execution underway.