
It was naughty of me not to mention The Belin Rule back in turn 10 when the Major arrived. Because Battlefront doesn’t allow scenario designers to give units traits like “glory hunter” and “complete wazzock” I’ve had to invent my own house rule for Belin. Every turn since #10 I’ve been quietly rolling a six-sided dice. This turn, for the first time, I rolled a 1 meaning the Comment Commanders’ highest ranking unit ignores assigned orders and does what he damn well pleases. “What he damn well pleases” invariably means bee-lining for the enemy with a Luger in his hand and a Knight’s Cross in his mind’s eye.
(Brinkmann’s Bridge is an open-to-all game of Combat Mission: Battle for Normandy in which the commenter-controlled Axis forces are out to recapture a Dutch canal spanner recently snatched by Red Devils. Each turn covers one minute of WeGo action. For a scenario outline and summaries of earlier turns, click here).

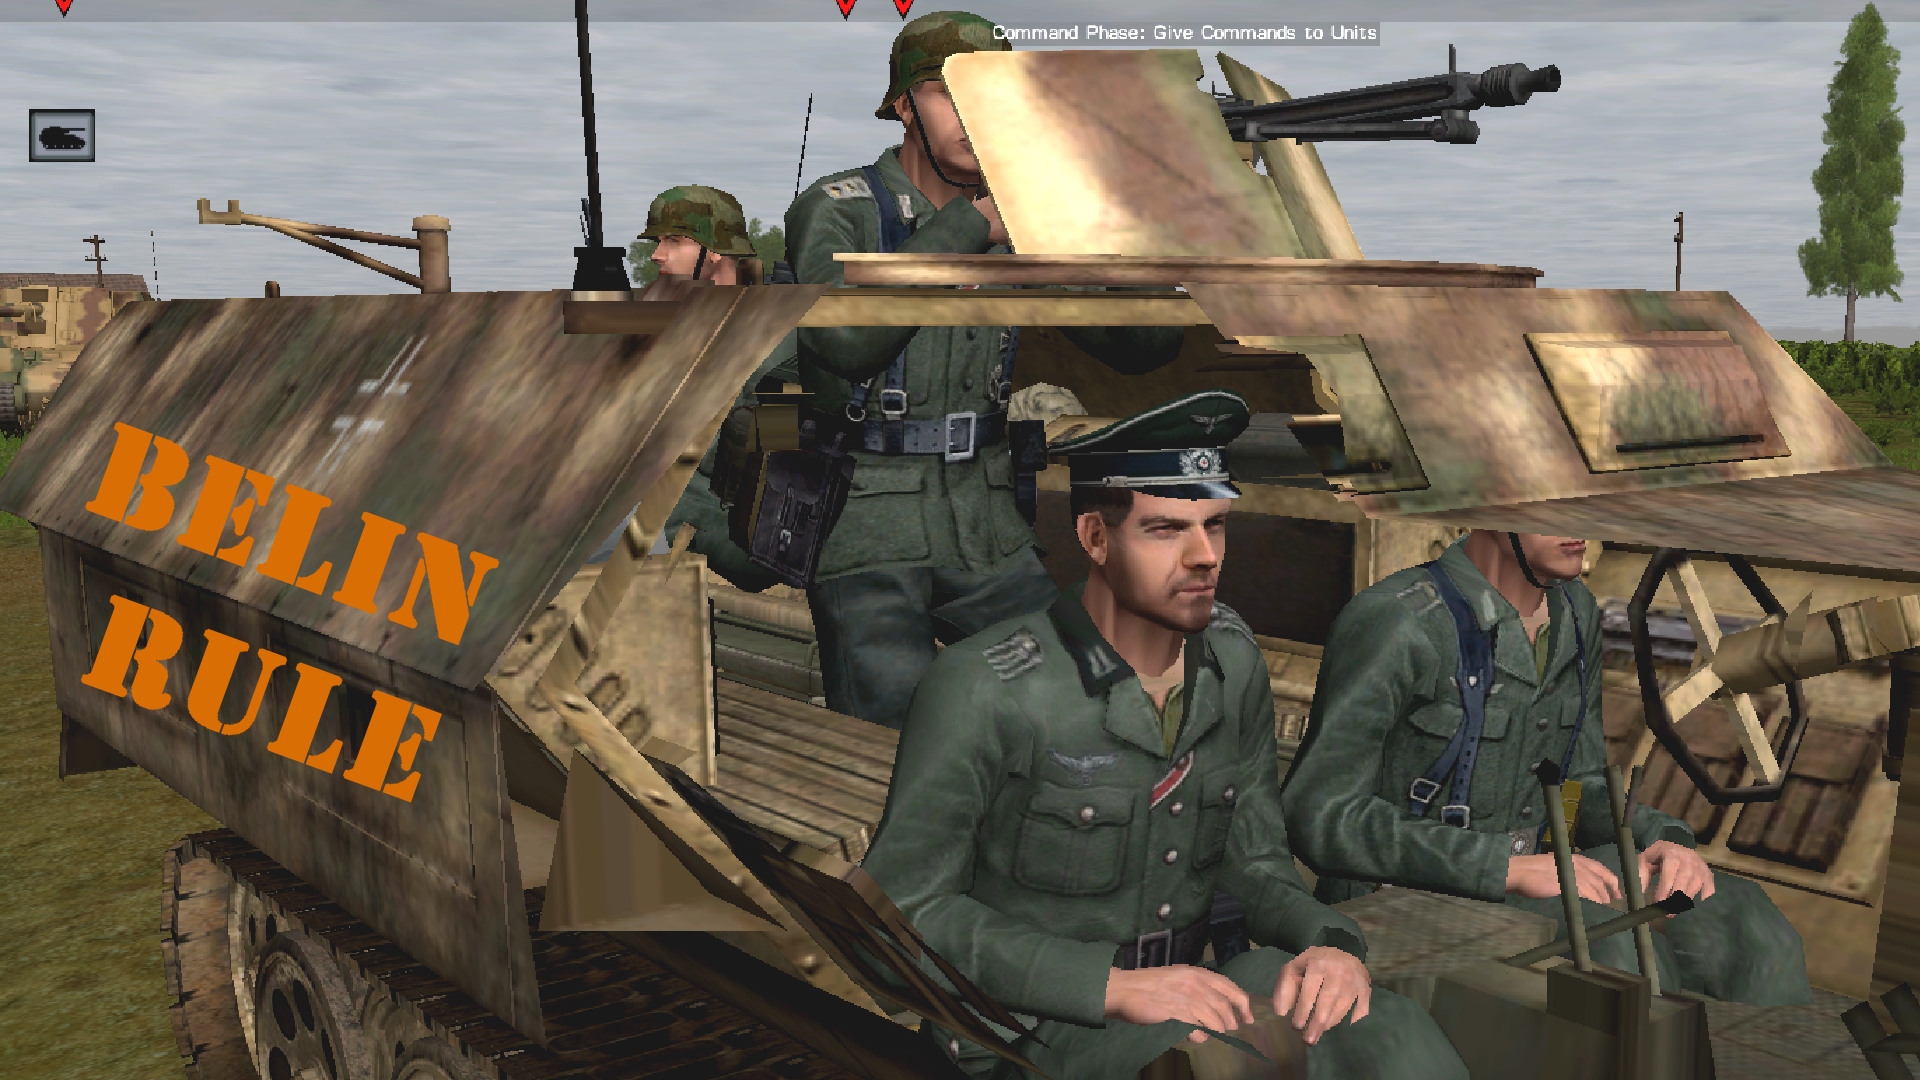
For Major Bellend his first single pip couldn’t have come at a better time. Sitting in the right-hand seat of a SPW 251/1 (Ausf. D), he tells one of subordinates to man the MG 42 and orders the halftrack’s driver to proceed at top speed to the Koffiehuis de Onionmancer, the cafe near the bridge where Brinkmann is trapped. The vainglorious chump intends to gain gongs and hit headlines by ‘singlehandedly’ rescuing the Reich’s most famous air ace.

Will the hurtling Hanomag get a 6 lb sock to the jaw when it turns the corner onto column red i? At T+0 this seems unlikely, but as the turn unfolds the risk increases. First the howitzer’s bid to eliminate the AT gun miscarries. Given the freedom to plot my own destination point for the SPH’s advance I choose one that seems to tick all tactical boxes. Our ambling artillery piece gets into position quickly then spends the rest of the sixty wiggling its gun barrel like an indecisive anteater. The 3D visuals suggest LoS/LoF shouldn’t be an issue, but the relevant code has other ideas.

Oh well, there’s still a chance our medium mortar will KO the mauled 6-pounder before Belin’s chariot rounds the corner.

Nope. When, at T+15, the Granatwerfer 34 runs out of HE ammo, the British AT gun is still operational. The turn ends on something of a knife edge. The AFV carrying our gung-ho Major is executing its turn onto the red i road, and the 6-pounder, pinned for most of the sixty, seems to be actively searching for targets again.

Turn 17’s other west side story involves a party of paratroopers shifting eastward. Spotted by 6 Squad first, the restless red berets start near the monastery’s western wall and end up in the woods opposite the main gate.

They are engaged by several German units during their journey. Only the rounds delivered by the SPW U304 produce red crosses (two).

Until the unexpected explosion at T+42 it looks like the easterners are going to enjoy another casualty-free turn.

Covered by comrades on the railway embankment and in the garage, Meister’s team make it to the the canal bank without incident and is soon slinging lead at threats in the vicinity of the monastery.

Bolstered by Griess + 2, Woikin’s team make figurative and literal mince meat of the enemies opposite.

Unless new tenants move in, there’ll be no more trouble from the foxholes under the poplars.

After (re)joining forces behind the bocage ‘T’, the three surviving members of 3 Squad add to British woes by permanently silencing the Bren gunner near the pill box.

The one setback occurs 18 seconds before the clock stops. Out of nowhere, a 3-inch mortar bomb Stukas onto the railway line between Bulau’s team and the nearby NE mortar.

The ballast-broadcasting blast deprives the Comment Commanders of one of their Panzerfaust porters.


Turn 18 orders here, please. Commenters are cordially invited to suggest moves for the following units (A maximum of TWO units per commenter. Embarked infantry and their taxis count as single units until separated. Split squads also count as single units. Units on the west side of the canal answer to subscribers only.)
****anyone****
*Fusilier HQ (4 men) [blue k42]
*Fusilier squad 1, Bulau (6 men) split into two teams – Bulau (3 men) tired, pinned [blue k32] and Griess (3 men) tiring [blue a37]
*Fusilier squad 2 (5 men) split into two teams – Meister’s team (3 men) [red z41] and Woikin’s team (2 men) tiring [blue a37]
*Fusilier squad 3 (3 men) tiriing [blue c46]
*Light mortar team (29 HE) deployed, pinned [blue k30]
*Light mortar team (NO MORTAR AMMO LEFT) moving [blue l48]
*SPW U304(f)-10 halftrack (51HE, 44AP) unbuttoned [blue k/l39]
****subscribers only****
*Major Belin (4-man battalion HQ) + halftrack, heading for the cafe [red i20]
*Sniper team (2 men) moving, ground floor of pumphouse [black y27]
*Platoon HQ (4 men) [circa black l28]
*Fusilier squad 5 (5 men) split into two teams, 1 man at [black q21] and 4 still ‘rattled’ in the pumphouse [black y27]
*Fusilier squad 6 (9 men) split into two teams, both tiring [black j42 and black l37]
*medium mortar team (4 men) (6S) [circa black b25]
*Panzer 35R (32HE, 22AP, 2CAN), buttoned [black l39]
*Self-propelled howitzer (11 HE, 2 HEAT, 2 SM) commander incapacitated [circa red g19]
*Truck (black e19)
*Kubelwagen(black b24)
Please start all order comments with ‘ORDER’ and any later revision comments with ‘REVISED ORDER’. This will help me distinguish firm instructions from suggestions and advice.
Let’s thrive on Chaos.
ORDER lock Major Belin’s command in for another turn.
Let’s go cover him. I’ll think of a productive second move later!
Is that the second jeep (Belin’s old steed) at black z 18? Is it commandable?
If so, and as we seem to be making a suicidal charge this turn let’s get it ready to move down and pick up Herr Brinkman.
ORDER Belin’s jeep to Come to where Belin is now on the road at red I 18
EAST SIDE IS THE BEAST SIDE!
Well, we got what we wanted: the western bank denuded of enemy forces to a depth of 50 metres (though I have an inking there may be a Vicker’s assistant somewhere by the balcony looking for a change of underwear). But I’m da**ed if I know what we’re going to do with it.
@Tim
– do we know from which mortar came the round that hurt Bulau’s squad?
– has the mortar at [red n, 46] been identified as to its calibre?
– which units (presumably in addition to Meister and the SPW U304) have line of sight to the mortar at [red n, 46] and their friends to the west?
PS. I like how Major Belin puts his subordinates at ease by mirroring their posture.
– do we know from which mortar came the round that hurt Bulau’s squad?
Everything points to the monastery courtyard mortar team.
– has the mortar at [red n, 46] been identified as to its calibre?
That icon belongs to a wounded rifleman, presumably a survivor from a two-inch team.
– which units (presumably in addition to Meister and the SPW U304) have line of sight to the mortar at [red n, 46] and their friends to the west?
Only Meister can see the aforementioned rifleman. Only Brinkmann can see the courtyard three-inch mortar at present, but when the sniper team climb the pumphouse stairs (imminent) they should spy it too. Three of the paras that moved east this turn are still visible to the Panzer 35R and the portion of 6 Squad in the cottage at black l37.
re your PS: Putting them at ease while leading them to certain death! Fantastic leadership! Very inspiring. 😀
The Major’s favourite book is a translation of Dale Carnegie’s ‘How to Win Friends and Influence People’.
As foreseen above, I’m indecisive on what to do next. I’d like to send Wilberg et al to check on the dead/dying Hirsch, but doubt we could do without them for the next 3 minutes or if it would improve our score, or even if they need the ammo. I have considered sending them on hero runs to the sandbags or maybe as far as the bridge, but don’t think the risk is worth it. So, for want of anything (better) to do:
ORDER: Fusilier squad 3 (3 men) [blue c, 46]
– Hunt to [blue b, 48], facing west.
– Hunt to [blue a, 49], facing west. (I’m not sure the arm of bocage extends that far, but if so, they can enter it).
ORDER: Light mortar team [blue l, 48]
– They should have an order to hunt onto the tracks at some point; have them face west when they do and add the following order after:
– Hunt to [blue k, 44] facing west.
After Alison kindly assured we didn’t waste a turn with the Easter half track and picked up two kills as a reward I think some aggression is due.
Belin will distract the field gun, the closest defenders appear to be suppressed so it’s time to shift the HQ and get them into foxholes by the bridge.
I’d like to get the NE mortar crew relocated too but since they’re pinned down they probably wouldn’t care much for a ‘get up and start walking’ order.
Instead, and risking it all in the final throes:
ORDER: Fusilier HQ [blue k42] to move at steady pace, returning fire but not allowing it to distract their progress, to the foxholes at (or near) Red Y40.
ORDER: SPW U304(f)-10 halftrack [blue k/l39] to drive fast to Blue C35 then Hunt to Red Z35, pause there and finish off that darn AT gun.
I’d like to get the HQ into the foxholes at Red T37 but they’re the wrong unit to make that first charge over the bridge.
Can I just berate German High Command a moment for their unforgiveable behaviour throughout this entire war.
I’m not going to criticise our failure to finish the Brits at Dunkirk, the inexplicable switch from airfields to cities that ended Sealion, the insanity of Barbarossa or the countless military mistakes made.
No, a far more serious issue on which, as someone commanding German forces in the field, I can no longer stay silent.
Which utter cretin chose the names for our armoured vehicles?
The tanks are glorious, everybody knows what a Tiger is and how beautiful a Panther looks, even the tank destroyers have catchy names like StuG, Marder and Nashorn but the cars and half tracks? Sd.Kfz. 251/6 Ausf B may well be a very precise designation but frankly just what the bleeding heck is it!
We’ve got a SPW U304(f)-10 which has a nice gun on it but nobody knows what it actually is. To order spare parts we’ve had to fill in 18 forms and jammed Enigma traffic for three days trying to work out what was needed. This is intolerable and whoever is responsible needs a stern talking to.
I pity the poor signaller painstakingly encoding ‘Sd.Kfz. 251/6 Ausf B’ via Enigma-wheel, quietly cursing under their breath.
Wait until he gets the response.
“Message unclear. Please spell in full.”
ORDER: Bulau’s team quick to east-facing side of the building by the Canal Bridge [blue b37]
This ‘Major Belin’ rule
is
FANTASTIC.
More of such house-rules please! It even has bad things happening on a roll of 1 on a 6-sided die, which, as a D&D player, is *chef’s kiss*.
Let’s see if we can avert the sudden turn into tragicomedy.
I suspect that AT gun is immortal. Perhaps that last gunner has a charmed existence. Or he is wearing dozens of pocket bibles attached via harness, catching fatal shrapnel? To test this theory:
ORDER: Self-propelled howitzer (11 HE, 2 HEAT, 2 SM) [circa red g19] to FAST to Red H18 (or further east if needed for LoS) and TARGET the ground at the AT position.
5th squad has been very quiet in that pumphouse: I presume they can’t see anything. Is our sniper also LoS-blocked?
ORDER: Our 4 battle-shocked boys at [black y27] to QUICK into tree cover at Black Z30, going SLOW for the last half-dozen metres to force them to crawl. Ideally such that they have LoS to the AT position, or the monastery.
Would anyone like to order the Panzer 35R forward?
I think this turn is the make-or-break it one for the armour. Either we’re taking out that AT gun, or it’s wiping out half of the armoured vehicles we have.
Did someone say “reckless movement of delicate & essential armoured units”? Tally-Ho!
ORDER: Panzer 35R quick to [M, 39] and then quick to [R, 37] target arc facing east, corners at [red M, 34] and [red M, 44].
Any chance you get, fire everything at the AT gun.
Incidentally, I was going to say “Halali” but couldn’t pass up the chance to meme the site name 🙂
https://www.collinsdictionary.com/dictionary/english-german/tally-ho
Take a moment to feel for the poor comment commanders who spent a whole 48 hours away from the site and are now returning to their painstaking and careful flanking maneouvres, using troops nurtured and protected through the battle, taking a look at the plans for next turn and realising the horror that’s about to ensue.
Let’s face it, Belin’s getting his semi-orphaned family arrested or a promotion out of this.
Well, as Stalin apparently said: quantity has its own quality. Lets hope throwing everything we’ve got (er, 2 or 3 things?) at the AT gun will work the same as one very good one (we’ve been trying the classic mortar to little avail). It will at the very least increase the chance of the gunners being paralysed by choice!
Probably makes as much sense as the notion of concrete boats, but then, they do exist and work well enough!
As cederic said: I’ve been carefully nursing this paper panzer through the fight. Now it’s gonna drive out blind as a bat and slow as molasses past the surviving scout killers, any troops in the monastery, and possibly the AT gun (through the light trees). To top it all off it’s then going to ignore any troops in the monastery like the mortar team or the recently moved paras.
But I’m not sad. In fact, this is exactly the kind of chaos I like from communal games and I can’t wait to see what happens next! I also think we should call this kind of action “Pulling a Belin” for all future CCMs. Thank you Maquisard for the well-needed excitement.
In hopes of making this daring action a rousing success it’s going to be on Squad 6 to cover the flank and let the panzer commander worry about fire from the buildings. Plus, if all goes well we can move to a position to take out the monastery mortar team next turn.
ORDER: The half of Squad 6 in the house [black L38] AREA TARGET BRIEFLY 30s [black p46]. The other half is going to QUICK to [black L45] in hopes of taking out any pinned paratroopers nearby.
And if the plan is to saturate the AT gun with targets and force enemies to reveal themselves to our pumphouse defenders, then I see no reason not to drive the Truck up and maybe pick up the platoon HQ next turn.
ORDER: Truck at [black e19] QUICK to [black p29] via the road.
I think FS2 deserve a breather this turn.
ORDER: FS2 Meister’s team in the sandbags at [red z, 41] to remain there and shoot anyone they see to the west.
ORDER: FS2 Woikin’s team in the house at [blue a, 37] to rest. Perhaps next turn they can follow the halftrack across the bridge and take up a position in the west bank sandbags.
Turn execution underway