
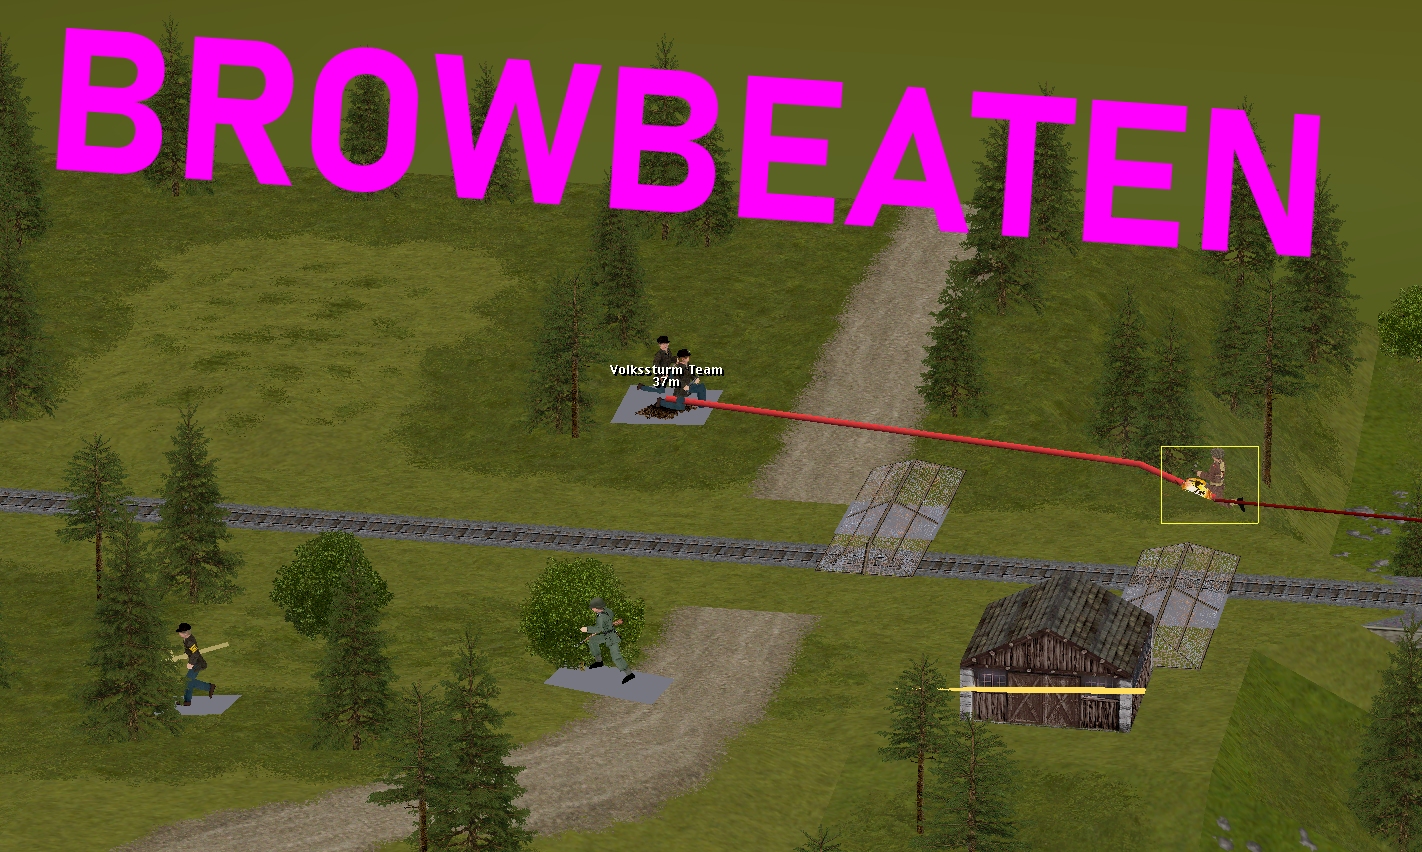
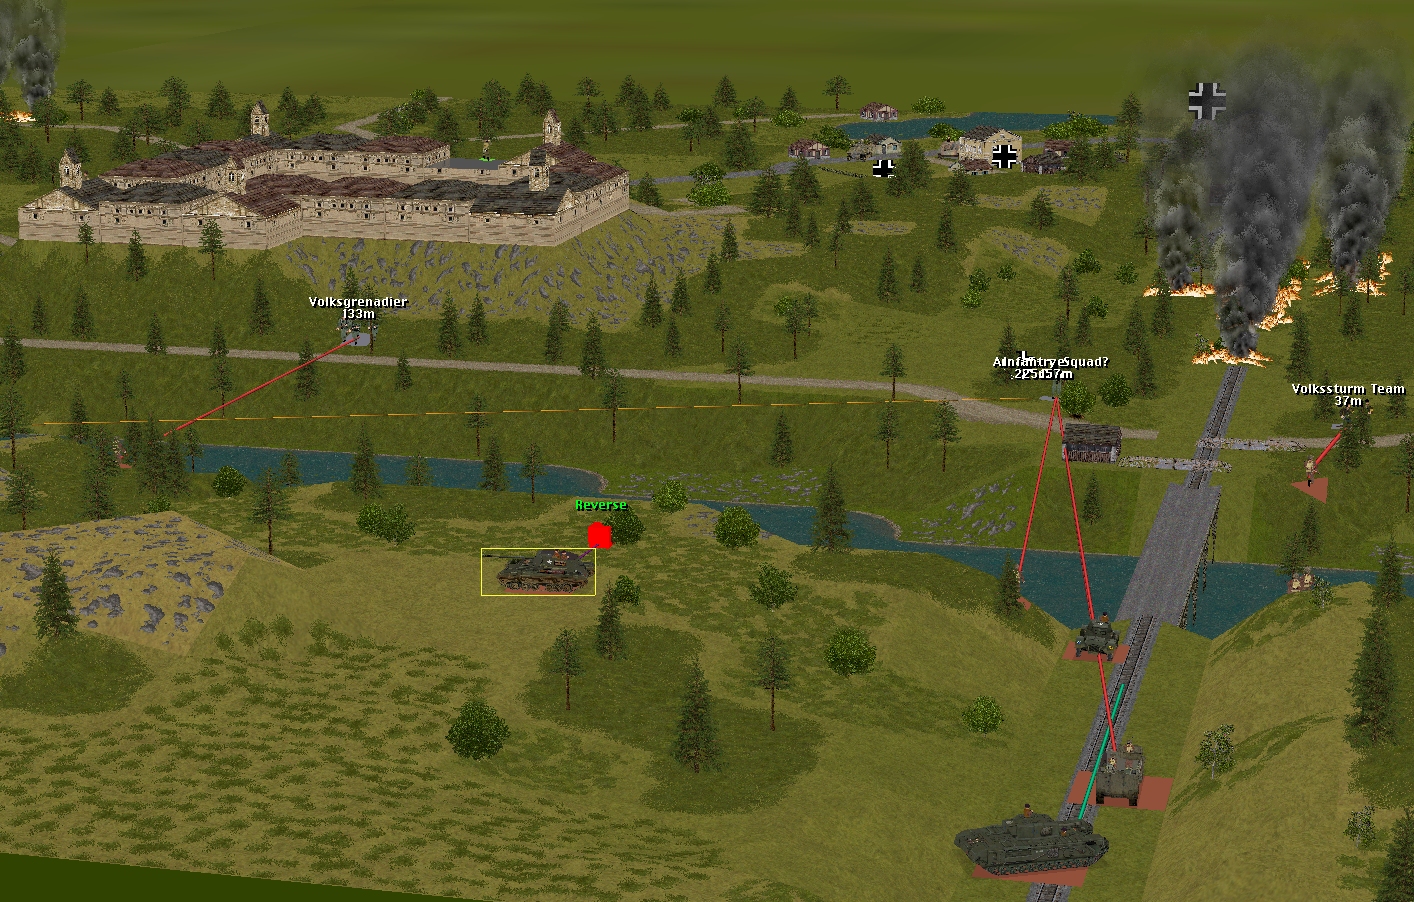
Volkssturm militiamen biding their time in camouflaged foxholes close to the rail bridge espy an irresistible target early in Turn 7. Unfortunately for Sergeant Venison, the target in question is him and his bank-traversing half-team.

Turn 7 starts promisingly enough for the Comment Commanders. The enemy Panzerschreck team in the bullet-riddled signal box suddenly remembers it has an urgent appointment in Nottingheim and legs it eastward. Not long after, the other occupant of the lever cottage – a unit tentatively IDed as an ‘infantry squad’ – follows suit.
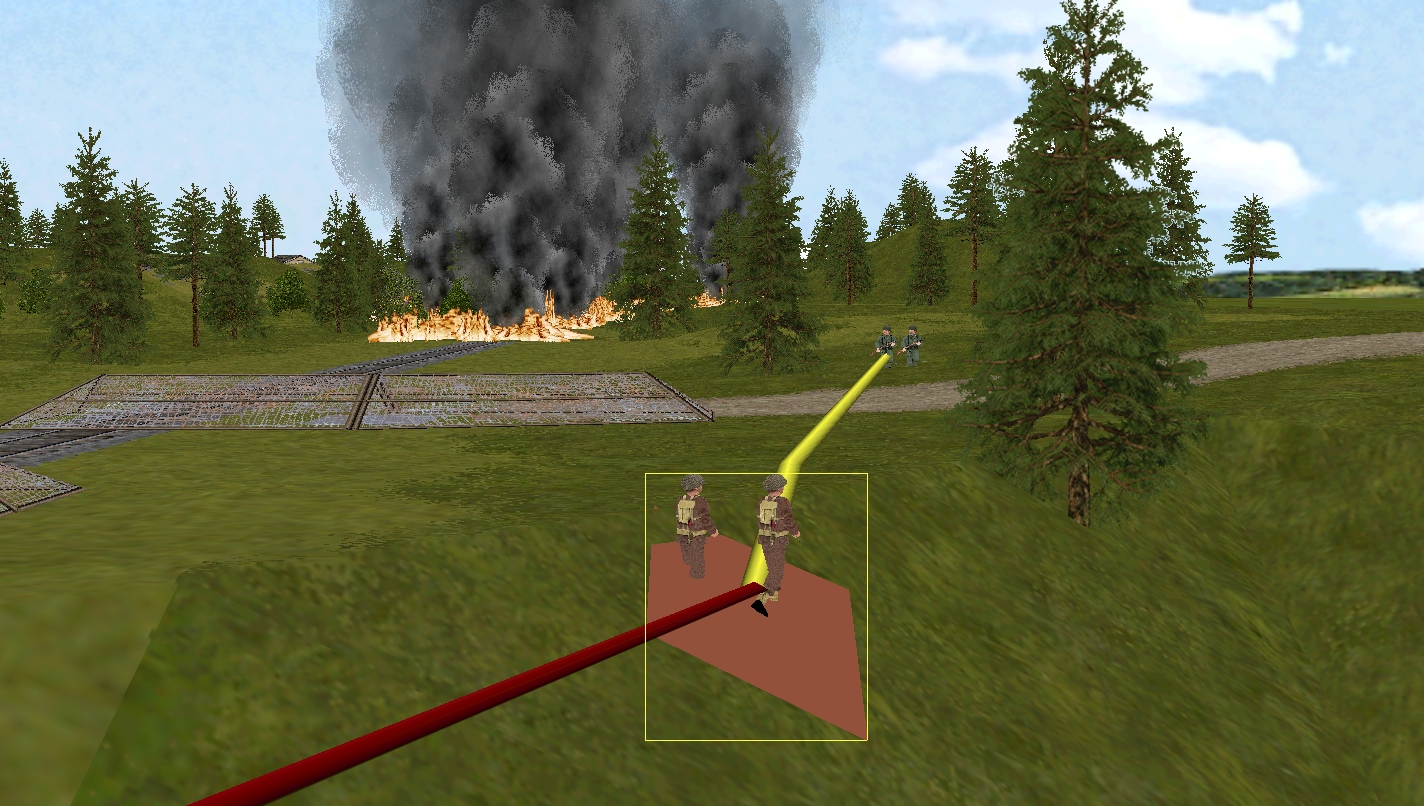
Fairly confident that the box no longer poses a threat and aware that a ‘friendly’ bombardment is less than a minute away, vanguarding Venison and his companions begin putting additional distance between themselves and the aim point of the stonk. They’ve barely commenced their manoeuvre, when MP 40s begin chattering nearby.
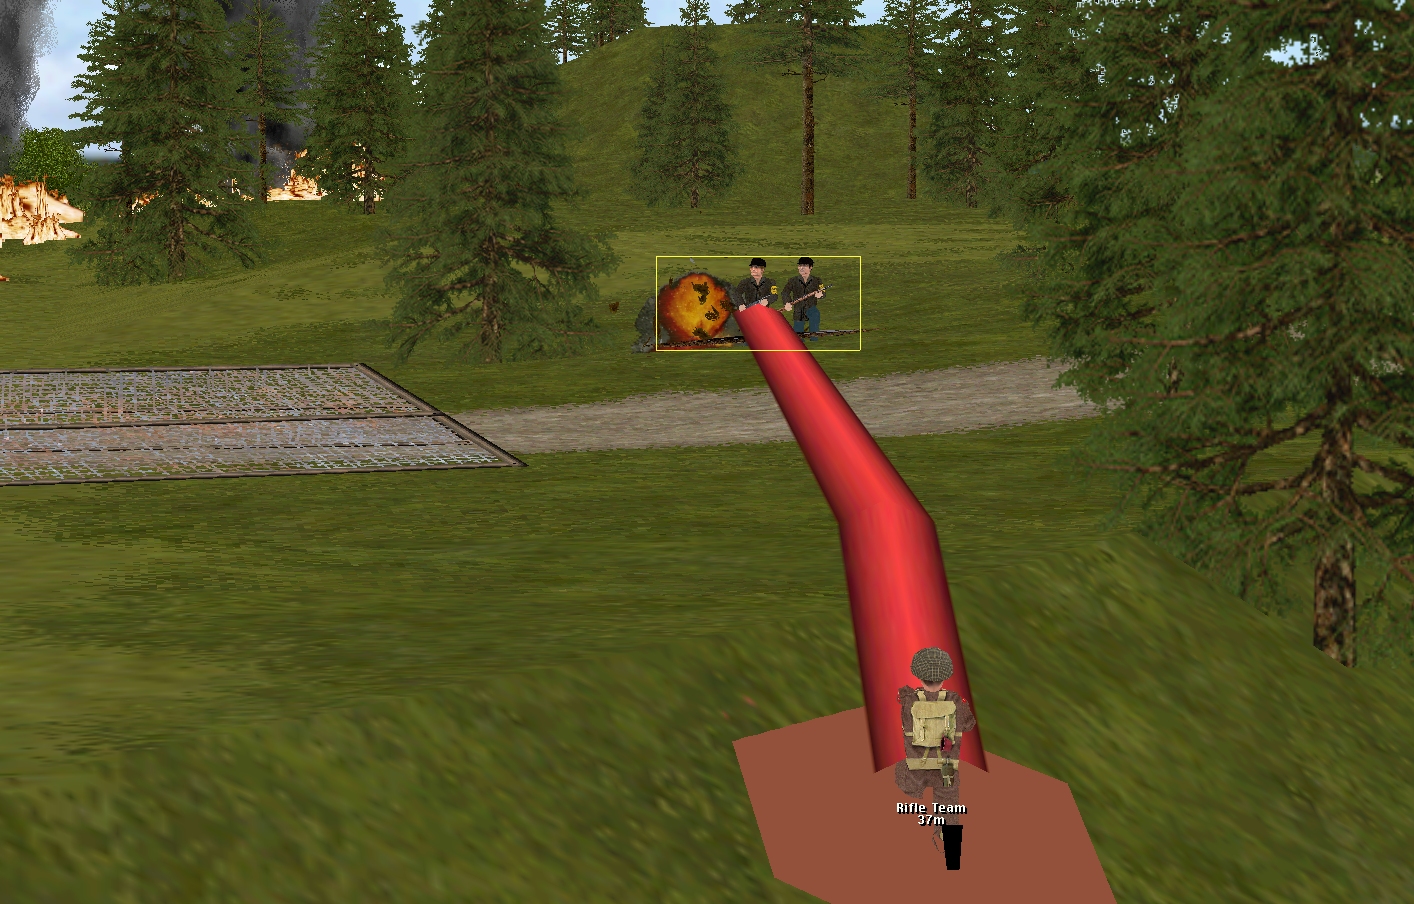
On another day, the Brits’ calm return fire and accurately hurled Mills bombs would have quickly silenced the party of keen but green ‘old men and boys’ across the road. On this occasion the Germans give as good as they get. By the time the clock stops, although the Volkssturm unit appears to have been reduced to four men, it’s out of LoS of all other Allied units, and Venison has lost his Sten gunner and one of his riflemen.
Tuck’s arty bombardment starts a few seconds before the end of the sixty. Judging from the impact locations of the first few rounds, next turn Venison has as much chance of being harmed by the incoming shells, as he has of being helped by them.
Elsewhere this turn…

Whitehand spotted movement below his window. Apparently heading southward, the squad of Volksgrenadiers halted shortly after entering the woods.
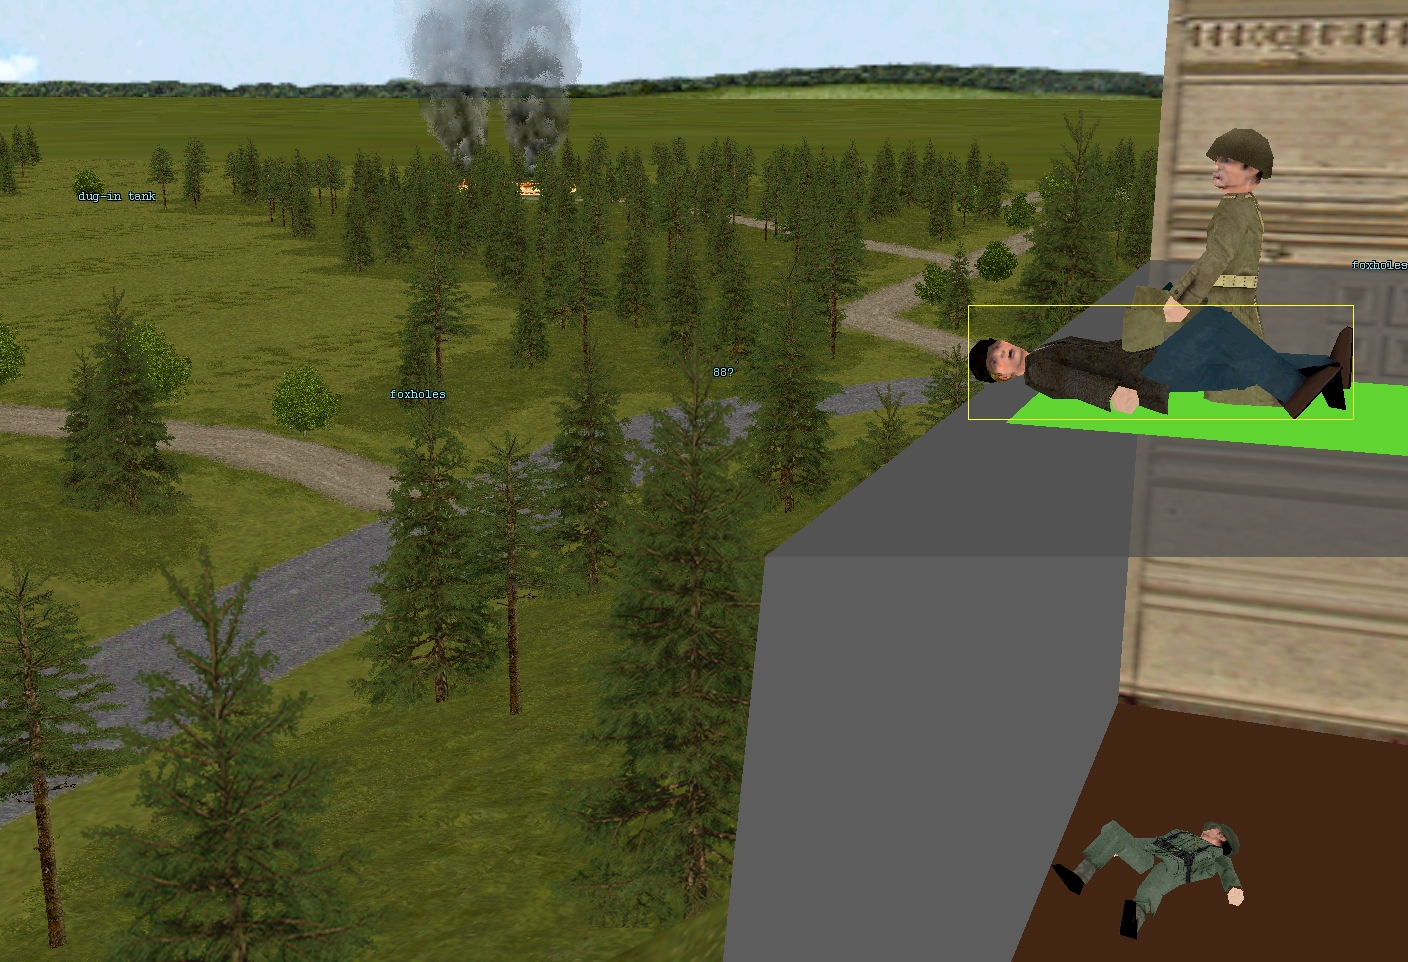
Dale inspected the corpses of an LMG team and surveyed a segment of terrain that – last time he checked – hosted a dug-in tank, a deployed ‘88’, and a halftrack. The fact that the Captain didn’t spot any of these threats in Turn 7 doesn’t mean they aren’t still in situ. Given a little longer, assuming they haven’t moved, he should notice them.
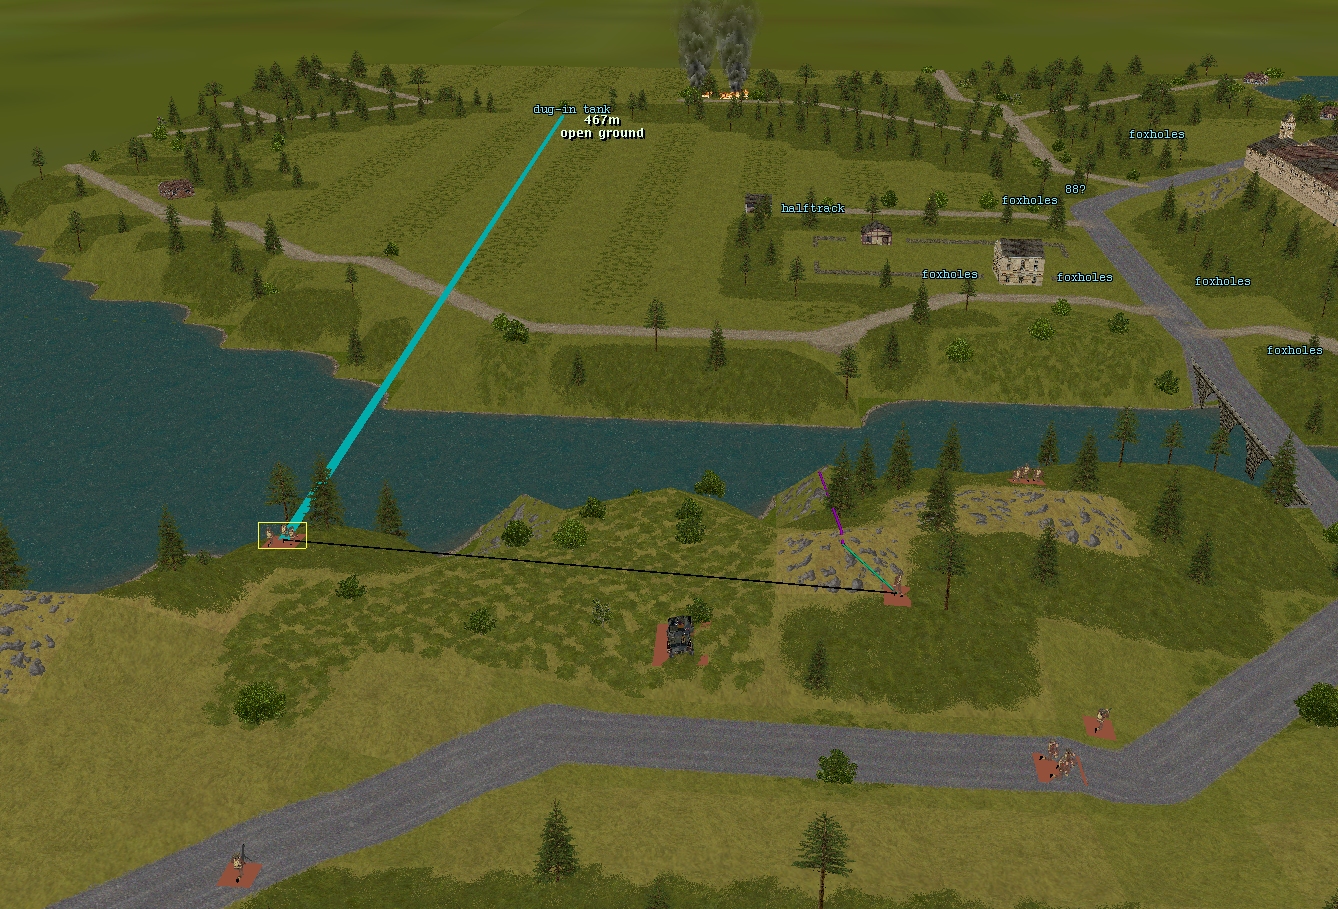
Having edged a little closer to the river bank, hopefully Greenwood’s squad will also spot the dug-in tank next turn.
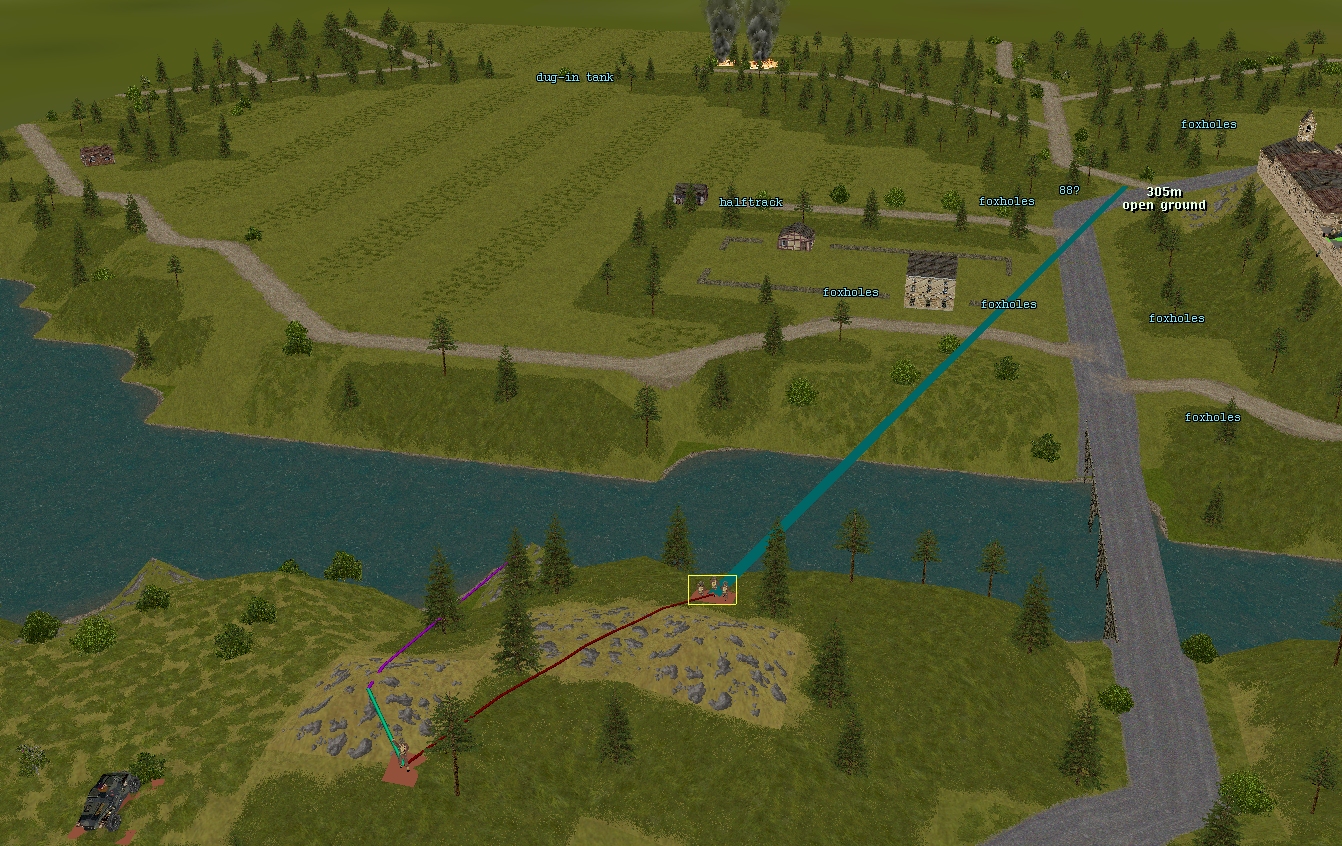
LoS obstructions mean Forester’s squad probably isn’t going to notice the angry house or AA gun anytime soon. However, from its new position, it does have a pretty good view of the road to Nottingheim.
Corporal Much failed to carry out his recon order to the letter due to a – take your pick – GM gaffe or bout of nerves. While the scout car did drive towards the Bogen this turn, it spotted nowt and reversed back to its start position on reaching its destination.
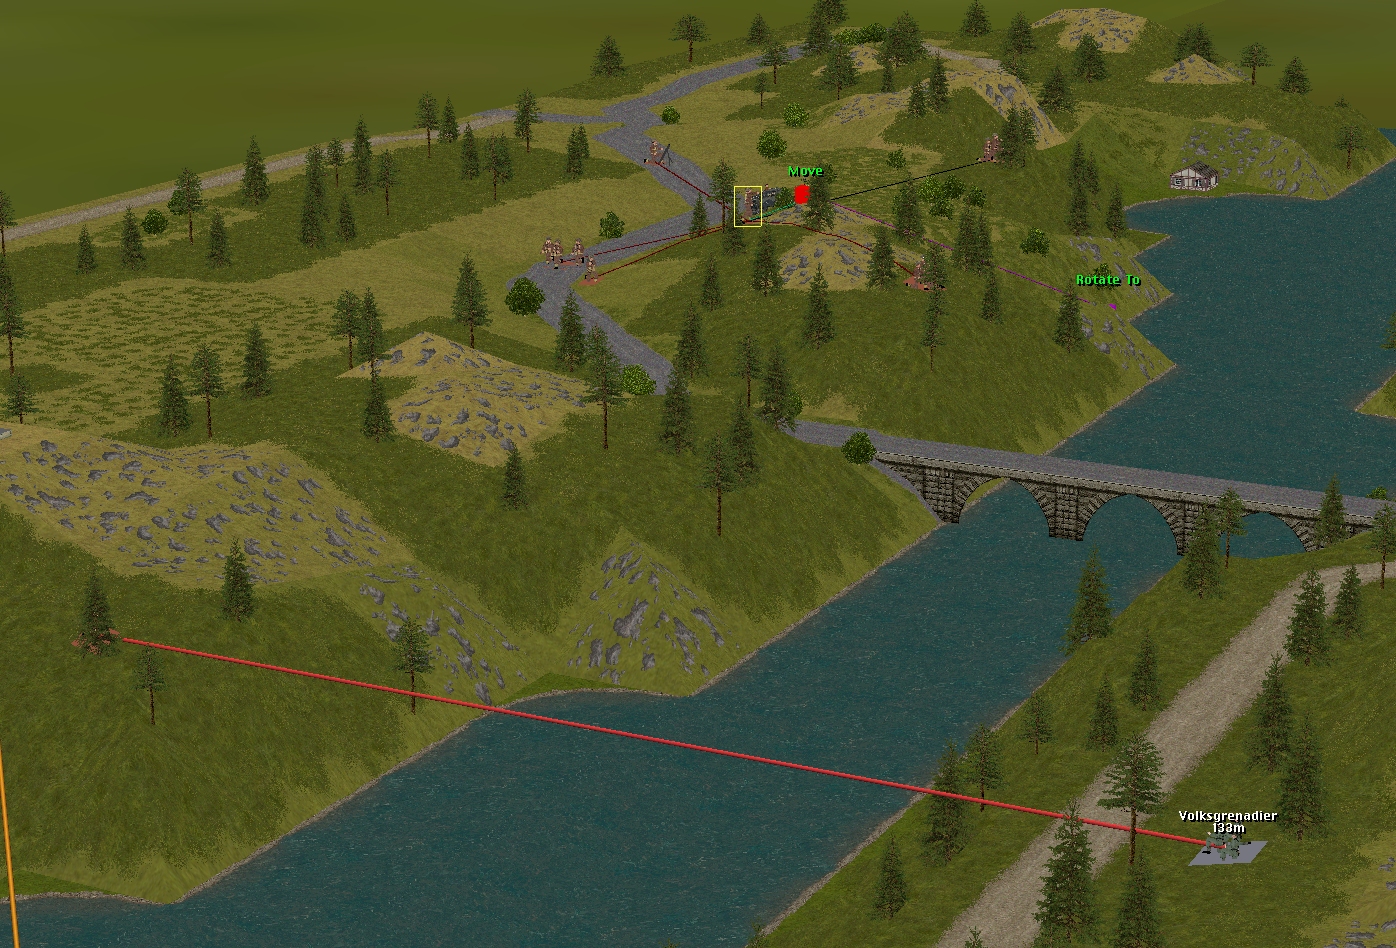
Hood spent much of Turn 7 trading lead with the Volksgrenadiers across the river. Neither side sustained casualties during the exchange.
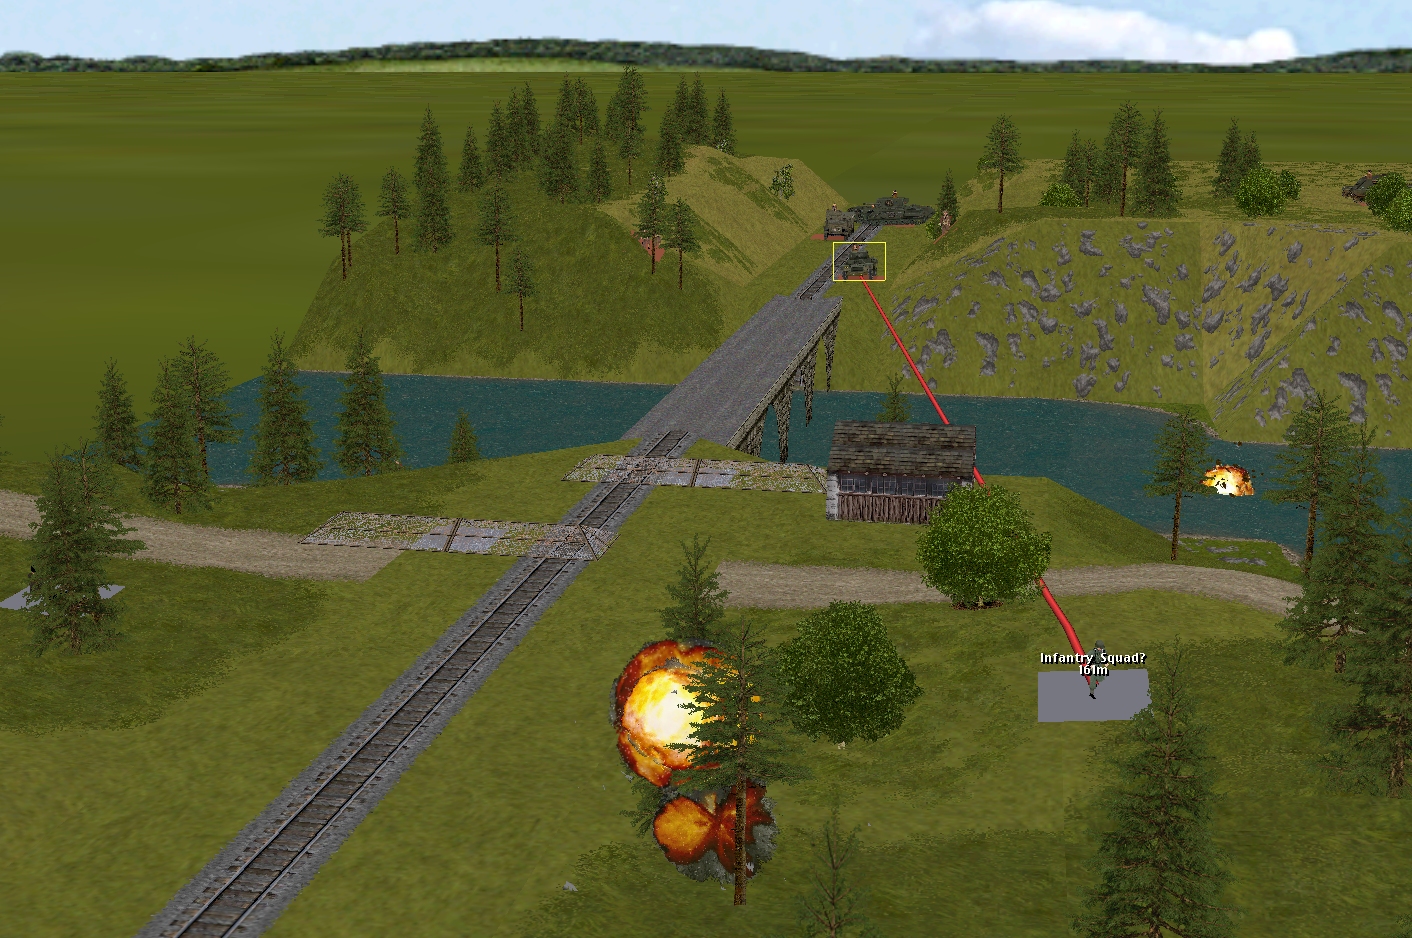
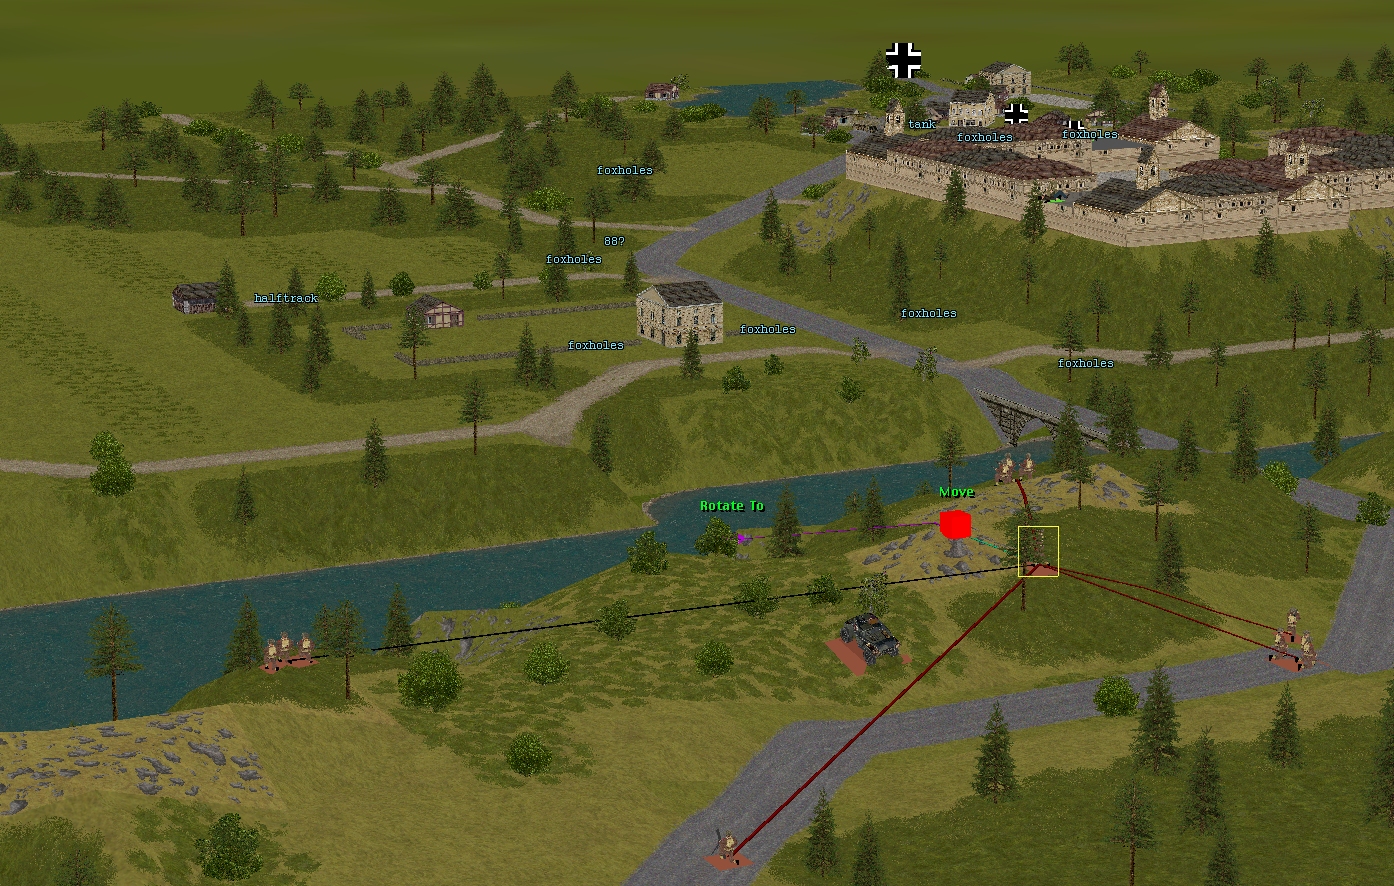
The situation at the start of Turn 8:

Turn 8 orders here, please. Commenters are cordially invited to suggest moves for the following eight unit groups (First come, first served. A maximum of one unit group per commenter. I’ll try to execute the turn as quickly as possible after all orders are in.)
(See screenshots for unit locations)
****anyone****
– Merry’s men (Lieutenant Merry + Sergeant Venison’s rifle squad + Corporal Fletcher’s M5A1 halftrack)
– Marian’s men (Lieutenant Marian + 3 x rifle squads + PIAT team + 3 inch mortar team)
– Sergeant Bowman’s Archer TD
– Corporal Much’s Humber scout car
****subscribers only****
– Captain Hood (Six-man company HQ + arty spotter Lieutenant Tuck)
– Sergeant Scarlet’s Daimler armoured car
– Sergeant Johns’ Churchill VIII
– Captain Dale’s party (Six POWs armed with pilfered rifles and pistols) + Corporal Whitehand’s team (Two POWs armed with a pilfered Panzerschreck)
Please start all order comments with ‘ORDER’ and any later revision comments with ‘REVISED ORDER’. This will help me distinguish firm instructions from suggestions and advice.
(Will consider revising these once other commanders dispatch their own Captain Nolans)
ORDER: Venison’s beneficiaries at [2,3,3]
Attempt to support Sgt Venison. I don’t know if a short move in any direction would open up line of sight to the Volksturm squad, or by targeting the squad they’d find a firing place on their own, or if they can blindly try to suppress them.
ORDER: Lt. Merry at [2,2,5]
-ditto-
Lt. Merry can move to 10,2,1 and fire on the Volks in grey. I don’t think the “beneficiaries ” can reach in time, maybe consider sending them to reinforce Venison?
Fast moving the halftrack to 10,2,2 adds more fire support during turn 9, prevents more enemy infantry moving down the west side of the castle and potentially targets any foxholers at 11,5,1.
I will order Bowman’s Archer to loose some arrows this turn.
REVISED ORDER: Lt. Merry at [2,2,5]
If moving a little north-ish would allow them to target the VolkSTURM squad, do so.
Otherwise continue to engage the retreating infantry – can move a little north if it gets them a better view, but avoid exposing their flank to the VolksGrenadiers for the time being.
REVISED ORDER: Venison’s beneficiaries at [2,3,3]
Move fast across the bridge and up to the outside of the western wall of the signalbox. Hopefully somewhere they have LOS to the VolkSTURM squad, but are protected from the east.
ORDER: Corporal Fletcher’s halftrack
Move onto the (northern side if poss.) bridge keeping the signal box between them and the path taken by the retreating Panzerschreck unit; approx [2,5,4] I reckon.
ORDER:
Sergeant Bowman’s Archer to continue reversing toward 10,2,3. Target Volkstrum team circa 3,5,3.
ORDER
Lt. Tuck to halt the current bombardment and start making his way to 26,3,5.
Cpt. Hood can keep trading lead with the Volksgrenadiers for now.
Any suggestions for the arty? Halting the current bombardment seems sensible, but what then? IIRC Tuck from his current position can see the building nearest the road bridge. He’d have to move north to see more of that area. Perhaps move him up so he’s in position to bombard/smoke when needed?
I’d agree with all of that. I think he’s done his bit in the south, and should get in a good position for an eventual road bridge crossing in a couple of turns.
With that volksgrenadier squad potentially joining the party very soon, I think Venison – if you’ll excuse the pun – is going to be cooked without support. I’ve consulted my Jim-Morrison-themed ouija board about the rail bridge crossing, and he’s said “the time to hesitate is through”.
Doesn’t he also say “Try, and we can only lose.”? But he’s probably just being a proto-Mr Miyagi.
TL;DR- We need more infantry down south asap.
Agreed cease the barrage, perhaps keep the spotter where they are for the moment. They can already see east along the road up to about 28,4,5 as well as a couple of the foxhole locations and the white house protecting the bridge. We could also lose visibility of the track running alongside the western edge of the castle where enemy reinforcements appear to be coming from. Finally it’s going to be extremely difficult to take the road bridge via direct frontal assault – even assuming the indicated defences are accurate – if anything they have been understated so far.
IMHO our priorities should be to take and secure the rail bridge (proving difficult with a single infantry squad) then reinforce the castle. From that vantage point we can rain fire onto the road bridge defenders and the village people – and it would be fun to stay there.