
Yet to issue an order in this year’s play-by-comment Combat Mission game? Now would be a great time to get your feet wet. In the final moments of this minute-long turn, the Comment Commanders’ force doubles in size. All of the newcomers will require thoughtful chaperones in the weeks/turns ahead.
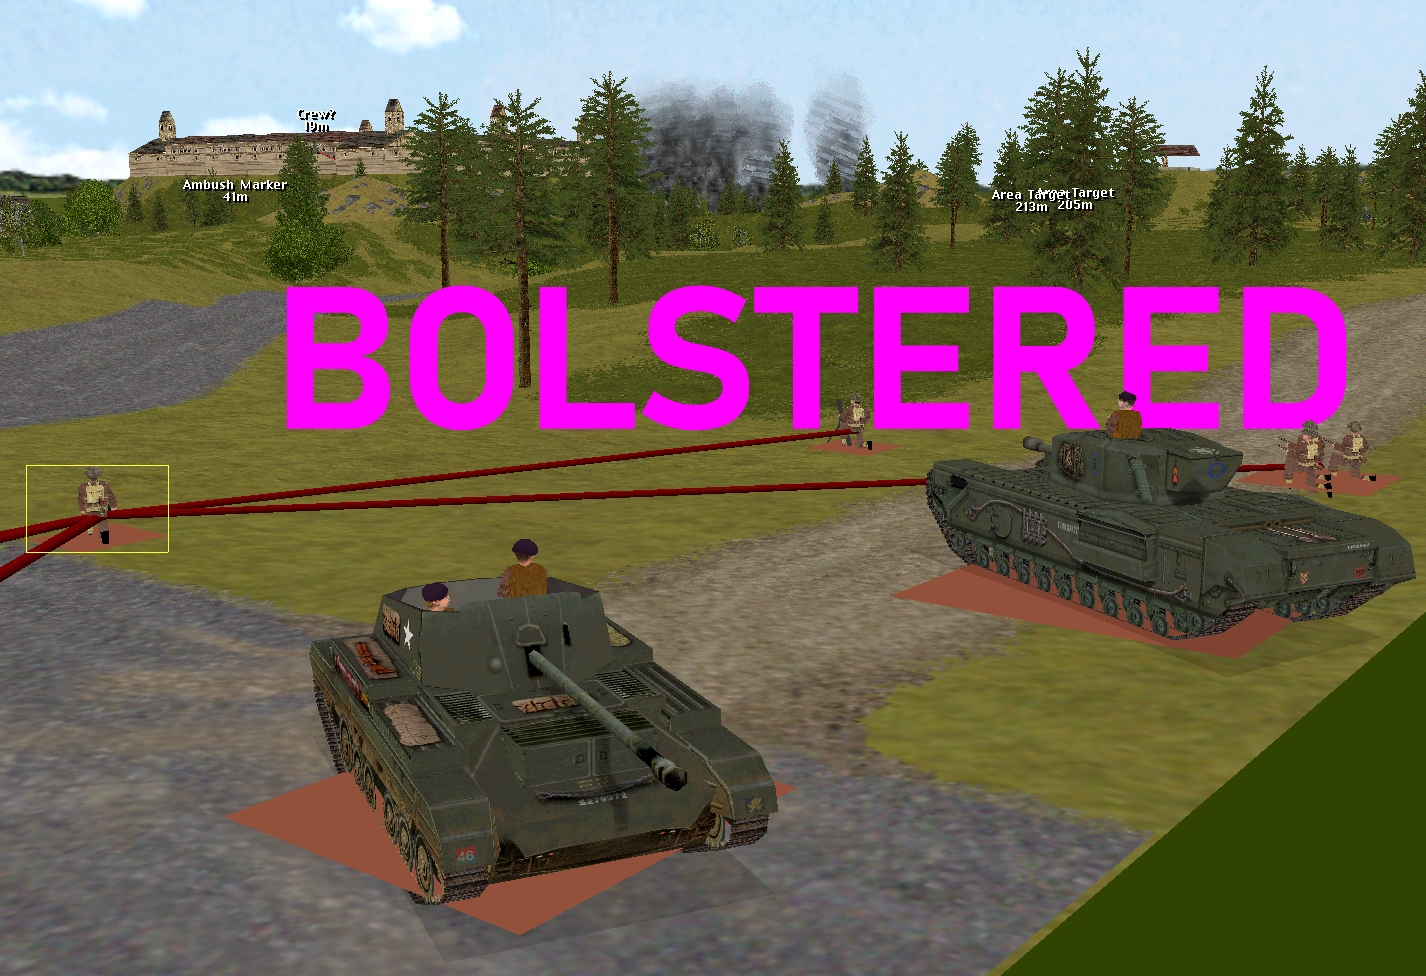
Before Sergeant Johns’ Churchill VIII close support tank, Sergeant Bowman’s Archer tank destroyer, and Lieutenant Marian’s infantry platoon (HQ, three rifle squads, 3 inch mortar team, and PIAT team) nose onto the battlefield circa 49, 1, 1, Allied units already on the map glimpse two previously unspotted foes.
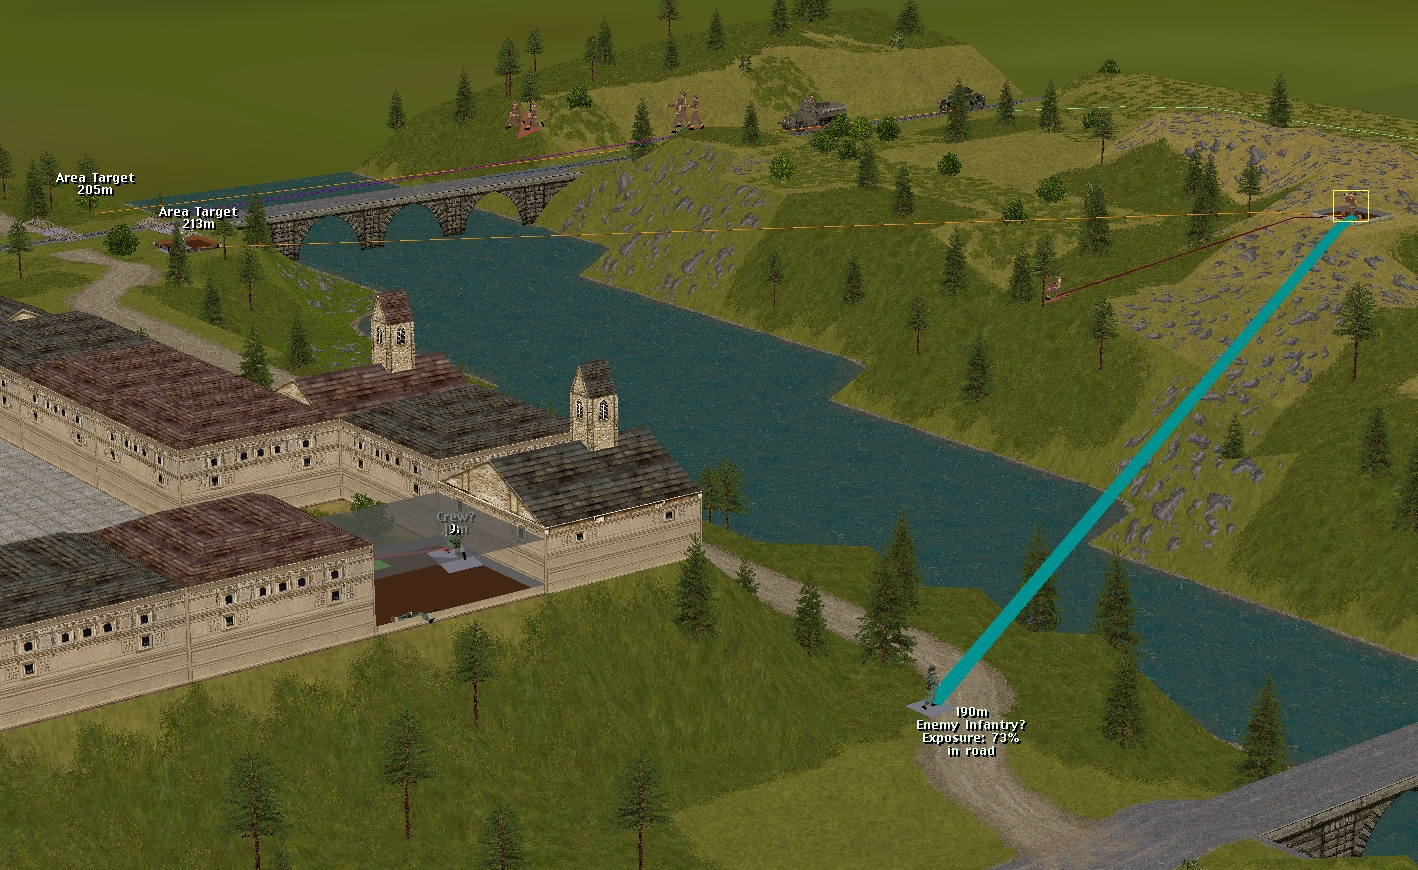
While waiting for his stonk to arrive, arty spotter Tuck notices movement on the far bank of the Bogen. Enemy infantry heading south or west by the look of it.
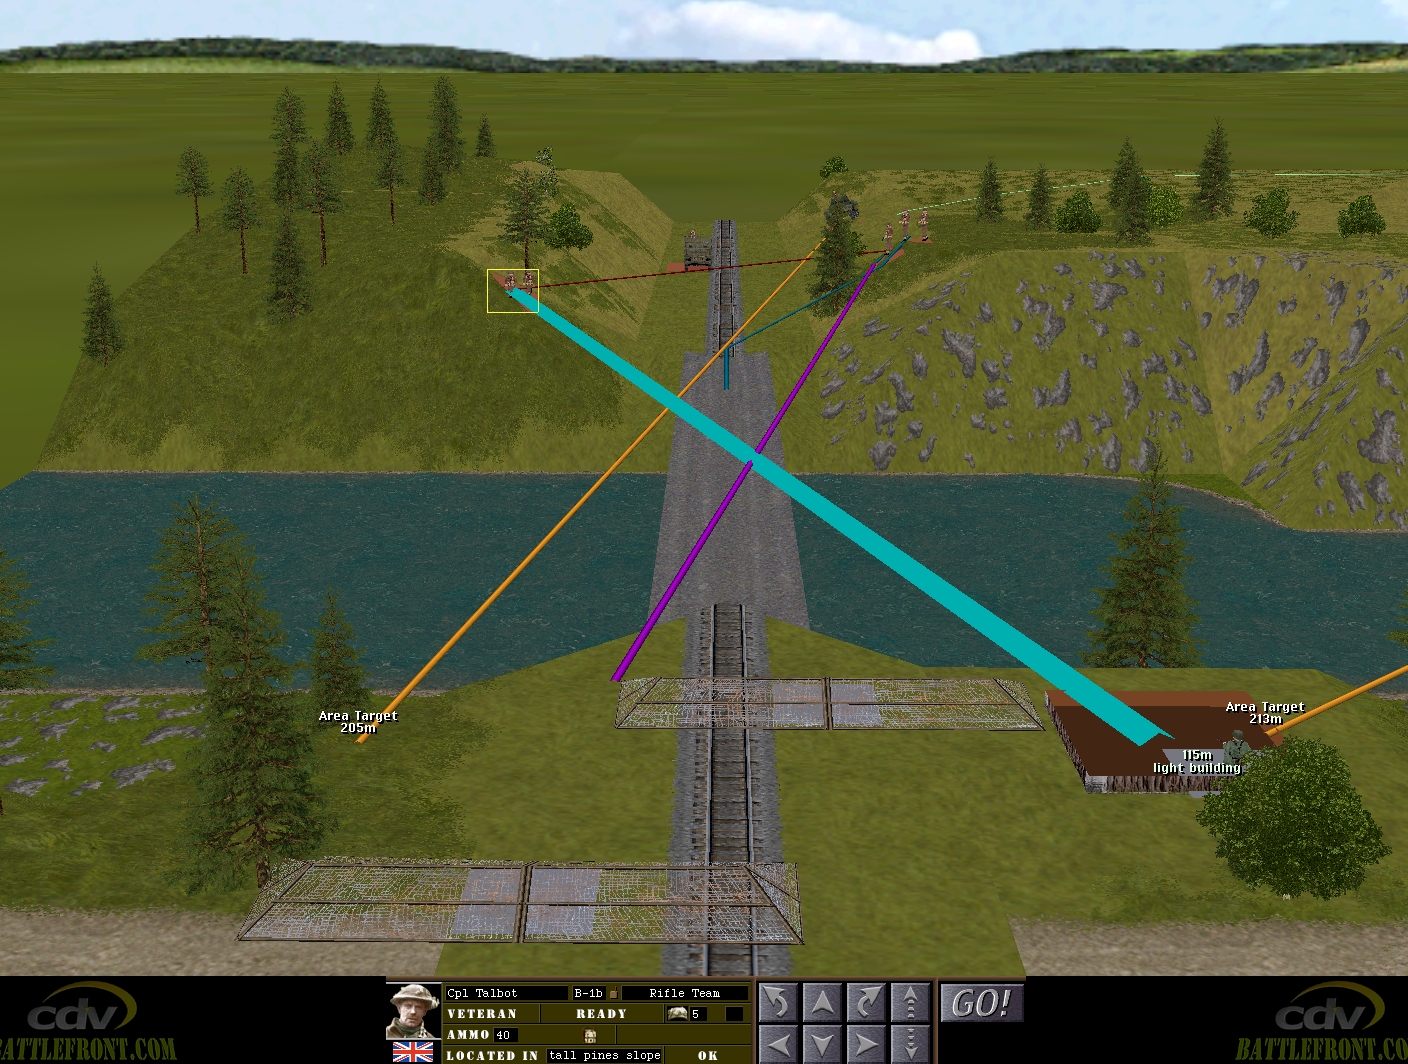
And, sneaking closer to the railway bridge, one of Sergeant Venison’s half squads spots uniformed figures within the signal box at 3, 3, 5. By the start of Turn 5, five British units (Hood, Merry, Venison’s half squad’s, and Fletcher’s HT) have eyes on the ‘signalmen’.
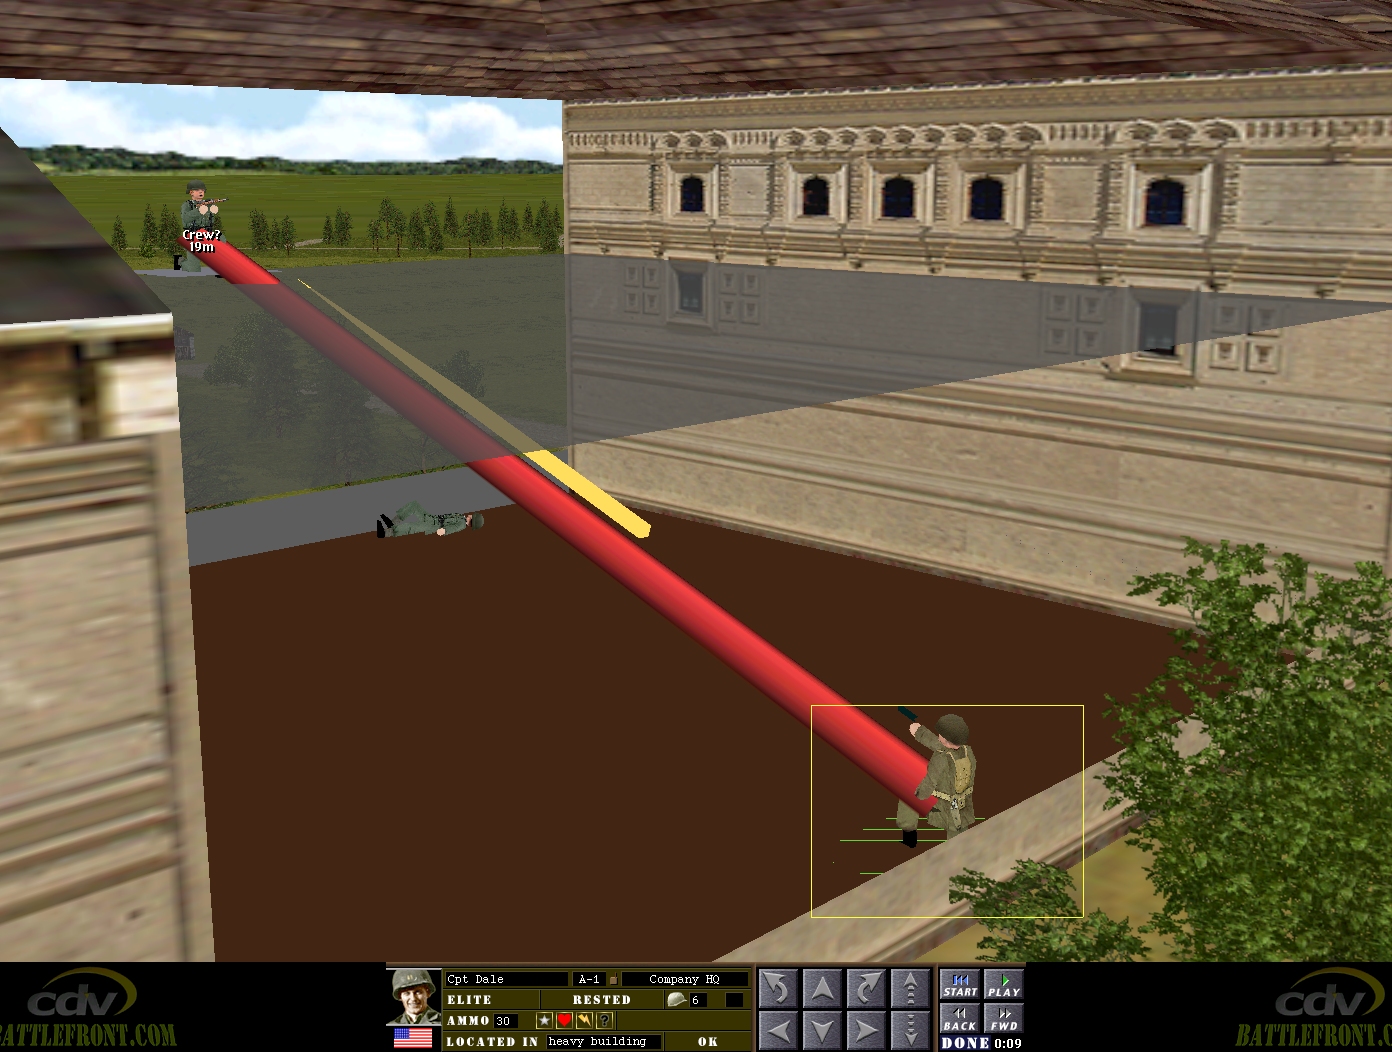
Up in the Schloss, Dale’s marauders make a lot of noise but little tangible progress this turn. The machine gunners upstairs at 28, 3, 2, are proving doughty adversaries!
Things worth bearing in mind at the start of Turn 5:
Now just sixty seconds away, Tuck’s bombardment will probably pepper the area around the signal box as well the box itself. Shells could strike the bridge or even the western bank of the river!

Unlike most tanks and TDs, the unusual Archer can’t ‘hunt’. To use it effectively you’ll probably want to ‘move’ or ‘fast move’ it to an out-of-LoS spot, then reverse it a short distance into a promising firing position.
Because Comment Commanders are a tad thin on the ground this year, I’m going to treat Allied footsloggers as three units (Marian’s platoon, Merry’s platoon, Hood + Tuck) for the time-being. If Allied AFVs are knocked out, or infantry commanders end up overworked, there may be a rethink.

Turn 5 orders here, please. Commenters are cordially invited to suggest moves for the following five unit groups (First come, first served. A maximum of one unit group per commenter. I’ll try to execute the turn as quickly as possible after all orders are in.)
(See screenshots for unit locations)
****anyone****
– Merry’s men (Lieutenant Merry + Sergeant Venison’s rifle squad + Corporal Fletcher’s M5A1 halftrack)
– Marian’s men (Lieutenant Marian + 3 x rifle squads + PIAT team + 3 inch mortar team)
– Sergeant Bowman’s Archer TD
– Corporal Much’s Humber scout car
****subscribers only****
– Captain Hood (Six-man company HQ + arty spotter Lieutenant Tuck)
– Sergeant Scarlet’s Daimler armoured car
– Sergeant Johns’ Churchill VIII
– Captain Dale’s party (Six POWs armed with pilfered rifles and pistols + Two POWs armed with a pilfered Panzerschreck)
Please start all order comments with ‘ORDER’ and any later revision comments with ‘REVISED ORDER’. This will help me distinguish firm instructions from suggestions and advice.
ORDER
Adjust Tuck’s bombardment towards 11,5,1. That ought to reduce the risk of friendly fire for anyone forcing the bridge while still pinning the signalmen and foxholes.
ORDER: Fletcher’s halftrack
OPEN FIRE on the ‘signalmen’.
ORDER: Venison’s overwatching Fire Team at 2,3,3
DIAL UP PROPENSITY FOR VIOLENCE … if there is a way
I don’t know if Rules of Engagement can be set to ‘shoot first, ask questions later’, or a Hunt waypoint placed a metre in front of their current position. Something that gets them looking for targets and shooting at targets.
ORDER:
– one of marians rifle squads to go to the top of the hill at 34
– another rifle squad to go straight ahead to 42 to have a peak over the hill towards the other side if the river
– the rest of marians men (1 rifle squad, piat, mortar and lt.) Go closer to the front, but stay hidden at 34,1,3
I do not know if the soldiers can ride on top of the armour?
ORDER:
Dale, ferchrissakes, learn to aim! You’re starting to make stormtroopers look disciplined. And think about it: how are going to flog those looted Dutch masters later if they’re full of bullet holes?
Whitehand: Stay frosty.
ORDER
Scarlet’s armored car to also engage the signalmen, moving to the vicinity of 1,4,4 first to pick up line of sight if necessary.
Order: The Humber scout car to try and get up the hill to 34, 4, 3 to see if it can see anything from up there.
ORDER:
Sgt Johns’ Churchill – FAST MOVE to 1,5,4 via 17,1,5.
ORDER:
Sgt Bowman – In the absence of any commanders – FAST MOVE as the Churchill.
If anyone else wants to take command/change order please feel free.
I suppose forcing a bridge in less than 5 turns was a bit optimistic on my part, but it does seem as though we’re a little bottled up on the west bank right now.
With the artillery landing next turn, that ought to (hopefully) give us a way across, but we’re also relatively limited in the strength of our forces on the southern end of the map, and I don’t know how quickly any reinforcements from the new northern group could reach the south side (or indeed if they should even try).
As a guiding principle, what do we think about Merry and Scarlet continuing to attempt to force the rail bridge, to provide support for the road bridge?
That maybe-88 pointing at the eastern end of it is the real question mark, though. Sure would be nice if it turns out to be something that the Churchill can tank.
At over 500m the Churchill has a good chance of surviving a shot to the front.
Closer range than that or a side/rear hit.. it’s a big risk.
Arty on the 88, surely?
Possibly it’s beer-enhanced bravado speaking but I fancy having Venison’s advanced fireteam sprint for the foxholes SE of the bridge.
– nothing was foolish enough to stick its head up when sprinkled with lead from the Daimler AC
– signalmen might be suppressed by the halftrack (not sure I’d specifically task other infantry units in assisting on that)
Also not sure how far NE the artillery could be adjusted to leave the southerly foxholes safe-ish, to catch the other foxholes (I can’t remember if they’re at 11,5,1 or 12,1,4), and to discourage southward enemy infantry movement.
ETA: Bottled up? We’re concentrating our forces to achieve local supremacy.
I guess the new forces should be ushered to the front asap.
Do we have eyes from the north on the road bridge?
If not, maybe some fresh troopers can go to the top of the hill at 34.
Ps. I only now have found some time to join in, so i’m not 100% up to date with the plans
Good to have you onboard. Maybe you could take Marian’s men and set them up on the 34 hill, as you’ve suggested.
Marian’s platoon includes a PIAT team. That can be useful as a countermeasure against the tank that is (assumed to be) in the SE village. Or perhaps against the halftrack that is (assumed to be) in the middle of the map. At a guess, the PIAT would not be much cop firing all the way across the Bogen? If that’s the case, then there’s something to be said for getting the PIAT team to the other bank ASAP. Our earliest crossing will be the southern bridge. The PIAT team to hitch a ride on one of the armored vehicles to be able to reach that area soonish?
Take my gung-ho attitude with a generous pinch of bärlauchsalz, but I’m all for continuing our rail bridge plan with Merry and Scarlet.
Since nothing seems to be moving in the village and the enemy MG team is being admirably kept occupied by Dale, I think I might move Whitehand to the south side of the castle to provide support, should any armour show up. Although we might have range issues again (20,4,2 seems to be slightly closer to the east end of the bridge than the present distance to the village, but not by much). Should I bother, or is it a waste of time?
I think he is more valuable keeping an eye on the comings and goings in the village. However if the AFV’s move south then quickly reposition as you suggest.
OK, looks like y’all could use a little help. Anyone want to volunteer me a vehicle or squad and I can get them rolling into position?
Much obliged. Maybe you could take Sergeant Johns and/or Bowman – I don’t think they’ve been claimed. Or, to be honest, take your pick of anyone who hasn’t been ordered around yet.
@Tim
Where did Venison’s bridge-skulking fire team end the turn?
At 2, 2, 5, roughly 12 metres from where they started the turn. Sneaking on a slope and in conifers seems painfully slow.
All,
I think we should concentrate our forces by sending the reinforcements to the rail bridge. I’m guesstimating about 2- 3 turns for the AFV’s, maybe longer if we try to carry some of the infantry.
The reasons discussed favouring the rail bridge prior to turn 1 still apply, i.e. more room to manoeuvre and options to subsequently push east for the village and/or north for the road bridge.
If we are continuing the bridge assault prior to the arty barrage arriving (beginning of turn 6) we should consider opening fire with all units having a Line of sight onto the enemy to provide covering fire.