
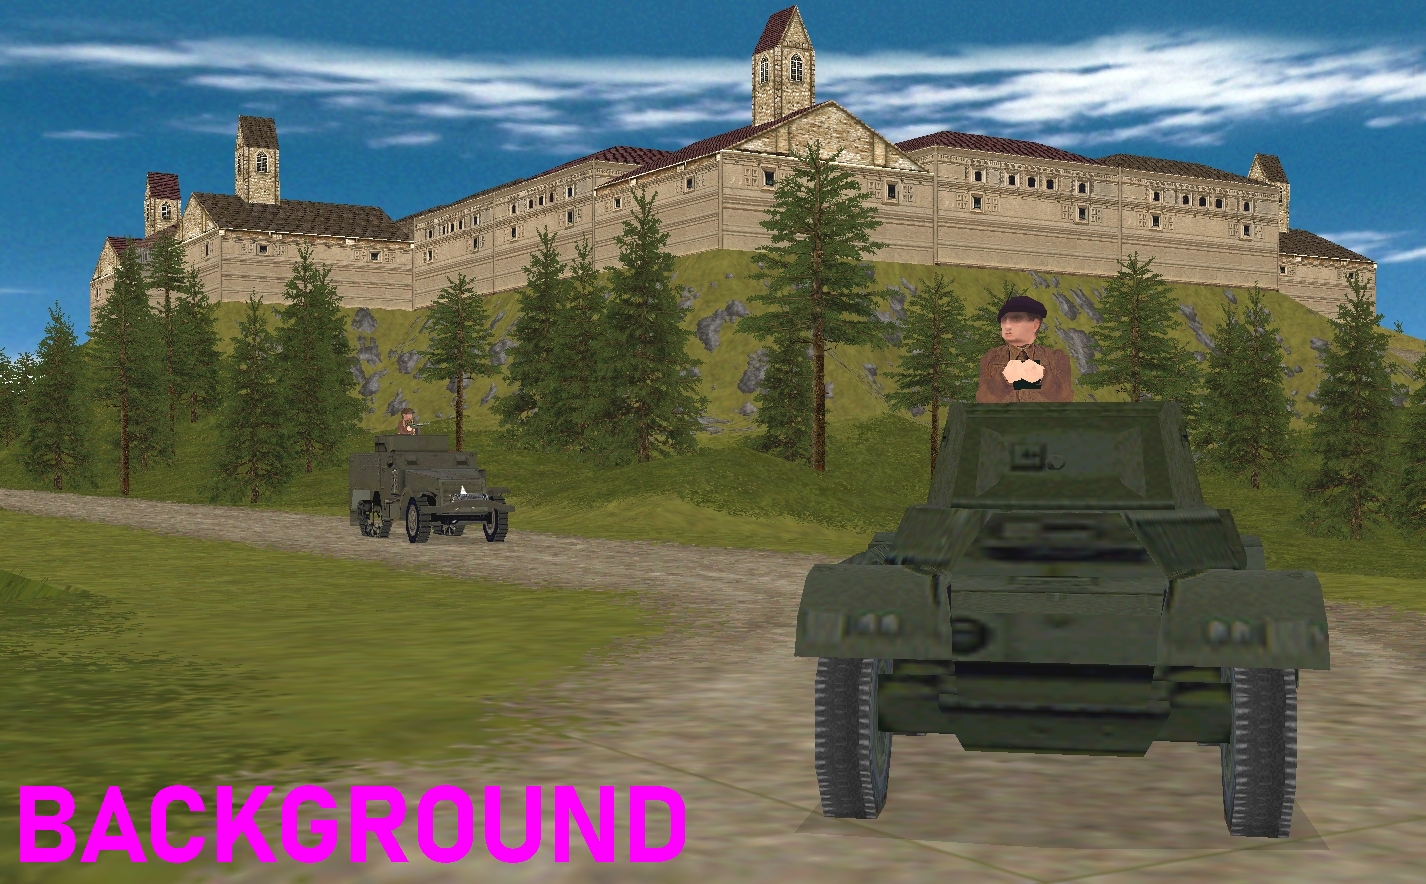
It’s early April 1945 and, a week or so after ‘bouncing the Rhine’, the Western Allies reach another watery obstacle, the Bogen river. At Mannsfeld a few gung ho US AFVs manage to barrel across the bridge before it is blown. Further south, in the British sector of the front, Monty’s vanguard reaches Nottingheim fully expecting to find its two crossings reduced to rubble and twisted metal. Instead the swashbuckling Captain Hood discovers a golden opportunity and a very helpful banner.
Hanging from high windows on the western wall of Schloss Nottingheim – the Renaissance fortress that looms over the locality’s inexplicably intact road and rail bridges – is a huge makeshift map revealing the positions of German units in the vicinity. Made from bedsheets by a small party of enterprising USAAF airmen that somehow managed to stay behind when the castle – until a couple of days ago, a Stalag for particularly troublesome Allied POWs – was evacuated, the map convinces Hood to throw caution to the wind. Rather than wait for the bulk of ‘Arrow Force’ to show up, the Captain decides to bounce the Bogen immediately!
— Task —
Comment Commanders, you’ve thirty five in-game minutes in which to gain a firm foothold on the eastern side of the river. Ideally, by the end of turn 35, the two bridges, the castle, and the village will all be under your control. As usual, it won’t be CM’s own victory algorithms that ultimately determine winner and loser. Your GM will make that call.
— Venue —
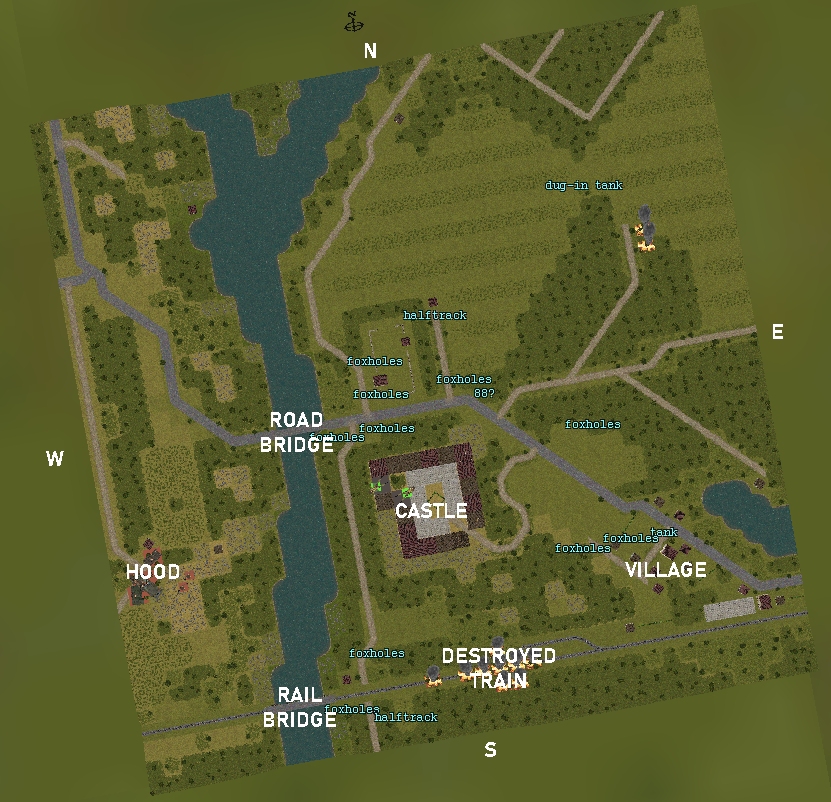
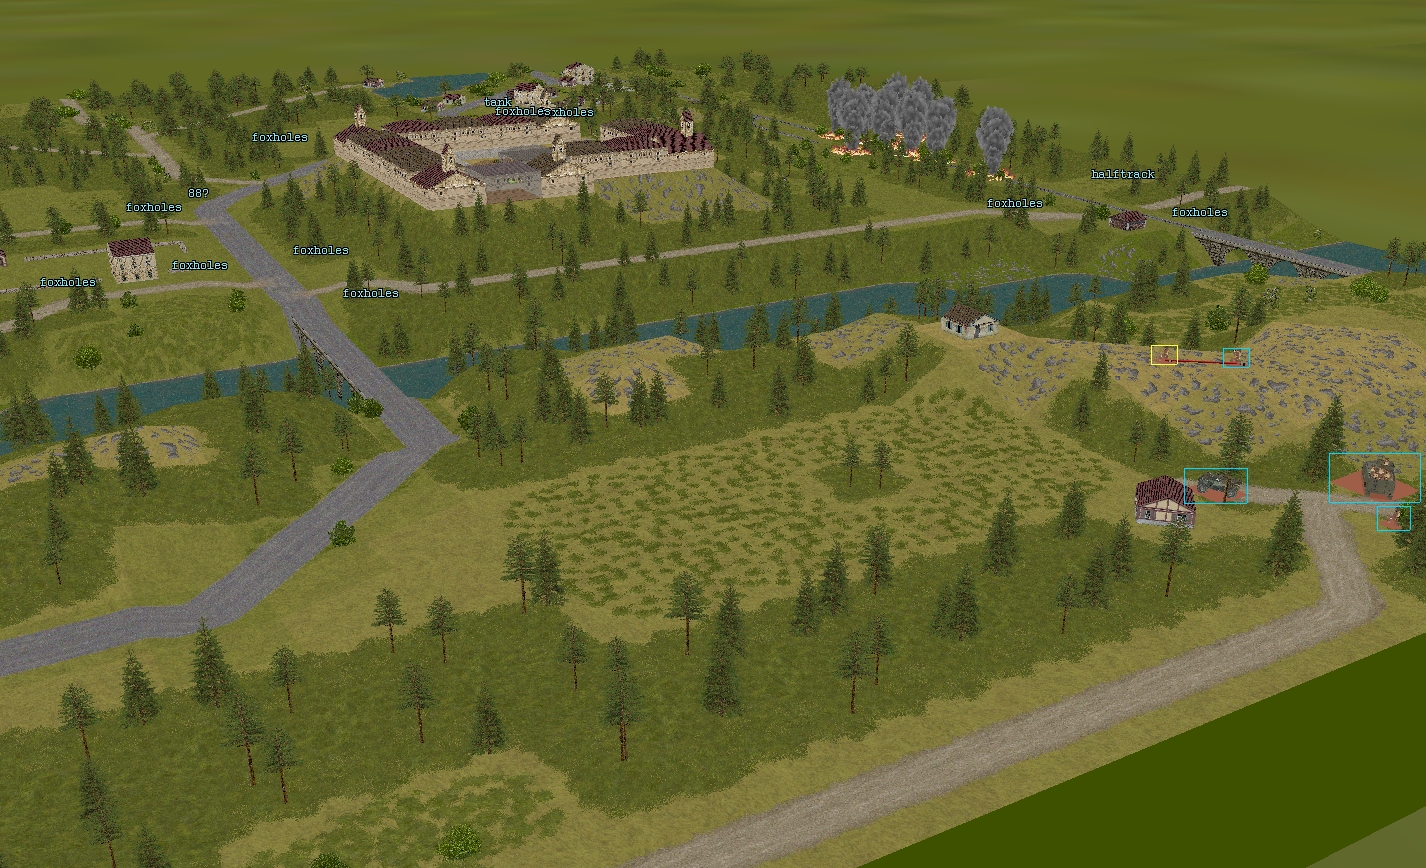
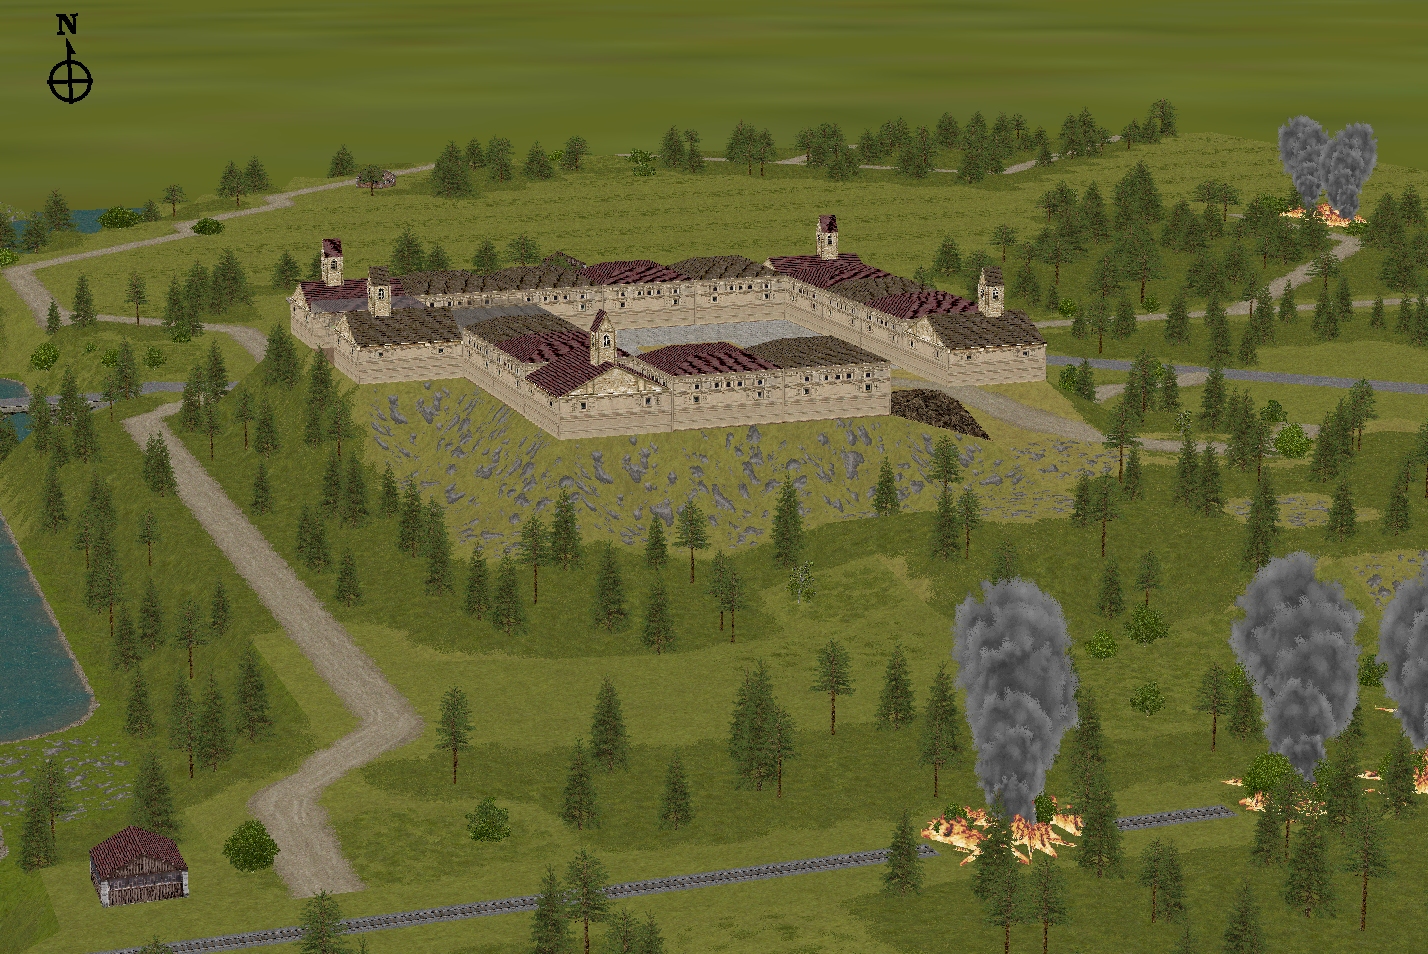
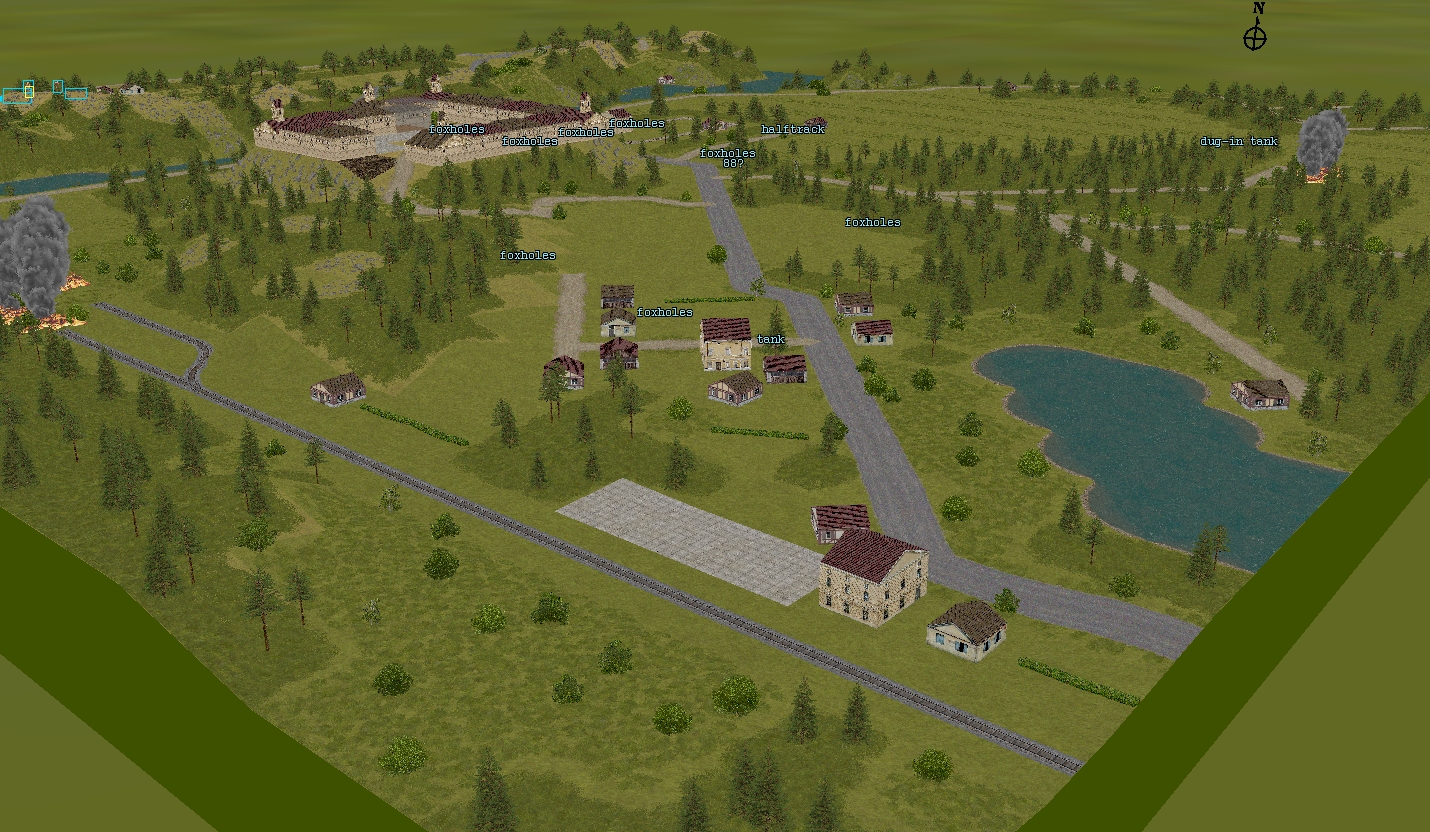
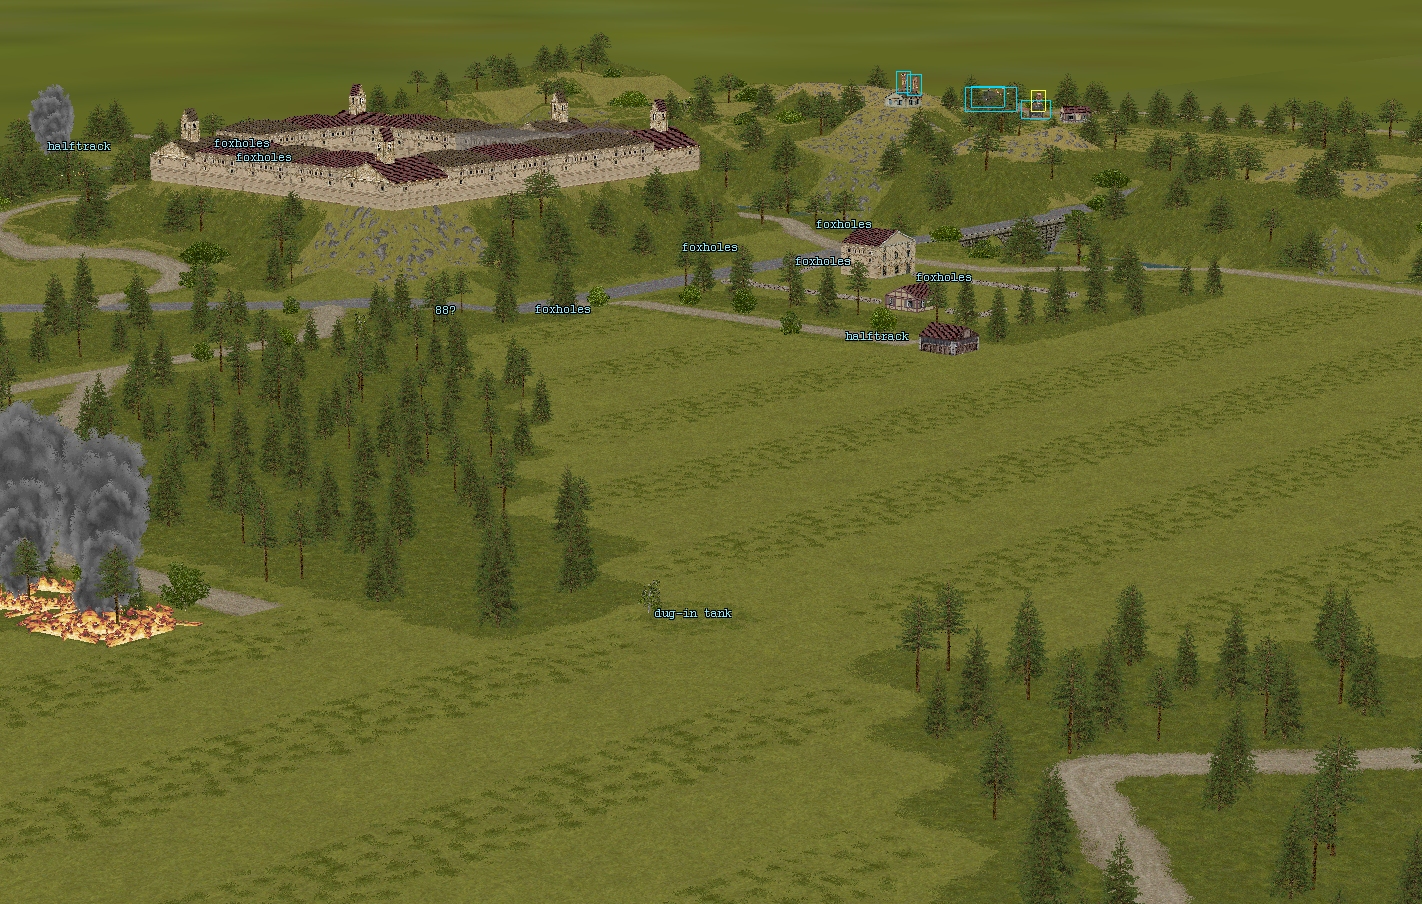
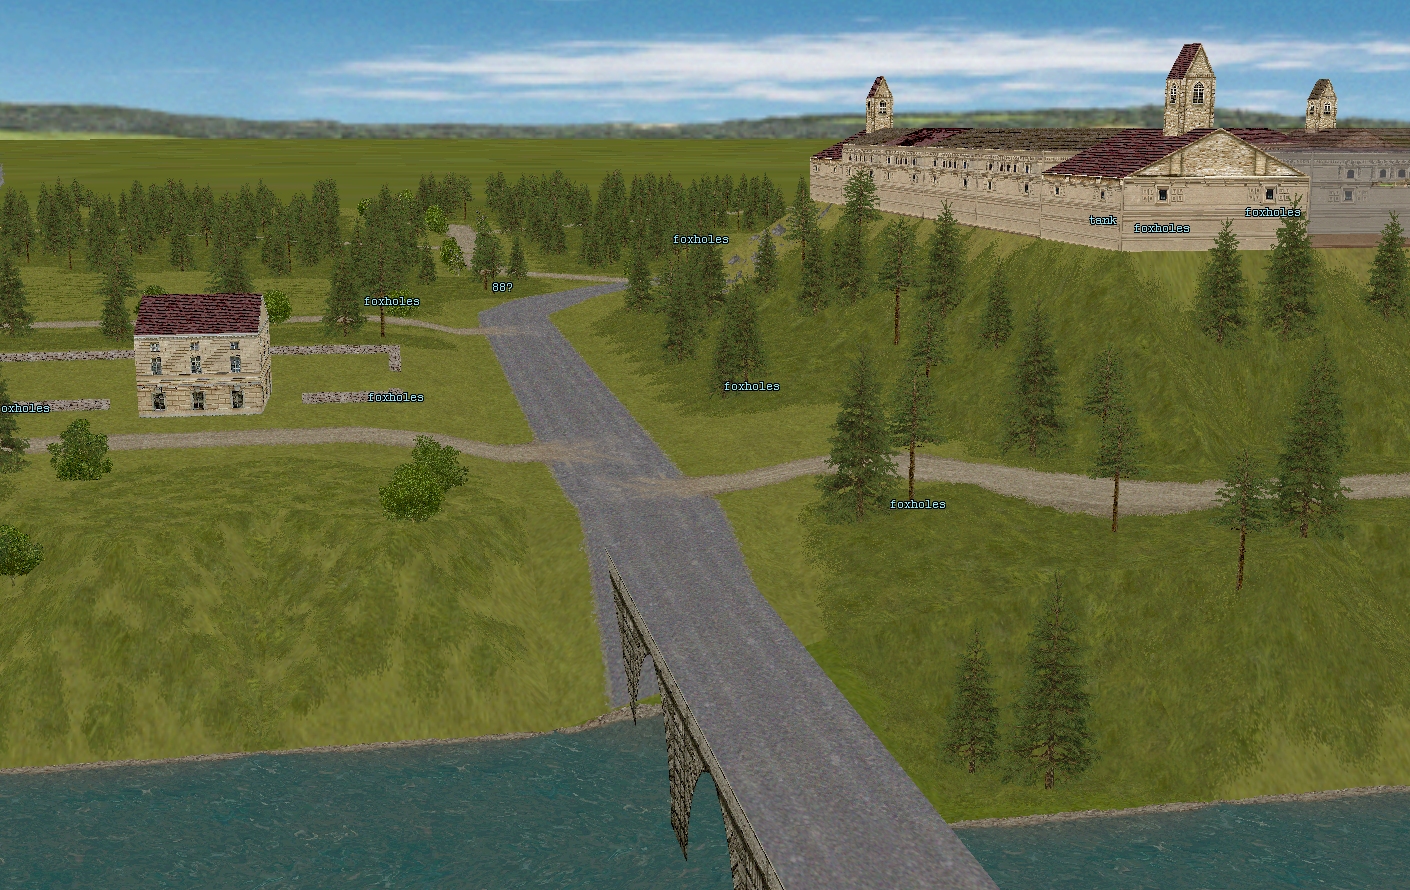
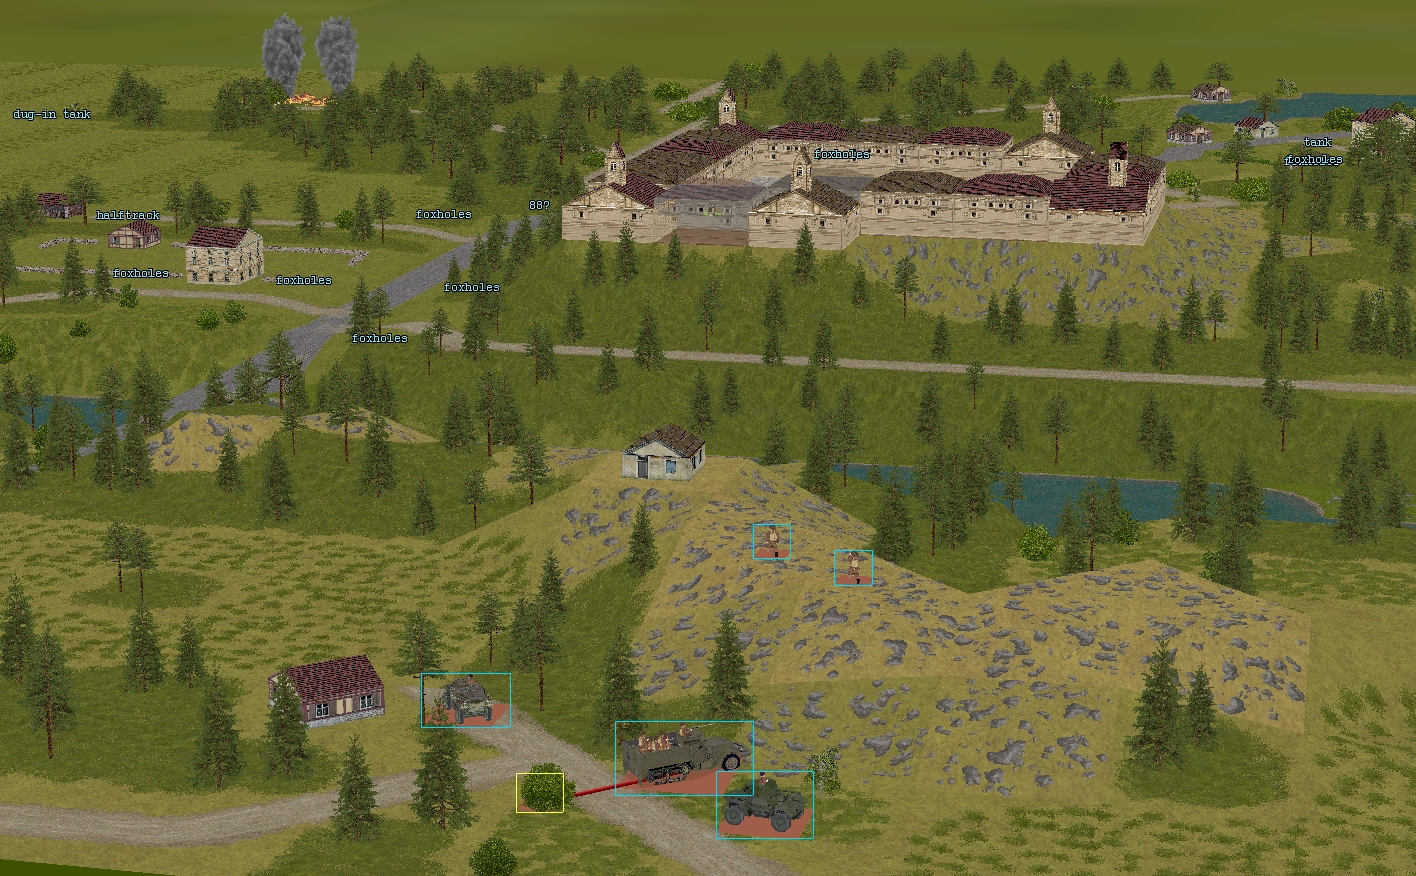
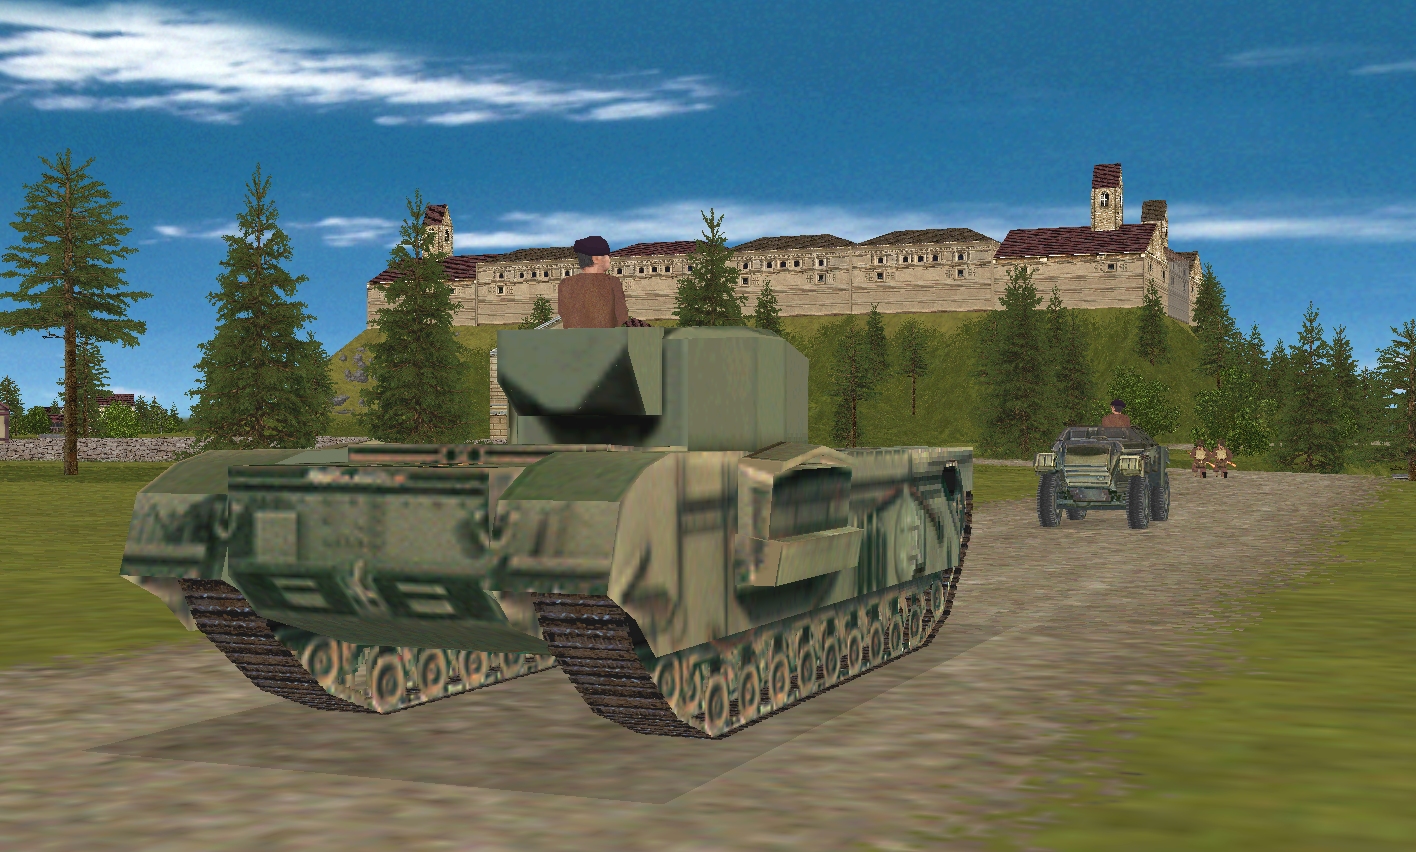
Notable features of the 640 m x 640 m map together with threats IDed by the eagle-eyed POWs are labeled in the above image.
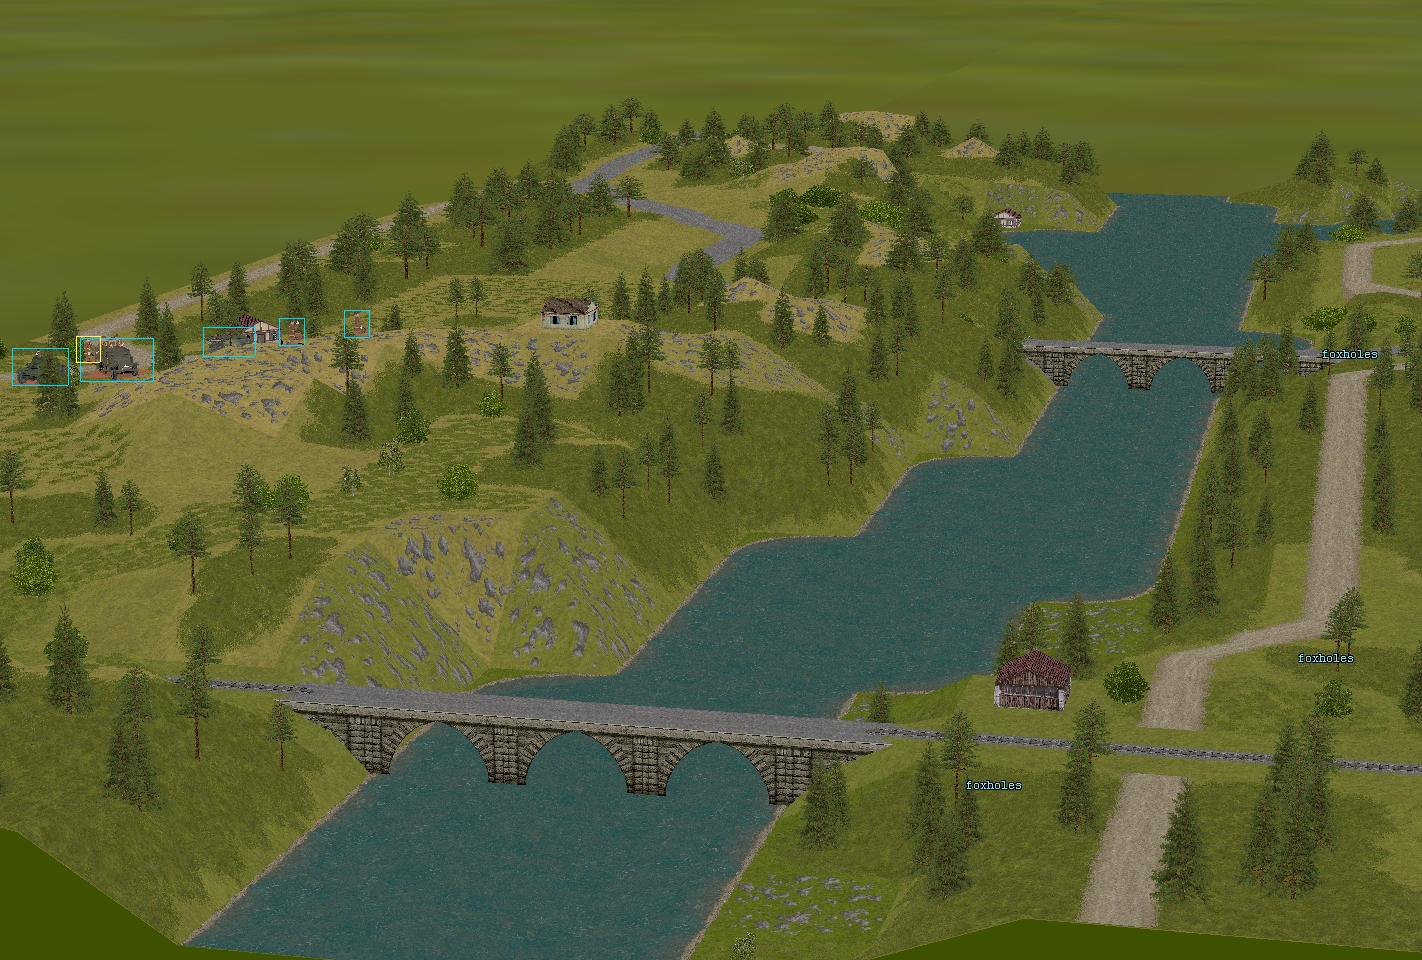
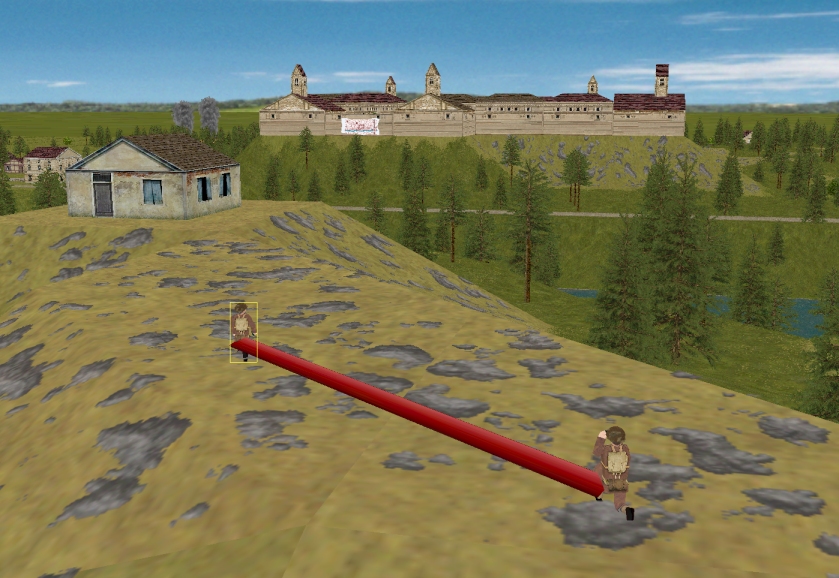
^ Looking north up the river. The rail bridge is in the foreground, Hood and his companions are on the left. Free of foes, the hilly, western bank of the Bogen provides plenty of concealment and potential vantage points, but off-road vehicular movement is severely limited by steep slopes and tracts of impassable (to vehicles) ‘rough’ terrain and conifer forest.
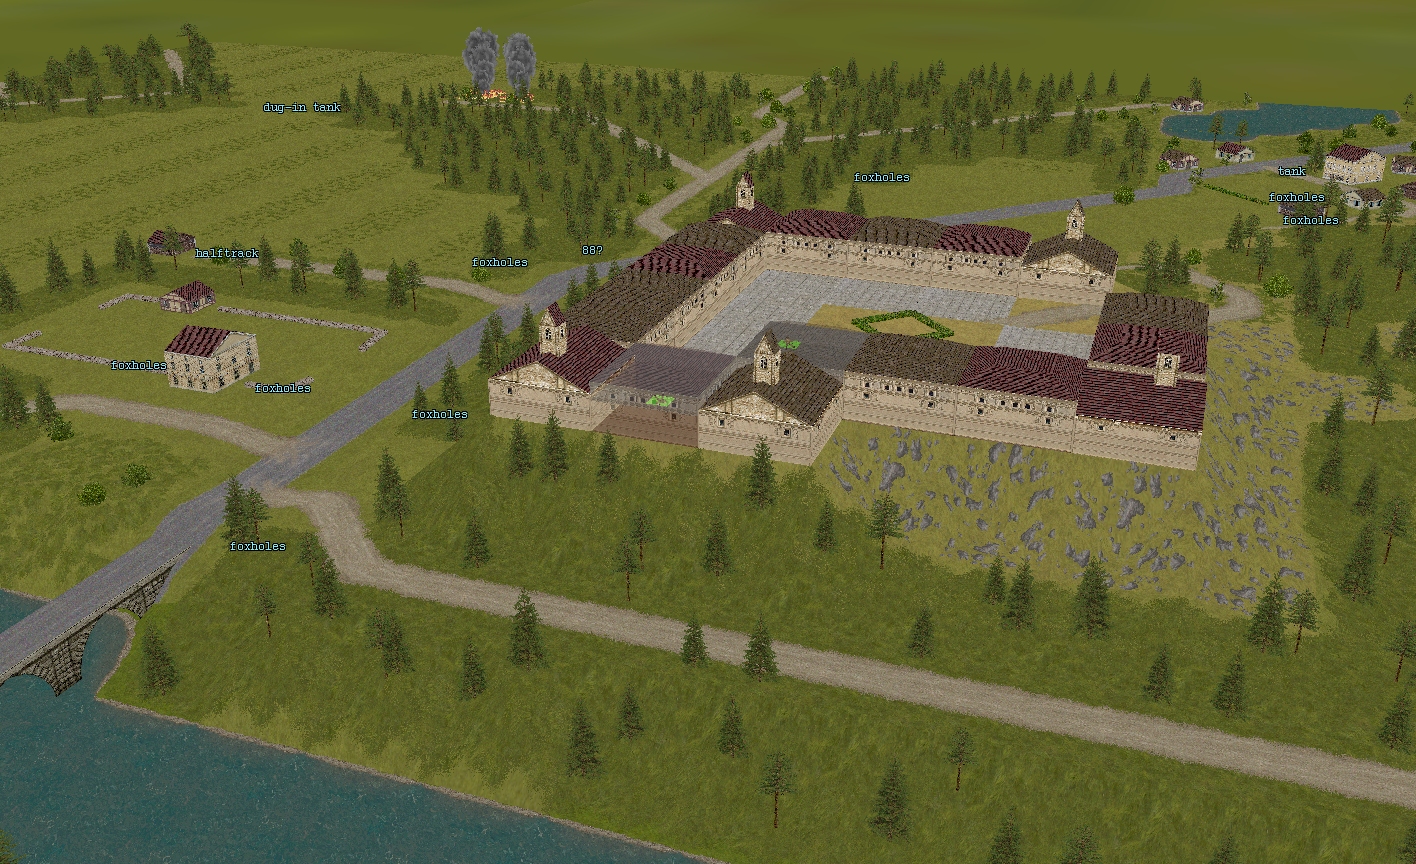
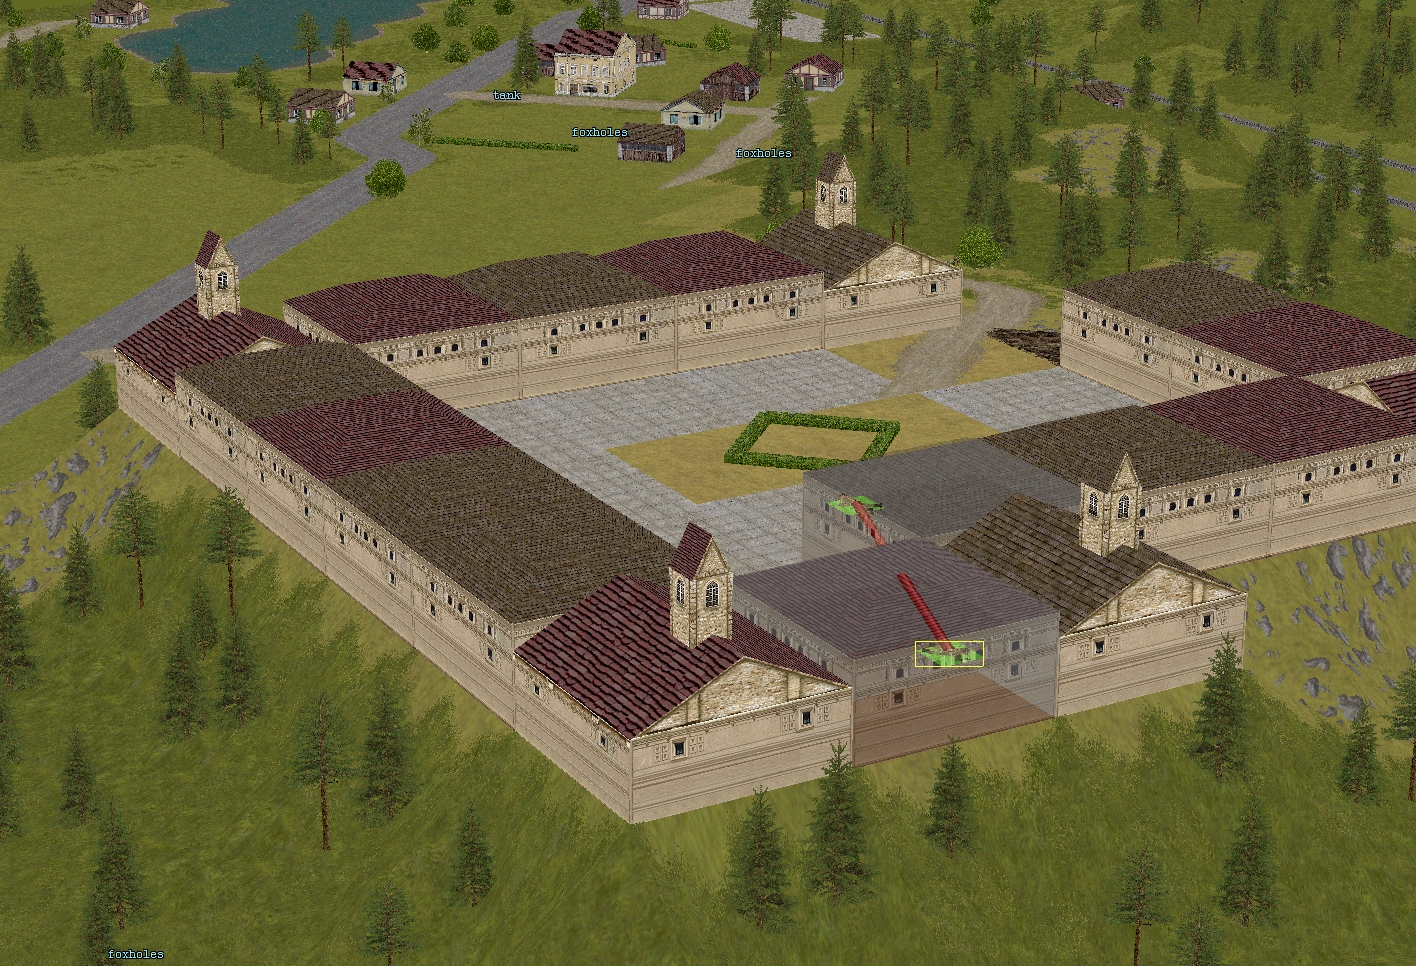
^ Looking east across the castle. The village of Nottingheim is in the top-right corner of the image. The only way to enter and exit the castle is by the damaged gateway on its SE corner. Due to CMBO limitations, the ‘towers’ on the NW, NE, and SW corners are completely inaccessible.
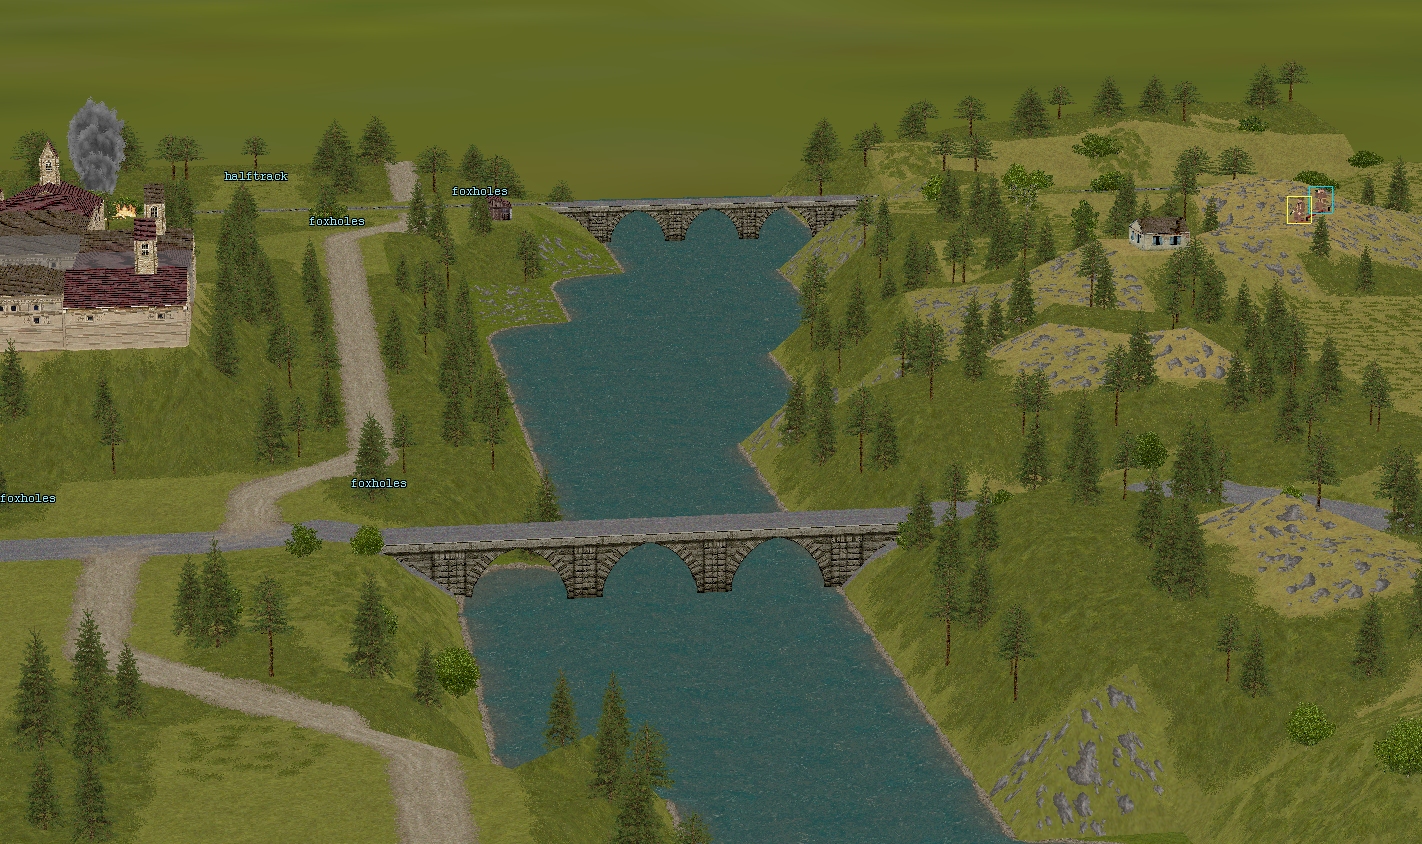
^ Looking south down the Bogen. Road bridge in the foreground. Neither bridge is rigged with explosives according to the POWs.
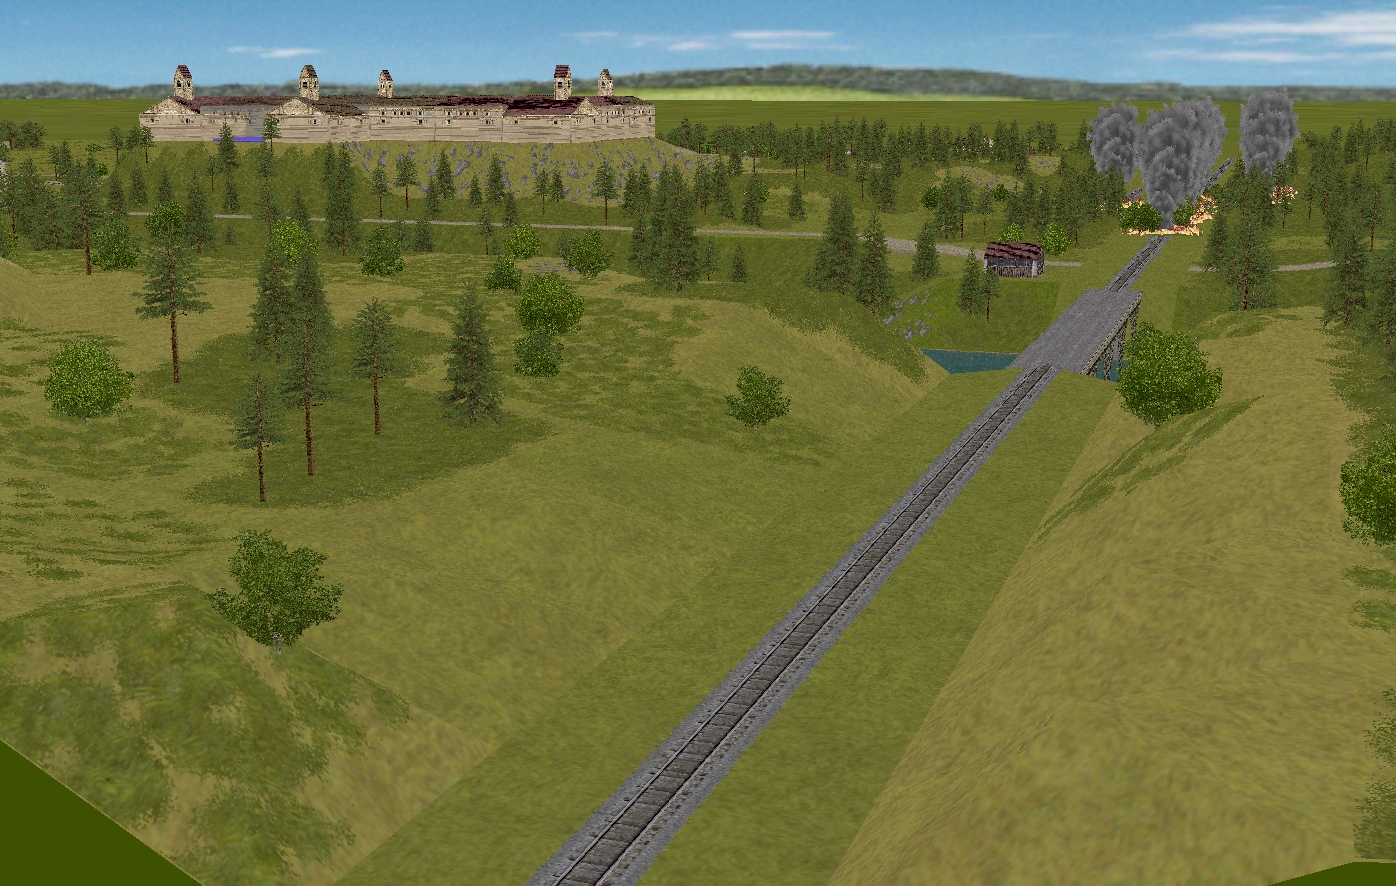
^ Looking east along the railway line. A train stopped and set ablaze by P-47s can be seen in the upper right corner.
^ Looking northward over the railway.
^ Nottingheim station.
^ The relatively open and flat terrain north and north-east of the castle.
^ View over the road bridge, looking east. Apart from the castle hill and a ridge extending from it into boxes 21, 13, and 14, the eastern side of the river is largely flat.

For ease of order issuing, the map is split into a grid of 64 5×5 cell ‘boxes’. Destinations and, if necessary, targets should be communicated to your GM in the following format: box number, x coordinate, y coordinate. For example, if you wished to send a unit to the building close to the eastern end of the rail bridge, you’d determine the destination’s coordinates by finding the relevant box number then counting right from the lower-left corner, before counting upwards: 3, 3, 5.
— Friendly assets —
Awaiting orders at the start of Turn 1 is a small selection of capable (‘veteran’ or better) Allied units:
(west of the river)
- Captain Hood (Six-man company HQ)
- Lieutenant Tuck (Two-man spotter team for a battery of 25-pounders with 125 rounds at his disposal)
- Sergeant Scarlet’s Daimler armoured car
- Corporal Much’s Humber scout car
- Corporal Fletcher’s M5A1 halftrack carrying Sergeant Venison’s ten-man rifle squad
- Lieutenant Merry (Venison’s boss. Four-man platoon HQ)
From their current lofty positions Hood and Tuck can see the west side of the castle but not the road or rail bridges.
(hiding in the castle)
- Captain Dale’s party (Six POWs armed with pilfered rifles and pistols. Nearest camera)
- Corporal Whitehand’s team (Two POWs armed with a Panzerschreck)
Due to arrive in approximately five minutes’ time (probably circa 49,1,1) is Lieutenant Marian’s rifle platoon (HQ, three squads, PIAT, 3-inch mortar), Sergeant Johns’ Churchill VIII tank, and Sergeant Bowman’s Archer tank destroyer.
There’s also a strong possibility that the group of US units that managed to cross at Mannsfeld will enter the battlefield circa box 61 at some point in proceedings.
— Foes —

According to Captain Dale, you’re facing a ragtag mixture of Volkssturm militiamen and ‘proper soldiers’. Watch out – some of the defenders are sure to be armed with Panzerfausts and Panzerschrecks. Unfortunately Dale is no expert when it comes to IDing enemy AFVs. He can tell a ‘tank’ from a ‘halftrack’ but that’s about it.
Shortly before Hood and Co. showed up, an MG 42 team and sniper slipped into the castle. Currently ensconced at 28, 3, 2, the new arrivals are unaware a band of feisty armed Yanks is nearby.
Once the Krauts realise the crossings at Nottingheim are in danger, it’s highly likely they will begin funneling reinforcements into the area. Any reinforcements will enter the map on its eastern edge.
— Tips —
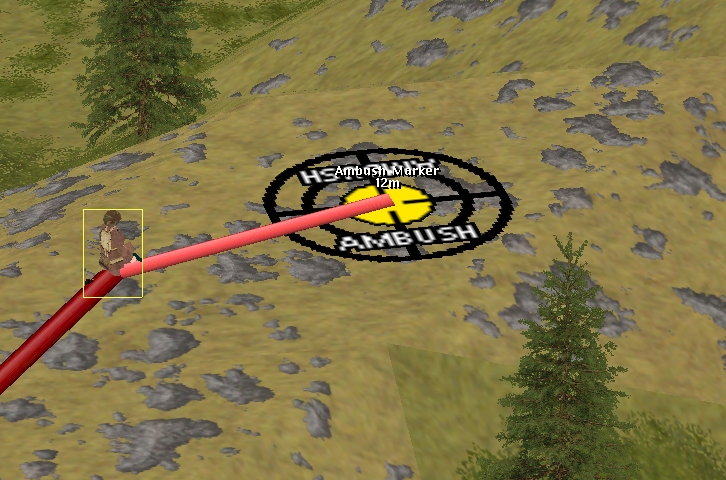
It’s worth remembering that Beyond Overlord is less sophisticated than second-gen CM. For example, while it’s possible to add 15, 30, or 45-second pauses to the start of a movement sequence, you can’t add pauses or facing instructions to waypoints. Useful for discouraging premature/unwise firing, placeable ambush ‘dots’ fulfill some of the functions of CMx2’s customisable ambush arcs. While buildings can be set ablaze and destroyed by HE fire, they can’t be mouseholed.
Also worth remembering, ten-man infantry squads are a) represented on screen by three figures, b) can be split into two half-squads, and c) like most smaller infantry units, can ride on most tanks and halftracks.
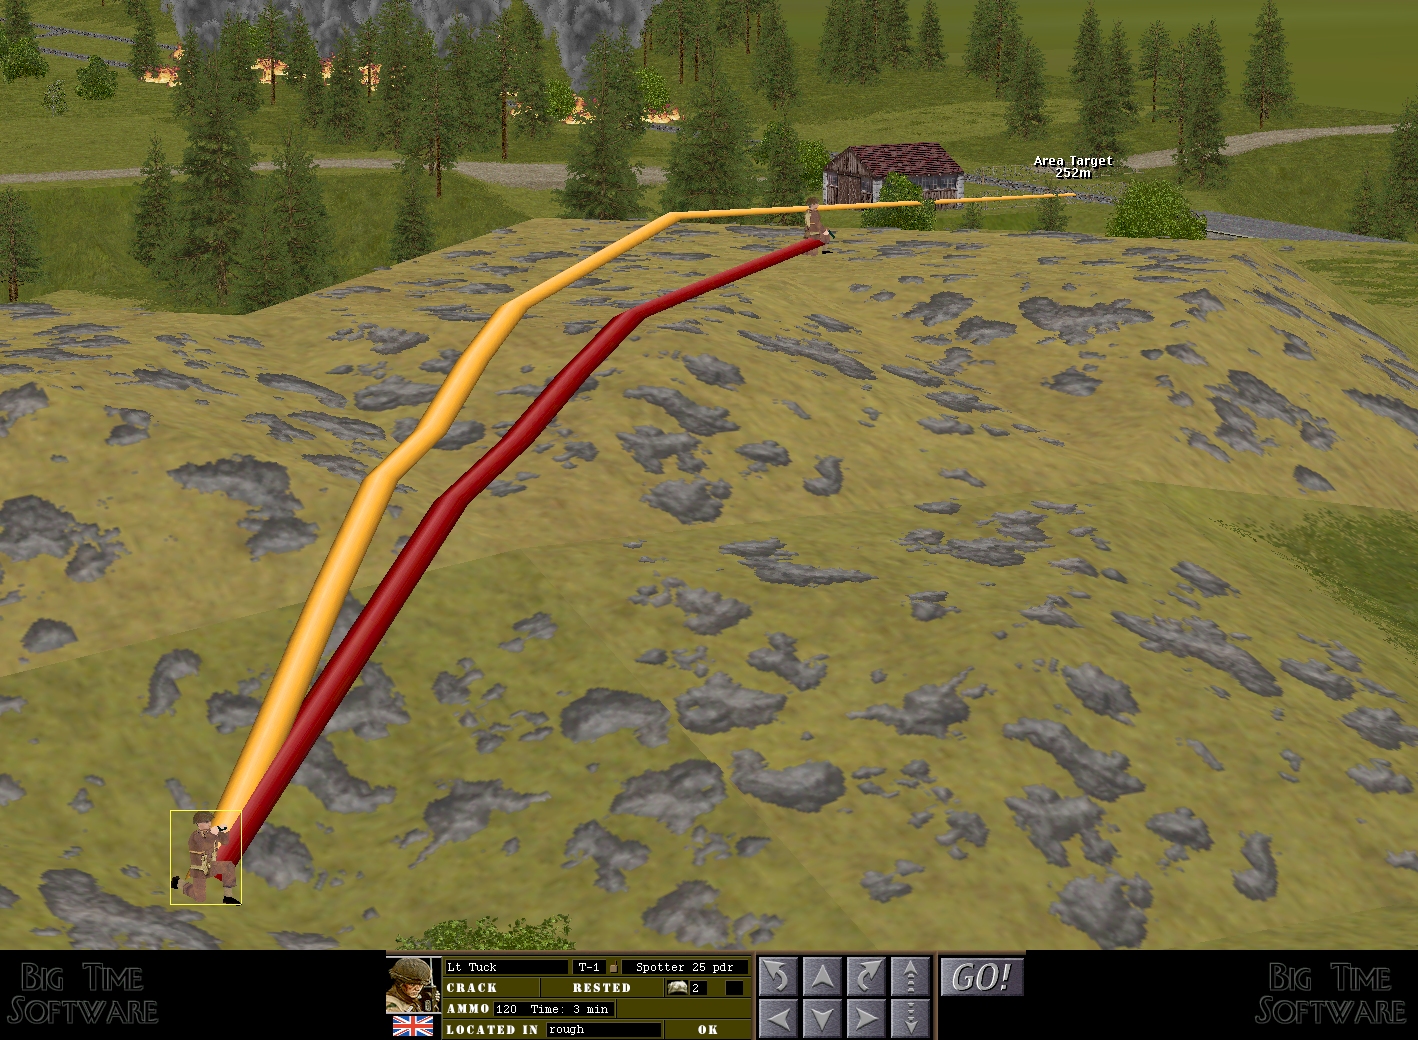
Both Lt Tuck and the 3-inch mortar don’t need LoS to a target to open fire. Assuming they’re close to an HQ with eyes on the target, they can make use of the HQ for spotting .
Rough and conifered areas are out-of-bounds to vehicles, and all units will refuse to enter steeply sloped squares.
— Timetable & communal Combat Mission etiquette —
I’m hoping to process and AAR at least one turn per week. If all starting units have been assigned orders by Sunday night, the first turn report should appear on Monday morning.
While, in the past, individual Comment Commanders have tended to stick with the same unit for the duration of a game, unit gazumping isn’t currently against the rules. Should it be forbidden? I’d be interested to hear your thoughts.
Best of luck, Comment Commanders!
Turn 1 orders here, please. Commenters are cordially invited to suggest moves for the following units (First come, first served. A maximum of one unit/unit group per commenter. Turn execution: probably August 4.
(See screenshots for unit locations)
****anyone****
– Corporal Much’s Humber scout car
– Corporal Fletcher’s M5A1 halftrack + Sergeant Venison’s rifle squad + Lieutenant Merry (Four-man platoon HQ, Venison’s boss)
****subscribers only****
– Captain Hood (Six-man company HQ)
– Lieutenant Tuck (Two-man spotter team for a battery of 25-pounders. 125 rounds)
– Sergeant Scarlet’s Daimler armoured car
– Captain Dale’s party (Six POWs armed with pilfered rifles and pistols) + Corporal Whitehand’s team (Two POWs armed with a pilfered Panzerschreck)
Please start all order comments with ‘ORDER’ and any later revision comments with ‘REVISED ORDER’. This will help me distinguish firm instructions from suggestions and advice.
ORDER:
Lt Tuck to move cautiously into the ridgetop building overlooking the river, which I chart as 18, 2, 4.
(I’d suggest Cpt Hood join him next turn as long as he draws no fire in the first 60 seconds)
Tim, you’ll have to remind me how embark/disembark orders work. From what I recall in previous years, the carrier unit has to be halted before the end of a turn for the order to take effect at the beginning of the next.
(I presume we’re doing the obvious and having the mechanized infantry assault over the southern rail bridge, and leaving the central road bridge for the tank-y units later)
ORDER: Corporal Fletcher’s halftrack with Sergeant Venison’s rifle squad
MOVE to 9,2,1
(No order to disembark, unless someone thinks it wise to put it in the queue)
If you order a dismounted infantry unit to board an approaching vehicle, they will wait until said vehicle has stopped before approaching it and climbing aboard. Similarly, if you give a mounted squad a movement order, they will only execute that order once their ride has come to a halt. In effect this means taxis and their passengers don’t need to spend an entire turn embarking/disembarking, but – because of the way the pause order works – it’s impossible to get a moving taxi to stop next to passengers, wait for them to board, then continue its journey, within the confines of a single turn.
Lieutenant Merry (Platoon HQ)
MOVE to 9,2,2 and thence to 9,4,2
[edit]
I may end up having to rethink the one-unit-per-player rule, Colonel. However, to avoid confusion in case I do manage to find takers for the Daimler AC and the Humber SC, by the end of the week, I’ve removed those order suggestions.
This could go (will) go horribly wrong, but I’ll take Cpt. Dale’s survivors for now. I’ll wait until there’s a bit more covering chaos, I think, before trying to sneak up on an MG42 team.
So ORDER:
Staying in the section of castle at 28,2,1, move cautiously to the top floor and cover the east/west windows, priority on the eastern windows.
Cpl Whitehand and his buddy to move FAST to the east side of the courtyard and enter the castle at 21,2,4, then cautious to the top floor and to the eastern windows.
I’ll take the Humber for now.
(I’ve not played CM, so like a proper officer, I’ll give the broad overview of what I want, and leave it to Sgt Tim to implement the actual move/hide/shoot orders)
ORDER
Corporal Much’s Humber to drive to 26, 1, 4 and park up in cover. Then the crew should disembark and sneak as quietly as possible to 27, 1, 4, next to the bridge, and do some scouting. They should be as cautious as possible.
Just when I thought I was out, they go and pull me back in… I’ll shepherd Scarlet’s Daimler for a turn or two.
Looking at the screenshots, the rail bridge looks fairly isolated. Is there a path for vehicles to get over the hill there, or are we limited to the road bridge for crossing our non-foot units?
What does the yellowish terrain on the overhead map at 25,4 to 26,1 represent?
We’ll do it conditionally, I suppose!
ORDER – Scarlet/Daimler AC
If it’s possible to head south toward the railroad without serious risk of bogging down, move to 9,2,1 in whatever way is least likely to result in a stuck car.
If the terrain south of the start point does pose any substantial bogging risk, instead move fast north to 41,1,1, where we can prepare the way a bit for incoming reinforcements, and potentially provide some supporting fire across the road bridge with a dash around to the east.
Last one in the bierkeller beneath the castle (Die Alte Fahrt nach Jerusalem) is a rotten egg.
I vote someone with more tactical sense than me takes command or I’ll just tell everybody to charge across the bridge.
https://getoutside.ordnancesurvey.co.uk/guides/beginners-guide-to-grid-references/ may be useful.
Wait a minute! So the 5×5 cells have their number increasing from North to South, but within each cell the sites are pinpointed by counting South to North.
So long as _you_ understand it, Tim … At the very least it should confuse our enemy, the supreme commander AI of which I expect to be playing a totally different game entirely, like Football: Tactics and Glory.
I guess it would be more consistent to number the boxes south to north too. Edit incoming.
OS letter their biggest grid squares from north to south but number from south to north. So in that regard you were consistent with them.
But their numbers are always south to north so in that regard you’re now consistent with them.
They’re weird. But you’re consistent with the British standard for map references.
You shouldn’t have gone into the extra effort for dizzy little old me; I’m sure I would’ve managed.
I’m not sure whether my foe is numbers or the human perception of numbers, but I’ve pretty much given up the fight for consistency. Like on your TV, you flick up the channels with ‘Channel+’, but when you bring up the Electronic Program Guide you get to the higher number ones with ‘Page Down’.
However, I suppose now we can get some good old “Back to Square 1” action.
It’s all fun and games until said commander beans Lt. Tuck with a perfect cross into the box and takes the artillery off the board!
Had better try for a decisive result within the time limit, then, lest it go to penalties.
This looks like a great scenario. Will there be a link after the battle where we can download the scenario to play at home?
>> Will there be a link after the battle where we can download the scenario to play at home?
Yes. In the meantime, CMBO-owning Comment Commanders who wish to inspect the battlefield in person can download a unit-less version of the scenario here:
https://filebin.net/rx0iqsxuxciadzoj
Gosh, that’s a very pretty map (and since I’m still trying to get the sand out of my pants after the last communal CM, the lush green carpet here is a sight for sore eyes). Sterling work, Tim.
I’m still trying to work out whether I can commit to tossing my incompetence into the ring (if I have the opportunity to hand off my unit to someone else when I’m MIA, it’ll make my decision easier).
In the meantime, though, for anyone needing a soundtrack, may I present:
https://www.youtube.com/watch?v=y2by810nulE
Soundtrack thoroughly appreciated!
Looking forward to this! What a great looking scenario.
I do have CMBO somewhere on CD, but probably the best way to do a practice run is with the GOG version?
Both the full scenario (not available until the battle is over) and the unit-stripped, map inspection version (https://filebin.net/rx0iqsxuxciadzoj) were created using a GOG CMBO install, but should work with a CD one. Expect the castle to look odd. I’ve modified my large building BMPs to get a better look.
We really need to get a proper look at the possible 88 (somewhere around 29, 4, 5, if I’ve got the hang of this co-ordinate system) before we send any tanks along the road bridge.
I think we should send a unit, possibly the Humber?, to *near* the western end of the bridge for a little scouting.
Perhaps drive to 26, 1, 5, and then dismount and crawl east until they can get a good look across the bridge from 27, 1, 4.
I’m hoping keeping the Humber behind the trees (26, 2, 4 to 27, 1, 4) should keep it out of view of our suspected 88, and that dismounted units should be able to get closer without drawing fire from the foxholes.
The rail bridge looks a lot more favorable for a crossing to me, given how soon a move down the road bridge brings the dug-in tank into play—the east end of the rail bridge at least provides some cover.
I agree that we shouldn’t try crossing the road bridge, but I think we should get eyes on it.
I’m guessing CM’s AI can’t really be distracted by a feint, and if we don’t go near them the troops in the foxholes will probably sit their patiently waiting to be engaged, but for RP reasons I think we should have at least a token presence near the road bridge.
And you never know, Tim might have hidden a whole platoon of Tigers over there.
TL/DR I think we should send just the Humber to do some scouting, while everyone else concentrates on the rail bridge.
The rail bridge looks a lot more favorable for a crossing to me, given how soon a move down the road bridge brings the dug-in tank into play—there is more room to maneuver, it looks like, at the far end of the rail bridge.
After the copious amount of time I spent on last year’s game I’m thinking I might have a “watch and enjoy” approach this time. Maybe when the reinforcement platoon shows up I’ll dabble a little.
I will give a few pieces of advice to the CM beginners:
1. You can and should split squads all the time. The only reason to have them in one place is for a minor morale boost if you’re using them to draw fire. Especially when moving units out of cover it’s best to send half the squad while the other half provides covering fire. Yes, it takes slightly longer, and you can have micromanagement troubles when suddenly a platoon is 7 units, but you’ll spot more, take less damage, and be better able to react to trouble.
2. Do not recon with vehicles. CMBO has no shoot-and-scoot, so you’re hanging them out for 60 deadly seconds every time you round a corner. Unbuttoned they fall prey to snipers and MGs, buttoned they can’t see anything. They work best when acting as elevated fire support for a half-squad moving 50-100m ahead of them. It’s late war so everyone has 60 or 100m AT weapons, not counting AT guns and tanks.
3. Don’t drive transports anywhere that you’re not 100% sure is safe. One quick shell can take out 12 men. Troops can move by SLOW/CRAWL across pretty open ground if you can wait 3-4 minutes for them to arrive. Don’t rush.
4. Operate with the goal of minimizing our casualties, not seizing objectives quickly. A full squad that has to dislodge a dug-in opponent is in better shape than a half-squad weakly holding an objective against an enemy assault. Having more troops give options for flanking, wave attacks, and covering fire.
Good luck folks!
Great advice.
I’d add a couple of qualifications though. While CMBO doesn’t have a shoot-and-scoot order, by chaining together move or hunt and reverse commands , it’s sometimes possible to approximate a shoot-and-scoot. The advance-here-then-reverse-there technique can work when conducting recon with scout cars too.
In CMBO I find myself ‘sneaking’ infantry more often than ‘crawling’ them. Faster, less exhausting, and IIRC better for spotting undetected foes, sneaking is bound to prove useful on Bounce the Bogen’s cover-rich map.
The lack of volunteers at this point is a tad concerning. In an attempt to get things moving and drum up interest, I’ve clustered units so some Comment Commanders have responsibility for multiple units (see first comment) and will publish a recruitment post later today. If the latter is unsuccessful I may have to rethink unit distribution, or even consider redesigning or replacing the scenario.
If chaperones can’t be found for the handful of friendly units on the map at the start, it seems likely the reinforcements due later (the majority of the Allied units in the game!) will struggle to attract Comment Commanders. Perhaps I should have gone with a more modest map/skirmish, and not launched during the summer hols.
I’ll take something that’s left, though it’s well outside my expertise so something relatively simple and non-vital would be best.
Looks like everyone’s taken now, which can only be good for chances of success.
It doesn’t look like anyone has taken Hood yet, so I guess I’ll give him something to do for a turn or two!
If he moves along the woods just south of the nearby hilltop building, I think he can get eyes on the German positions near the railway bridge?
ORDER
Hood to move cautiously through the woods to 18,4,3 and look to the eastern side of the railway bridge.
He should hold fire if possible too.
(If he can’t see the German railway positions from 18,4,3 or an adjacent wooded tile, then I guess he can just wait where he is – see if the spotter finds anything)