
I’m not saying the first three minutes of this CMAK contest were uneventful, but when the TV camera panned across the grandstands at the end of Turn 3, I noticed several people scrutinising phones or reading newspapers, and at least one spectator fast asleep. Said spectator awakes with a start 40 seconds into Turn 4 when the clatter of 20mm autocannon fire reverberates around the stadium.
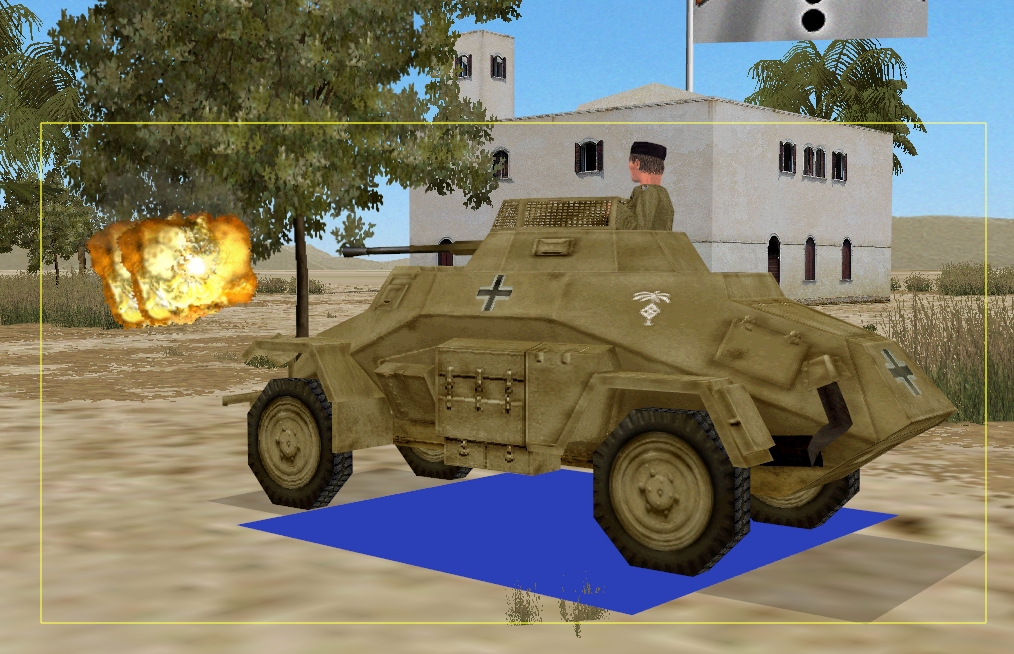
The unit on the receiving end of this torrent of ire is the French Bren Gun Carrier. Hurrying for dead ground circa J25, the tiny APC is spotted at approximately T+26 by an enemy armoured car of unknown type moving southward along column F.
Unfortunately for the Carrier, trees on ‘Mosque Mount’ stop the Crusader that is half-way through a sly ‘shoot and scoot’ manoeuvre at the time, from preventing Team France’s first casualty.
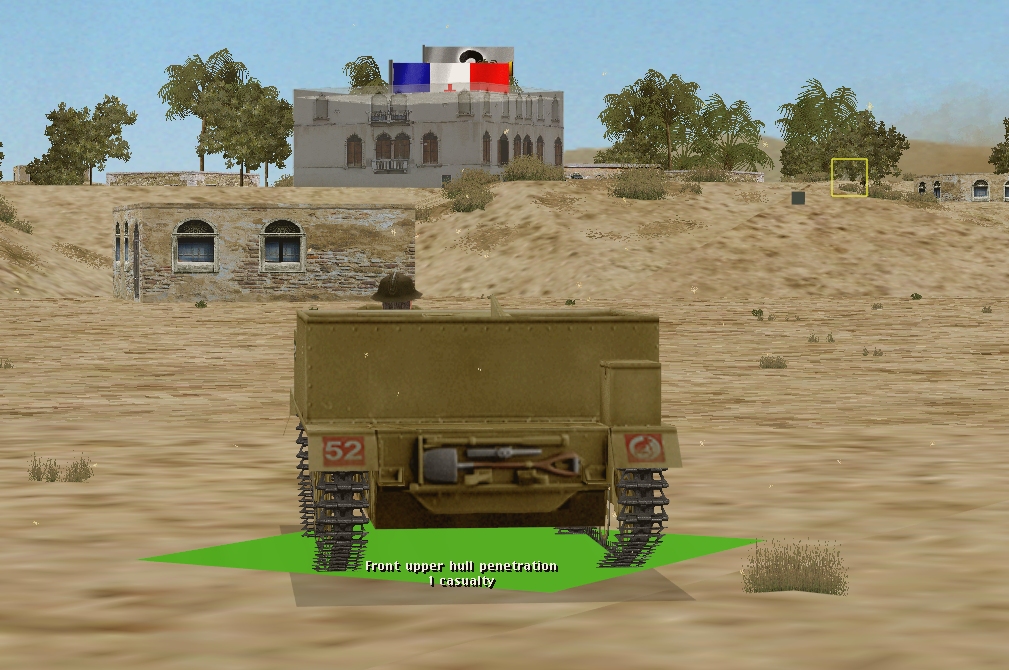
Displaying impressive marksmanship, the AC hits a small, motoring, and almost certainly hull-down, target with its first burst.
When momentum or possibly the plucky actions of the dying/grievously wounded driver, propel the ‘shocked’ Carrier out of LoS, the Axis vehicle continues on its way.
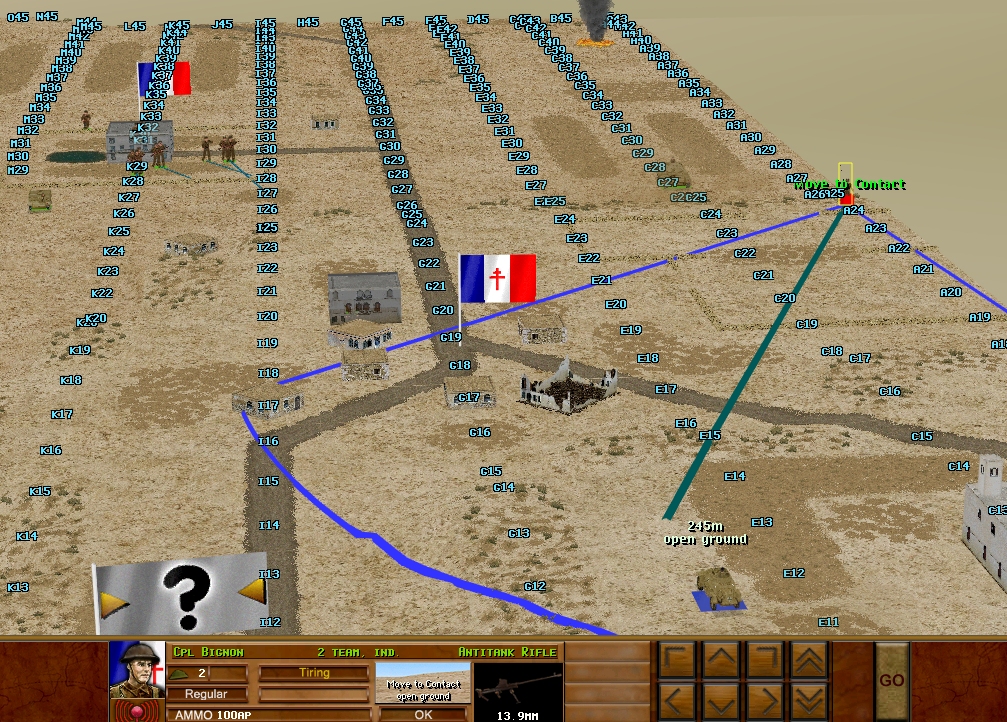
At T+60 the AC is still trundling south. Assuming it doesn’t halt in the opening seconds of Turn 5, it should find itself under fire from a Boys AT Rifle very soon. Will LoS-obstructing buildings in the village prevent the infantry in the villa area from providing diversionary fire should the ATR Team get into trouble. It’s hard to say, but right now no French units have eyes on the advancing threat.
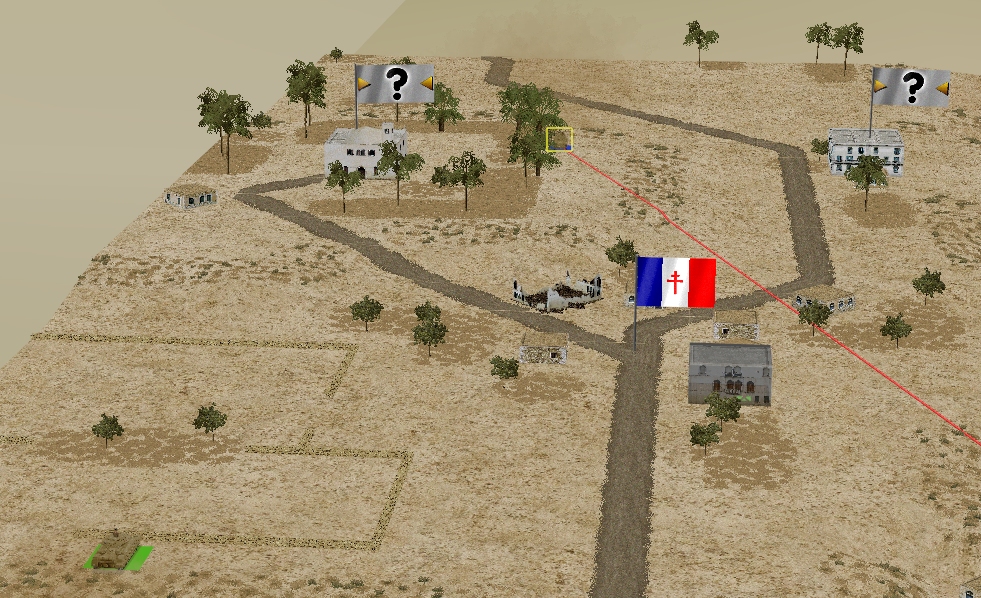
The French situation at the end of the turn:
Team GB also sight the enemy for the first time in Turn 4. About twenty seconds into the sixty, the British Crusader spots movement on Mosque Mount.
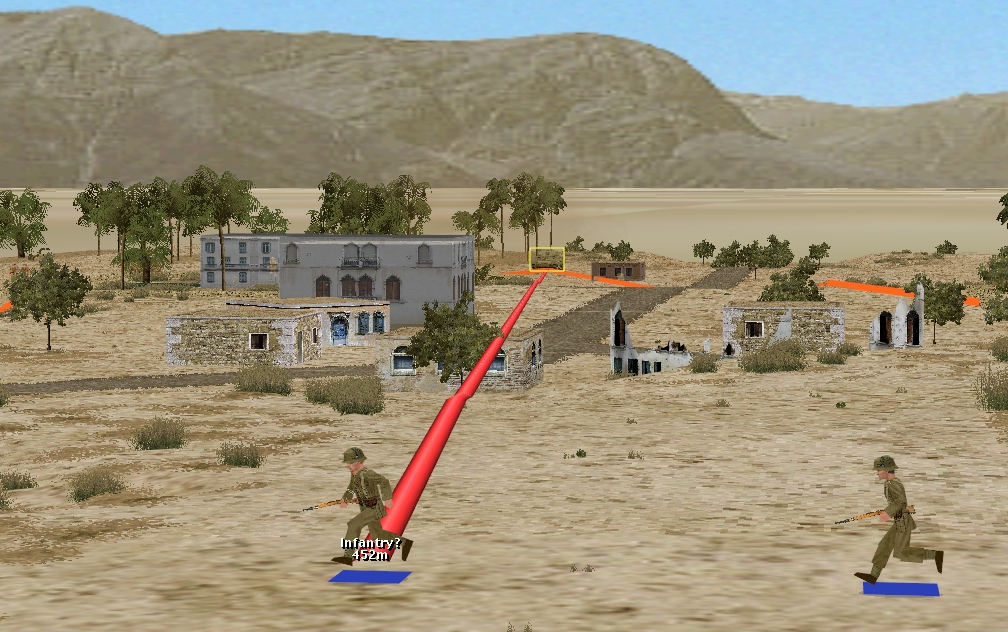
Realising that one – correction, two – German infantry units are making a dash eastward in the vicinity of F12, the tank buttons up and opens fire with its coaxial MG. While the bursts hasten the Jerries, they don’t appear to damage them. The targets disappear into brush at about T+30.
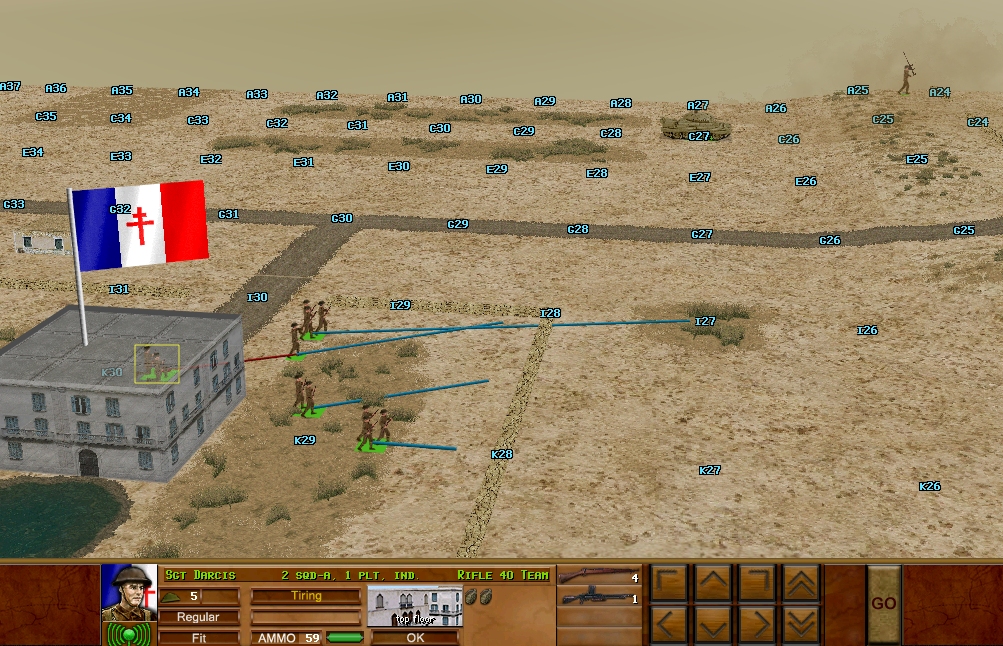
The British situation at the end of the turn:
Next round is when the pilots get involved, right?
Yes, the airmen are now active.
TEAM GB DISCUSSION
When I was reserving parking at the nearest airport for an upcoming trip, the online form said it was ‘authorising’ payment, which is of course the correct spelling, and need not have been remarked upon as unusual in any way.
I think we came out of this 60 a little bit better than the French, even disregarding the hit to their Carrier.
I guess they know where the Crusader is now, which might justify trying to reposition it a bit.
Pilot reporting in.
As I see it I have two options:
– pocking my head out to recon a bit
– leg it to our end of the map and hide in a corner for the rest of the olympiad
As I haven’t played this iteration of CM, I am a bit uncertain as to what we’ll see now the pilot is online. Do we immediately get a full view of stuff happening outside my house? Or do I have to go to a window to check stuff out? Or worse, go outside of the door?
I feel like I’ve made an error in putting too many of our eggs in the VP locating basket. We don’t really need a lot of units at this outpost and I worry we’ll draw fire and waste our shots at long range.
I’m going to try to displace to the slope of the hill with our tank in overwatch. I’m happy to hear suggestions of good locations and keyholes.
I will again stress that our AT rifle should be hiding with a 100-150m max target arc. Shots at 300m will just draw the wrong line of attention.
‘Hide’ will preclude firing at all, won’t it?
The ATR team has a target arc of 160-170 meters or so. I thought the chance of a shot into the lower glacis of something coming up to the brow of the hill was worth the slightly longer range.
With the tank here, though, I suppose that’s not as important.
Hide will not preclude firing within the arc. It will significantly shorten our Los, but I think that’s fine with our tank and squad on overwatch.
TEAM FRANCE DISCUSSION:
Merde alors! That is desperately unlucky. Let’s hope the wound isn’t fatal and we’re not completely disabled.
So assuming the German armoured car does emerge this turn, what do we have to counteract the threat to the ATR team? Should I drive back up the slope and let loose a smoke shell or two? What does our mortar team have LOS to?
And what do we do now with our unarmed friend in the village?
Unarmed friend here! My initial plan (I thought last turn was my start) was to run to that house SW of me, and await pick-up – or for the rest of the unit to move past me, then slip away while Jerry is busy. Given that carrier taking fire where it was, though, right beside the house, I worry the path is covered now. Should I still go for it? At least the other house is kind of covered by the sloping ground, and it’s not a long run.
It’s a tough call. If there was any major enemy movement in the village already, you would have thought that the Crusader would have spotted it during its manoeuvres last turn. But having said that, if our Germans are anything like the ones Team GB are facing, the infantry moving east from F12 means that a) a village capture isn’t too far off, and b) they could have LOS to your building already. Coupled with the armoured car, making a dash does seem like a risky proposition.
On the third hand, I get the feeling that it’s now or never if you want to make a run for it. If you do, I would suggest waiting a short time (15 seconds or so?) for the german AC to be otherwise engaged with our ATR team, then as a first step maybe just aiming for the south side of your building, which should be protected.
Sorry, Carrier and mortar team commander here. I was a little bit distracted by life coming at me at considerable speed.
1) I am not sure as to actual status of the Carrier after this unfortunate hit. I think smoke is not necessary, since my APC is out of LoS of the enemy already. It would only provide more concealment to the enemy advance. I still have to figure out where to move it, if the remaining crew member can indeed perform this task, but I think that covering it is a futile endeavor.
2) I think that ATR can reasonably bag the enemy, but providing distraction for it might be useful. This should be done conservatively though. I don’t think that we should show our tank yet, but this is just my opinion.
3) Mortar has no LoS to anything, since it is behind a building and a wall, as we initially planned to rely on infantry HQ providing the coordinates. I am not sure that opening up with mortar will do any good, but, maybe, if HQ has LoS, maybe we could plant a timed smoke cover, in case their sniping attempt fails?
I need the infantry commander for FR to tell me if he thinks that this is a good idea. I think disclosing the location of our Crusader might prove too costly in the long run
Good thoughts. I’ll sit tight with the Crusader for now. What do you have in mind for a distraction, then?
I’ve reviewed the situation, and, in my eyes, we have no real capacity for distraction, because mortars have no way to be ordered a fire mission without own or inf HQ’s LoS.
If I move them, they will not be there in time and also will not be deployed and will be vulnerable.
If it is possible, maybe ATR guys could be ordered to crawl away and hide after a couple of rounds? I am not sure how well an AC can detect the location such fire is coming from in an effective manner, since ATRs don’t do much in terms of spectacle. Maybe they are in a good position as they are
Re: ATR. I think you’re right. I’ll tell them to keep their eyes peeled for about 30 seconds, then hide. I think if they’re prone behind the wall, they’re pretty much invisible.
Umm. I wish success and survival for our allied teams but.. the Leichter Panzerspähwagen is cute, and the Sd.Kfz. 222 really needs to make it through this mission, the war and a happy retirement in a museum.
Please.
If it’s currently commanded by Unteroffizier Grüber before his promotion, I believe it sees out the war in relative safety in Nouvion in northwest France.
But it might just be that it’s the commander that gets sent there as it’s an out of the way place where he can’t cause as much damage to his own side.
@Tim
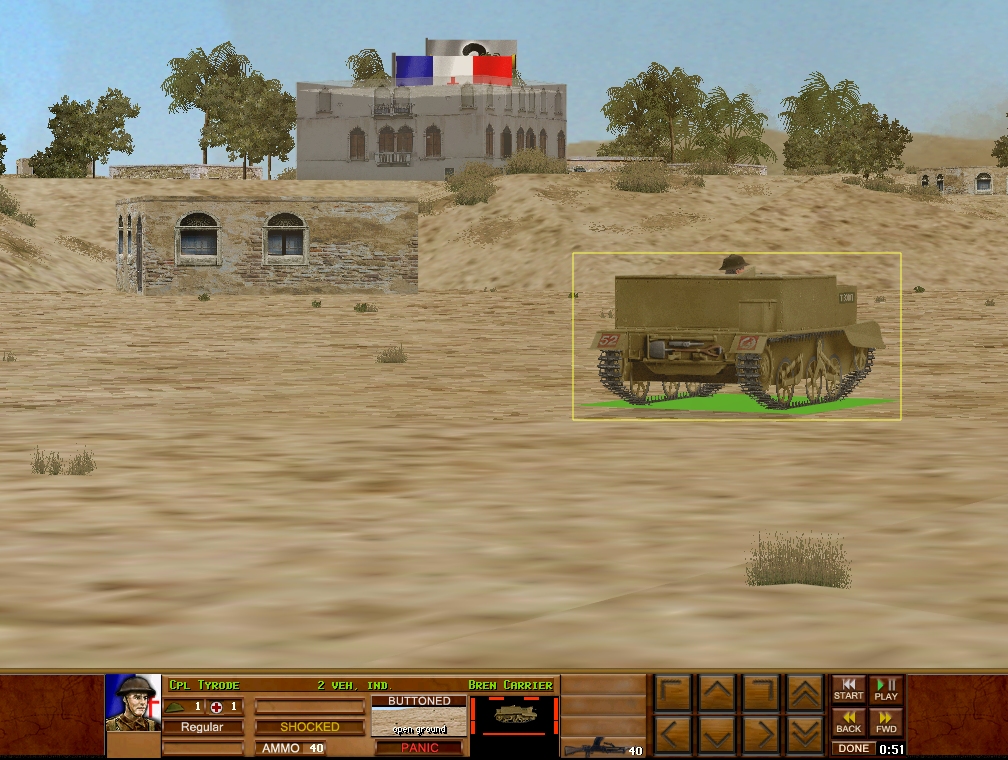
Can you provide the actual status of the Bren Carrier after the turn’s end? Is it possible for the gunner to handle the vehicle or is a bail out in order?
It’s currently ‘shocked’ and ‘panicking’, so giving it orders of any kind is impossible. IIRC CMx1 isn’t sufficiently sophisticated to model AFV crew switching, but I might be wrong. I suspect it’s now an open-top steel pillbox armed with a Bren gun! Assuming the gunner doesn’t bail in panic and the Panzer or AC doesn’t finish it off, it could still prove useful.
Got it, thank you!
@Tim FRENCH mortar team and Carrier:
No orders, as they were
@Tim: FRENCH F3 orders:
Crusader: maintain target arc and stay put
ATR: Wait 30 seconds with same target arc as before, then HIDE
@Tim: FRENCH F4 orders:
Pilot wait 15 seconds if possible then move out of building to the south side, and hide or hunker down, whatever the command is for “be small”.
@Tim BRITISH GB2 ORDER: Again, without HQ eyes-on from the top floor of the villa and no targets there’s nothing we can do with the mortars. The Bren boys are equally at a loss until our Crusader/AT starts opening up some DAK sausage tin cans from our Cyrenaica pantry, so there it is. Make like the waxworks in Madame Tussaud’s lads and don’t move. Baldrick! Give me those goggles! I’m getting sand in my eyes dear boy!
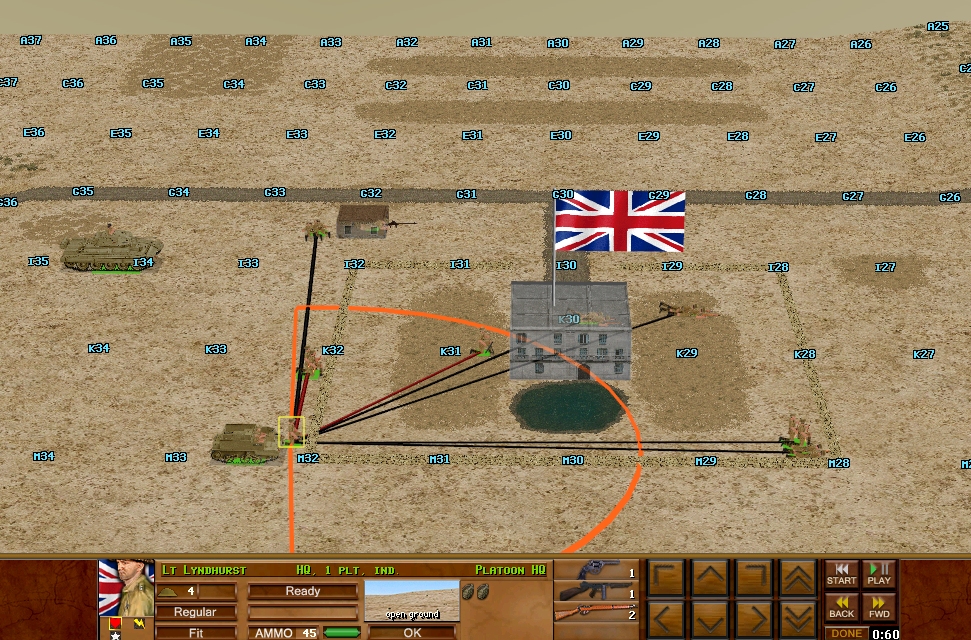
GB ORDER 1
HQ: MOVE to K30 ground floor and HIDE
Half squad at M28: HIDE
Half squad at J29: PAUSE 30, FAST I27, FAST I25 and HIDE
Half squad at K30: FAST to J28 (don’t hide). Target Arc out to 200m.
Half squad at K32: FAST to H33 and HIDE
Half squad at H33: PAUSE 45 (or more), FAST E32, FAST E26 and HIDE
GB3 ORDER
Crusader: REVERSE to the north edge of the 34 rank on the same file (I34, I believe? I’m in a hotel room on my phone, so I can’t see the map very well), to take slightly better cover from Mosque Mount while still providing overwatch to the infantry.
AT rifle team: HIDE in place.
Not a very crowd-pleasing set of orders!
GB order 4:
I don’t know the correct wording, but I want to poke my head through the windows to see if I spot germans and then hide under a table for the remainder of the turn.
Ps. Sorry for the (too?) late order
I feel like you and me are going to learn some tough lessons as an unarmed bozo wandering around a warzone, amigo. I chose to run, let’s see if your idea works out better!
Bonne chance!
I hope I’m not too late.
F1 ORDERS:
Continue previous orders then:
Squad 1 fast to I24
Squad 2 fast to K24
Squad 3 halfsquad 1 stays in place
Squad 3 halfsquad 2 fast to J24
HQ fast to J23