
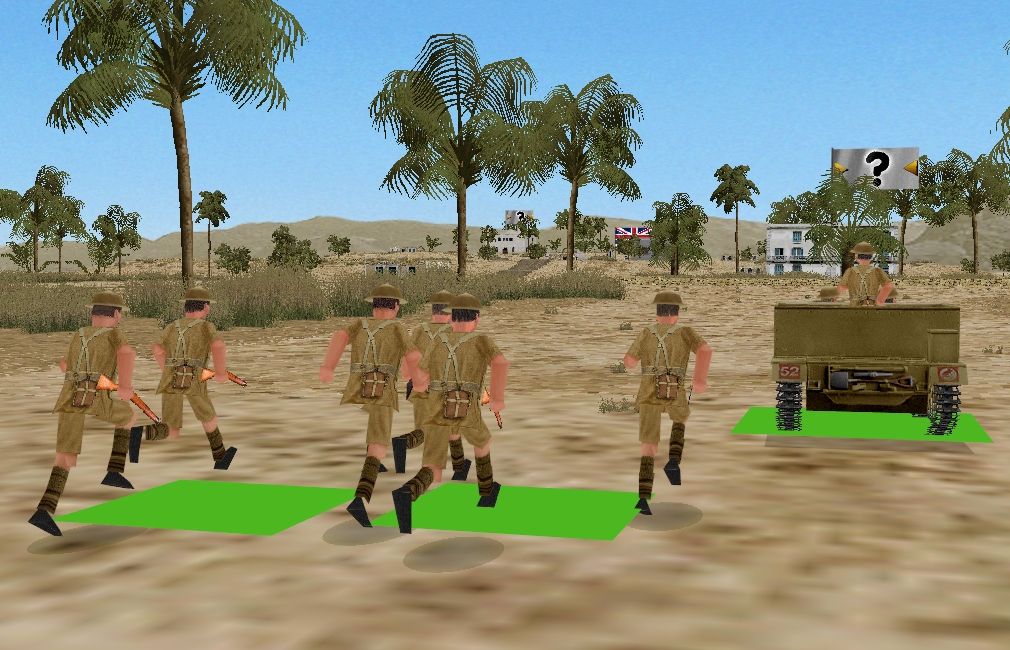
Apart from the green ‘GO!’ flare fired into the sky by a match official at the very start of this turn, the Olympiad’s first minute of action is fireworks free. Both teams race their infantry and their mortar-team taxis towards the villa VL. Team France’s Crusader makes for the map’s western side while Team GB’s cruiser tank sticks to the central highway.
Prioritising concealment/shade over ease of movement, the clustered French infantry make slightly less progress than their British counterparts. The British carrier also outstrips its Gallic equivalent, unloading its passengers by the villa wall moments before the clock stops.
Neither side spots foes this turn, or any signs that enemy AFVs are on the move.
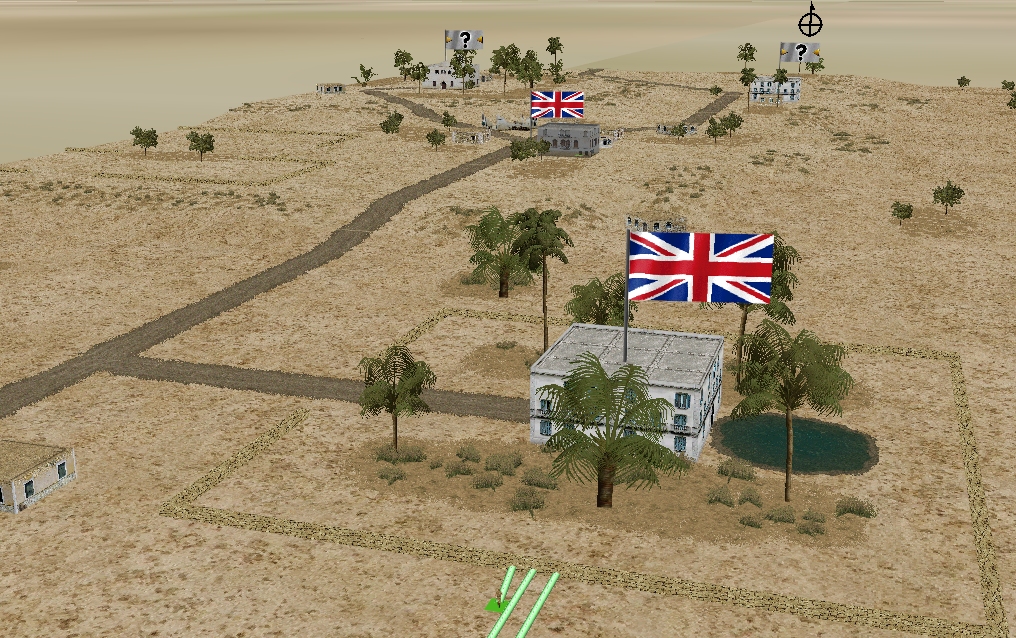
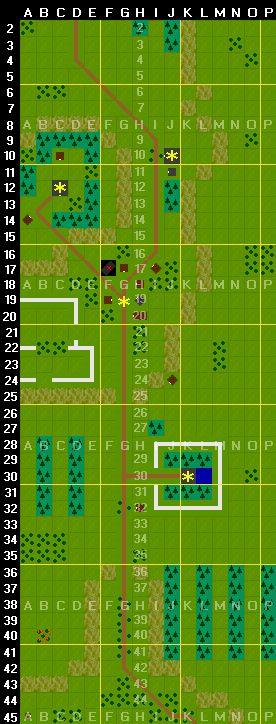
The situations at T+60:
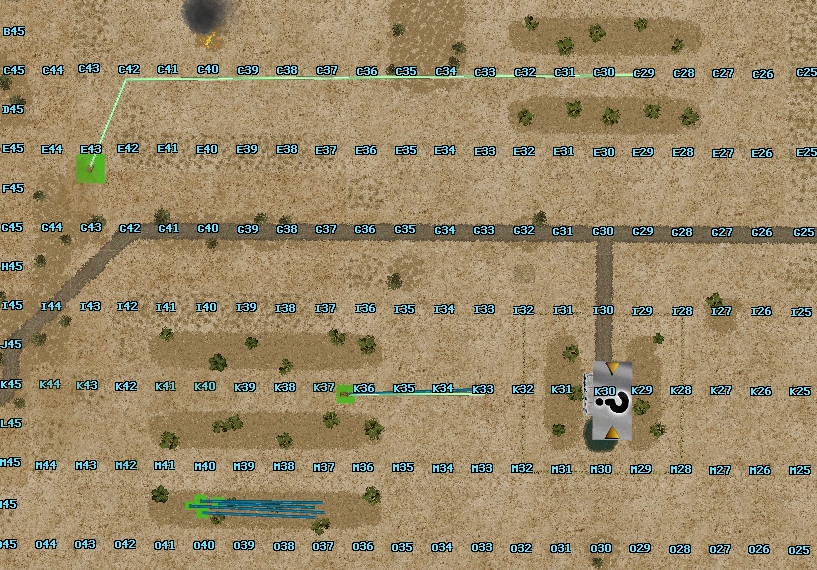
(France)
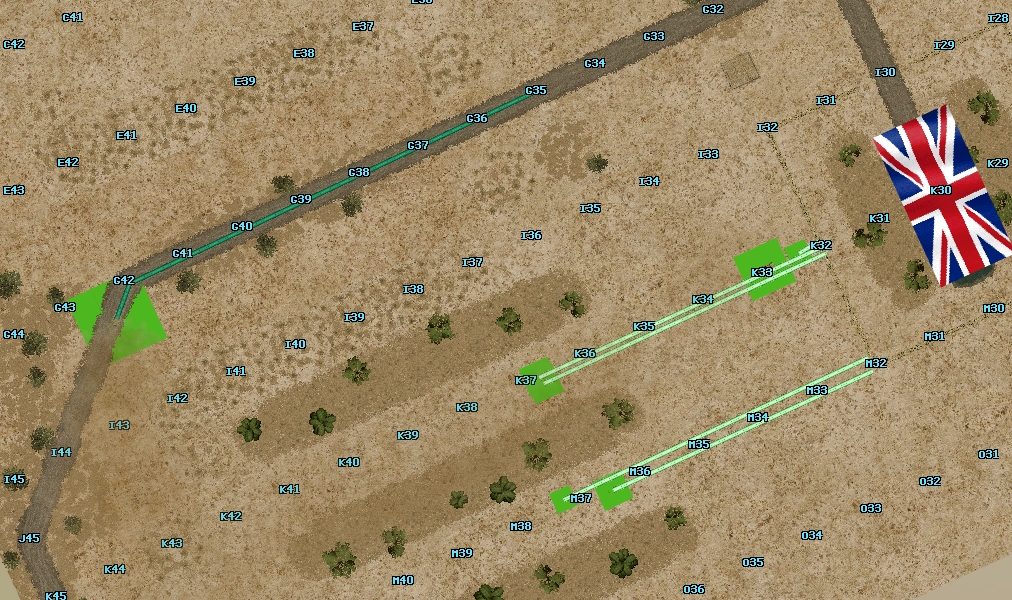
(GB)
Turn 2 orders here, please.
(Team GB discussion thread, maybe?)
A cracking start! I’m surprised to see that the Krauts haven’t made it to any objectives yet—seems like they start quite a bit closer to the inn and mosque than we are to the villa.
I’m hoping to disembark my AT rifle team soon, since having them on the back of the tank does nobody any good. Perhaps they join the infantry force at the villa for a bit of extra punch? There’s also the wee building at J24, but they would be lacking in support there, and the 3D view of the map suggests they wouldn’t have LOS up the hill to the village and mosque.
Can we control which floor of a building infantry occupy? The top floor of the villa might be a good spot, although granted it would also be an HE/mortar magnet once things kick off.
(French Team Thread Pt.1)
I am looking to disembark my mortar behind the wall, me and my GB counterpart had more or less the same idea. The modest plan is to then go around the wall from the east and to try and establish a good coverage with my bren.
However, I have a more plucky plan, which I’d like to bounce of you, my friends, for validation or a reality check: to the upper-right corner of the wall and drop off my guys at around M28. This way, if my guys are not instantly vaporized, I can have a LoS for direct mortar support on a huge portion of the map and have my Carrier covering the mortar.
Maybe it would be a better idea to dismount at M29 and then peek out. But I desperately want to catch the Germans pants down and bag a few kills or pin them early.
What do you guys think?
Shit, did I accidentally start a thread in your thread?
Sorry
I made a separate comment discusing our planes, so we may use it as our thread base.
Hey, don’t forget we’re the French, not the Brits! We never apologise.
@Fishbreath well said sir, I’m with you. Yes, we can enter the top floor and you are right it will definitely attract the Jerry tank and the mortar, but that’s what we want; it’s the first “F” we need to immediately do. As in, 1. FIND, 2. FIX, 3. FLANK and 4. FU- FINISH. The lads will likely die but we will have the necessary intel fast. My only question is, who do we mortar first? The tank? Or the mortars? My gut feeling says counter-fire the (likely stationary) mortar team ASAP and leave the tank to our Crusader. We have limited mortar ammo and it could be wasted on the Panzer III if he gets into high gear. So, I’ll kill the mortar team first while you deal with the tank, agreed?
My second gut feeling is there is very soon going to be an AFV (likely the 8-rad car) barrelling down the eastern right flank at top speed, attempting to flank whoever is behind the stone wall behind the villa (me, haha). So, I’m going to pull back the Bren carrier to the right flank between the palm trees and cover the right flank at hull-down, if there are no objections? Let them come to us and fire when you see the whites of their eyes. Perhaps setup a flanking AT ambush behind the villa for that 8-rad AFV, if possible. Can your AT lads join me at the stone wall?
My thoughts are not clear on what’s going to happen on the left flank, but I think that’s where the 251 is going to be advancing, followed by infantry crouching behind it. If Axis doctrine is followed – and Rommel himself is in the cupola of that tank – my gut says he will keep himself central (sticking to the road area) and the half-track will cover the left (Western) flank. I think his tank will be his FIX part of the “4 F” equation. For us, I think it’s better to be a bit more mobile and loose (LRDG SAS style), to counter his superior armour.
So, my suggestion is first for our HQ lads to run to the top floor of the villa ASAP so we can FIND the enemy ASAP, as that’s our first imperative need. One thing I would say is please don’t put your AT team inside the villa (yet) – we can’t afford to lose them in an HE building collapse early. Only expendable troops in there for now, for temporary mortar spotting purposes only. What do you think? Tell the lads at HQ there will be wine and women for them on the top floor, but don’t get too drunk and keep the binoculars wiped. Don’t worry chaps, soon we’ll be back to base for tea and medals (he says haha).
PS: Tim, it occurs to me we can’t see the usual sandy “dust cloud” kicked up by vehicles moving in FOW, to give us some rough idea where they are. Does the “silicon enemy” have that sandy knowledge while we don’t? Can you produce an interim save file for us to look at the replays, to maybe see that dust? Or would that give the game away (we could load the save file in the editor to reveal the positions, and we obviously don’t want to do that). Just a thought!
“Tim, it occurs to me we can’t see the usual sandy “dust cloud” kicked up by vehicles moving in FOW, to give us some rough idea where they are.”
I’ll report/screenshot dust clouds when they appear. I’d be surprised if the next turn report didn’t include a few clues to enemy AFV positions and moves.
Perfect, thank you!
I think you’re on the right track. In terms of armor, the AT rifle team should be capable of dealing with the armored car or the halftrack without much trouble. Especially if the tank roams a bit, leaving the AT rifle team with the infantry means that whatever position the infantry occupy is quite strong.
Some reading suggests that the Crusader and the PzIII Ausf. J are very evenly matched, so a plan that lets me get the drop on him will likely pay dividends. Lacking a dedicated recon unit like the Germans’ armored car, getting eyes up high seems like a good way to develop a scenario where we can make that happen.
The HQ probably ought to be as close to ‘hold fire’ as can be ordered, to avoid giving away who is calling the shots for the mortar team.
One final thought for now if I may. Although one would think Jerry has the advantage in superior armour, so long as our strategy is taking out his mortar team fast and early, literally in the next turn, that’s key. Once his mortar is dead, that’s it. If all our infantry then takes cover at the stone wall behind the villa (where I am), he has to come to us. Keep our own tank alive in a hull-down flanking position covering that stone wall from the west, and he can’t SEE us or get to us. I am also covering their approach at that point with the Bren boys from the east flank. After turn 4, I think we also have our hidden pilot on the move to spot for our mortar, so as long as our mortar remains intact, and our troops remain in cover behind the stone wall, that’s it, we’ve done it. If they are still alive, I will then rain down the final mortars on his tank and AFV’s, job done. Tea and medals await.
Wall simulation in CMAK/CMx1 is somewhat quirky. Stuff worth bearing in mind when choosing positions close to the villa or in the walled fields SW of the village:
https://community.battlefront.com/topic/50489-walls-as-cover/
https://community.battlefront.com/topic/39718-protective-effect-of-stone-walls/
Given Tim’s notes on walls, I’m not sure how best to handle the AT team this 60. Putting them south of the south wall seems unwise if they come under fire, since it’s open ground.
Putting them in the south courtyard seems safer, but also like it would dramatically limit their effectiveness: if they go prone, which I imagine they would have to to fire the AT rifle, then they can’t see anything past the villa wall.
Meanwhile, putting them in the villa proper seems unwise because it’s a big target. Maybe the outbuilding at H32, with orders to cover east (to avoid drawing fire if the tank comes through the town)? Or the palm trees just west, or perhaps the larger palm plantation south of the villa where the infantry are currently advancing.
Then all I need to figure out is what to do with the tank. Given that stone walls make for hull down positions, it might be good to park behind one to avoid outrunning the infantry support. Or, the daring maneuver might be to go for the fields south of town, to get a bit of elevation and some additional control of the village/center of the map.
Ok Team French, mon Amis how do we want to continue? My concept is to leave one squad or halfsquad in villa objective and then continue to the other side of the road, as woods and fences there provide more cover and concealment on the way to the village. Our tank is already on that side of map, so we may as well concentrate of effort there.
Sounds pretty reasonable. If you are to cross open terrain West, you may not get another chance. And we need infantry advancing on the Western flank I think.
The only thing that puzzles me is how to best approach the advance itself, since we don’t SMGs and would suffer greatly if we’d try CQC. Maybe you could use the other half-squad as an improvise scout squad? They are less significant in terms of our overall combat effectiveness, but they can serve us by provoking whoever advances South.
What about my idea about trying to setup mortar in a bold position?
At this point I have no good ideas for our tank commander. We have no eyes on anything as of now and he might as well sit tight for now. We should not recon with our most valuable asset, n’est ce pas?
I’ve played this scenario last night and it seems that advancing straight to the village from the villa is better idea. The elevation difference gives some cover in dead ground. On the other side German have good positions overlooking the approach. Placing the mortar near the villa should be good for now, it won’t have LOS into the village but my HQ should have so it will be useful.
Got it. Is there no difference in precision of mortar fire between using HQ and own LoS?
The thing that I am little anxious about is that, I dunno how it works in this engine, but should HQ get under fire I expect that it won’t be able to spot for mortars quite as effectively if at all.
What I mean is that a mortar is a good way to relieve pressure from infantry, but it can potentially be prevented by the same pressure.
We need to find out how it works here. If it is not a factor, I am completely pro not risking
I’m not planing to push the HQ to the very first line but it need to be close to the squads for the leadership bonus. As the Germans have much higher firepower per squad (thanks to MG34 and MP40) I’m not planing to push deep into village. I’d rather pick some defensive position on our edge of it, try to pick enemy attention so our tank could get some flanking shots on enemy armor. After we deal with enemy tank and PSW we will be able to pin and break enemy infantry with our tank and carrier with impunity.
Also securing the souther part of village should help us in successful extraction of pilot for those sweet, sweet points.
Sounds like a good plan to me too. As for our Crusader, I think I will take the chance to offload the AT team this turn, in the relative cover of the slope (so around B-C26). The idea being that the next turn they would clear the slope together from two different points (AT team at B25, tank at E25), rather than present a single target. Hopefully we can sync this all up with the infantry advance on the village, so we are attacking from multiple angles.
@captaincabinets keeping the tank in hull down position in that brush line seems like best course of action for now. It should have good line of fire on advancing enemy from there. It’s also important to remember that Crusader’s frontal armor may be penetrated by PSW’s cannon from lower hundreds meters.
@RadioactiveRat
Roger that. I assume you’re referring to A25-E25, which as I understand is the top of the slope, but should get a hull down position thanks to the wall. In which case I completely agree. I don’t know how long it will take to safely offload the AT team this turn, but I imagine I’ll be hitting that position early on Turn 3.
@Tim what is the deadline for the next batch of orders?
The order deadline going forward is midnight (GMT) on Saturday.
@Tim Could you refresh my memory on how disembarking carried troops works? Can it happen in the middle of an order sequence, or is it an ‘ends your turn’ deal?
Can troops re-embark later? Any troops if so, or just the ones who were originally carried?
Inserting a pause in a vehicle’s move sequence, provides an opportunity for troops to embark or disembark at the pause location. The longer the pause, the less chance there is of SNAFUs.
The Bren Gun Carrier has sufficient room to transport the AT Rifle team or the mortar team. Not sure if the HQ can fit inside.
@Tim French Carrier/mortar orders (TURN 2):
Carrier: Move Fast to K34, Move Fast to L33, Dismount mortar at L33 or, if it is possible, at L32 (We want to hug the wall).
After the dismounting, Carrier is to move fast to M33, then Hunt to N32, then Hunt to N29.
If it is at all possible to do this route closer to the wall (I am not sure, since the wall runs through the middle of the grid squares) it is preferable.
As I am now exploring the WDS games (thank you for inspiring me to try to enter the bottomless chalice of goodness that are these games, Tim), I wonder how well the Squad Battles games would serve for such community events.
But maybe I am just hungry for a PBEM, lol.
@Tim F1 ORDERS (TURN 2)
Continue previous order then fast move team 1 to J31, HQ to K31, team 2 to L31, team 3 to K30 (bottom floor).
@Tim FRENCH F3 ORDERS (TURN 2):
Forward to C27, pause for 45 seconds and dismount AT team. AT team SLOW to A26. Crusader HUNT to D26.
@Tim GB3 ORDERS (TURN 2):
Crusader: move at normal speed to I33, face north, cover the pie slice from the south village road to the villa building, dismount AT team.
AT team: move fast to occupy the building at H32, then cover north to east (to get both the village road and anything coming down the east flank).
I may revise these this evening if the team does something unexpected or vehemently talks me out of this course, and such revisions may come a bit after midnight GMT (because of schedules and pesky time zones), for which I a̶p̶o̶l̶o̶g̶i̶z̶e̶ apologise in advance if it becomes necessary. (I’ll make sure I have final orders in before bed tonight, at the latest.)
@Tim GB2 BRITISH ORDER. Please continue running the McGoohan egg deliverers (mortar) forward and North over Hadrian’s wall to setup shop at the palm trees just behind the villa (between K30 and K31). At the same time, please FAST MOVE Bren carrier to M32 – just South of and behind the stone wall – and ROTATE North, thank you. I wanted to pop smoke at this point, but I don’t think we can do that manually. He will probably be popping it and reversing soon anyway. Thank you!
British team note: I noticed if the mortar stays behind the stone wall, it’s actually out of range of HQ spotters on the second floor of the villa, making that wall position useless. Reluctantly, I had to move closer. Hopefully chef Fish can land, batter and serve up an AFV from his position, but I think it would be better to get his cavalry hidden in the low ground on the western flanks fast ASAP. Rommel will likely be staying near the back rank of the chessboard for now but… if he’s rolling down the road now, Fish is cooked. His shell will bounce off Rommel’s frontal armour at long range, but his return shot won’t. If there’s any lads still at the wall I would advise you to keep your distance from the secondary explosion of 72 AP shells going off at once, along with chunks of smouldering haddock and bream. Good luck and good hunting lads, see you in Alexandria for a pint (Ice Cold in Alex)!
Is it that bad? The stone wall should serve to put the tank hull down, and being stationary should hopefully give me the drop on any AFV coming down the road, whereas the west flank exposes me to fire from a lot more of the east of the map, without giving me any better shot at them.
I’m operating under the assumption that this is the 57mm Crusader III, and should therefore be capable of punching through the Pzkw III’s armo(u)r at the ranges this map appears to support. I don’t have a copy of CM to test that assumption, however, so please let me know if I’m wrong!
I believe I’m a few hours late. Apologies, but in this case I’m fortunate that it doesn’t matter much.
I’m not 100% sure what the wall situation is given Tim’s comment and those two vague forum posts that oscillate between walls are amazing and block 70% damage, and walls do nothing. It might be that what I thought was good cover will literally just get my troops killed. So I’m going to play the way I would in a non-game, which also means conveniently ignoring that in CMx1 there is Borg spotting, and any enemy who sees any of our troops will bring mortar and tank fire right on our heads.
My plan for the infantry is to get them to the wall (not on it, behind it, apparently) and then rest them for the turn while they are in overwatch.
As such…
ORDER: GB platoon. Carry on with existing orders, nudging them to put them safely behind the wall if necessary.
@Fishbreath and @Clive:
I’m not really comfortable putting the HQ in harms way, as it’s the only way we can do indirect fire with our tiny mortar (from experience, a 2in mortar might knock out a few enemy troops if it exhausts it ammo without return fire, but it’s nothing compared to the Germans’ 50mm)